
SUNLU FilaDC i10 Tested: Can a Desiccant Cabinet Dry Filament?
SUNLU FilaDC i10 tested: ten spools, twelve days of weighing and dozens of test prints show whether the heat-free desiccant cabinet really dries filament.
TL;DRthe short version
- The SUNLU FilaDC i10 is a $180 cabinet for ten spools with a self-regenerating molecular sieve in the back. It keeps the air inside at around 15 to 16% relative humidity, without heat and without any maintenance.
- Ten spools that had sat in the open for months lost almost 27 g of water on the first day and more than 60 g over twelve days. The i10 doesn't just store filament dry, it slowly dries it.
- Cardboard spools hold a surprising amount of water: the Snapmaker PLA lost more than 1% of its weight, and most of that came from the spool, not the plastic.
- PLA, PETG, ASA and PC printed clearly better after twelve days in the cabinet, with less stringing and smooth surfaces instead of the bubbly, overextruded look of the spools stored outside. The i10 had removed roughly 70 to 80% of the removable moisture, and that was enough.
- Nylon is a different story. After two weeks the Benchy was still full of bubbles, heat drying pulled out another 2%, and pre-dried nylon started taking moisture back up inside the cabinet. For nylon, PPS, PPA or PEEK you still need a heated dryer.
- Power draw is negligible: around 1 kWh for the whole twelve-day test, 1 to 2 W in idle and roughly 35 kWh a year in realistic use, about $10 to 15 in electricity.
- My complaints: the built-in hygrometer reads too optimistic, humidity spikes back into the chamber during every regeneration cycle, and the door only opens to the right.
- A sealed box with fresh desiccant is cheaper, but only if you keep regenerating it. I really like the i10 as the lazy, reliable solution and will get at least two more for the studio.
📦 Get the FilaDC i10 at SUNLU ($180): https://bit.ly/3SiUlsZ
📦 Get the FilaDC i10 at Inslogic: https://bit.ly/4qoRUlp
This special AMS unit I built two years ago changed 3D printing for me, because basically every filament I put in there ended up perfectly dry after a week or two, giving me always perfect prints and all of that without any heat. Instead, it uses a painfully expensive active drying element that continuously pulls moisture out of the chamber and, over time, out of the filament itself. And I honestly couldn’t understand why nobody had commercialized something like this, because it’s just such a convenient system. But the wait might finally be over. SUNLU just announced the i10, a $180 cabinet for ten spools with a self-regenerating desiccant system in the back that keeps the air inside extremely dry. For the last six weeks, I’ve rigorously tested it, collected hundreds of data points, and printed dozens of samples. So can the i10 only keep your filament dry, or can it actually dry out those neglected, moisture-soaked spools as well? Let’s find out.
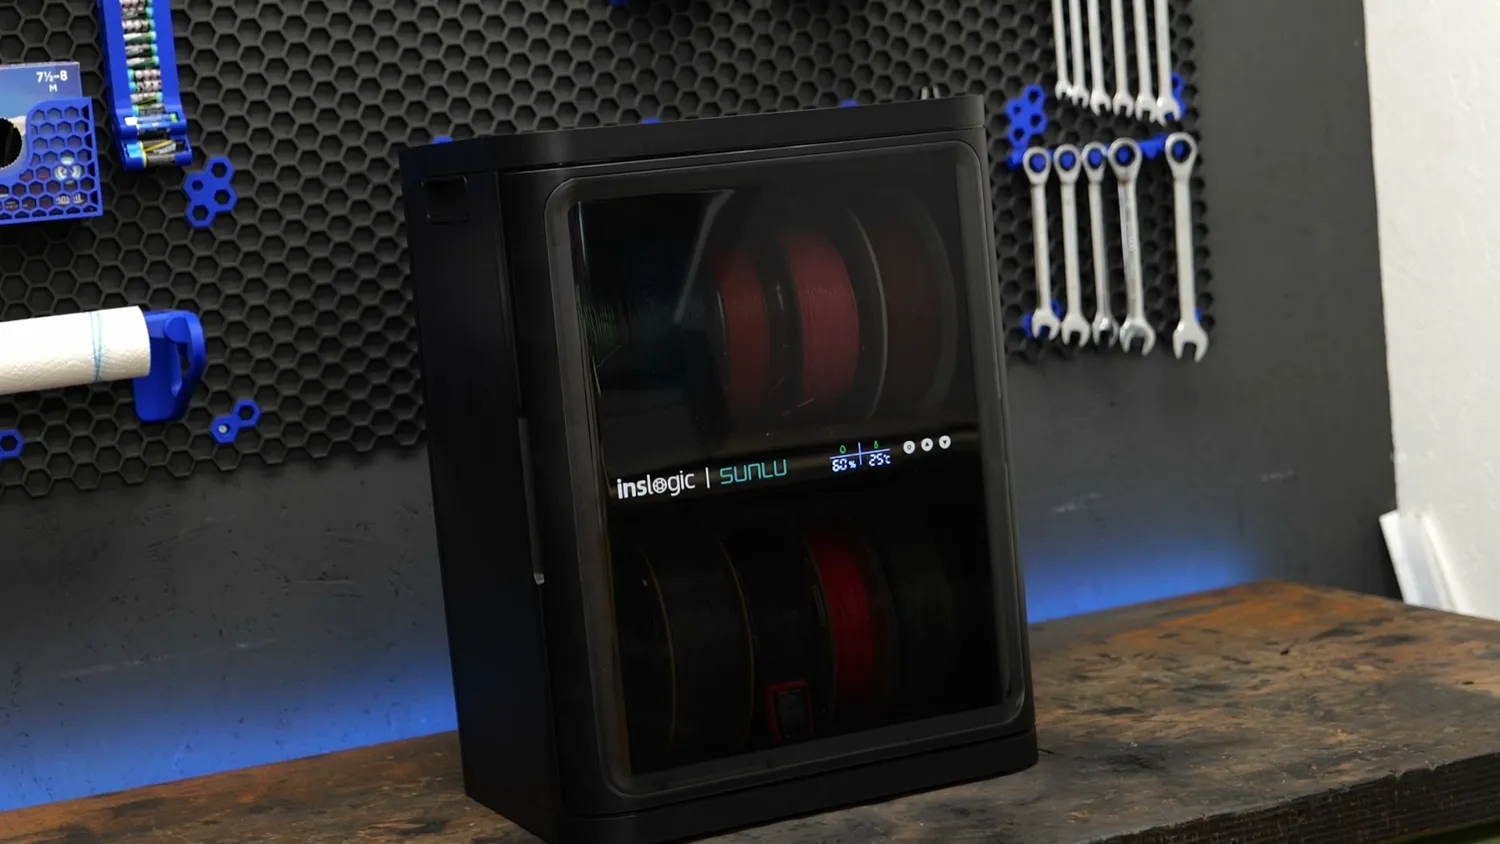 The SUNLU FilaDC i10
First of all, I have to point out that SUNLU sponsored this video. But I think, as you’ll see from all the testing I did, they bought my time and not necessarily my opinion. There are also deliberately no affiliate links in this article, so I won’t earn any commission from sales. Feel free to watch what others have to say about the unit as well, but I’m pretty sure barely anyone tested the i10 to the extent that I did, and I hope you can appreciate that. I went through a four-step test program to find out if it dries filament, what it can dry, and how well it does it. I also looked at power consumption and noise, all to answer the most important question: Does the i10 only keep your filament dry, or can it actually dry it as well? But first, why is dry filament so important when 3D printing?
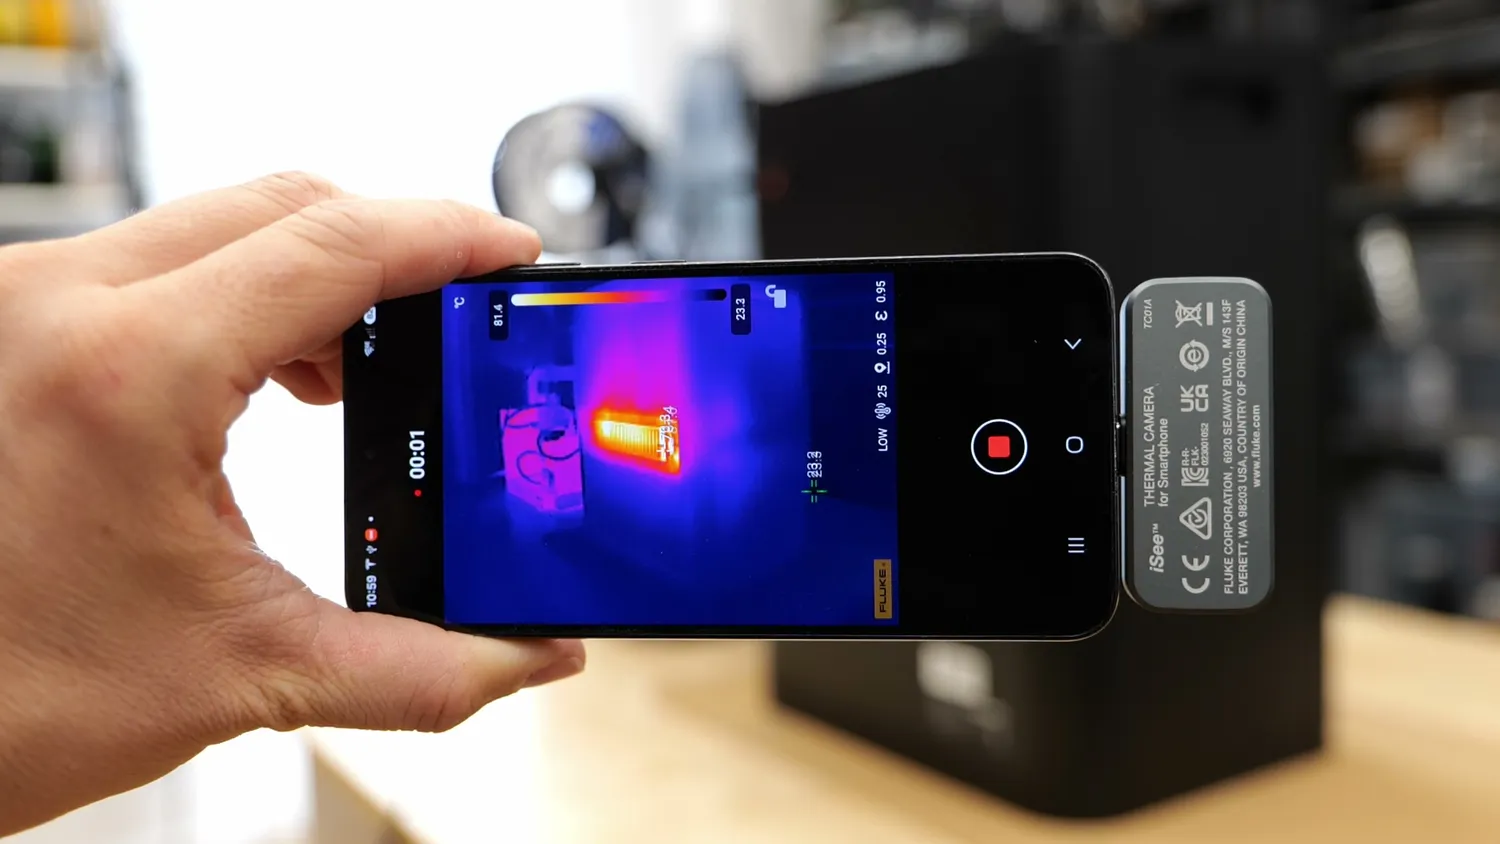 Checking the regeneration heater with a thermal camera
Why dry filament is so important
I think most of us are guilty of storing many of our spools out in the open, and that’s the same for me, especially with PLA. But that’s actually one of the reasons PLA is so popular. You can let it sit basically anywhere and still get good results. Starting with PETG, though, things get more complicated. PETG is often regarded as one of those materials where you really have to fight stringing. But often, the problem isn’t the material itself. It’s the condition it’s in. Most polymers are hygroscopic, which means that over time they absorb moisture from the air. Some materials like PLA, PETG, and ABS absorb less than 1%, while others, especially nylons, can easily absorb up to 3% moisture. That’s basically a whole shot glass of water per roll, which is pretty crazy.
When you print with moist filament, two things happen, and only the first one is usually easy to spot. First, the trapped moisture starts boiling and forms bubbles of steam inside the molten filament, which you can sometimes even hear. This can cause major stringing, but also a rough and overextruded-looking surface.
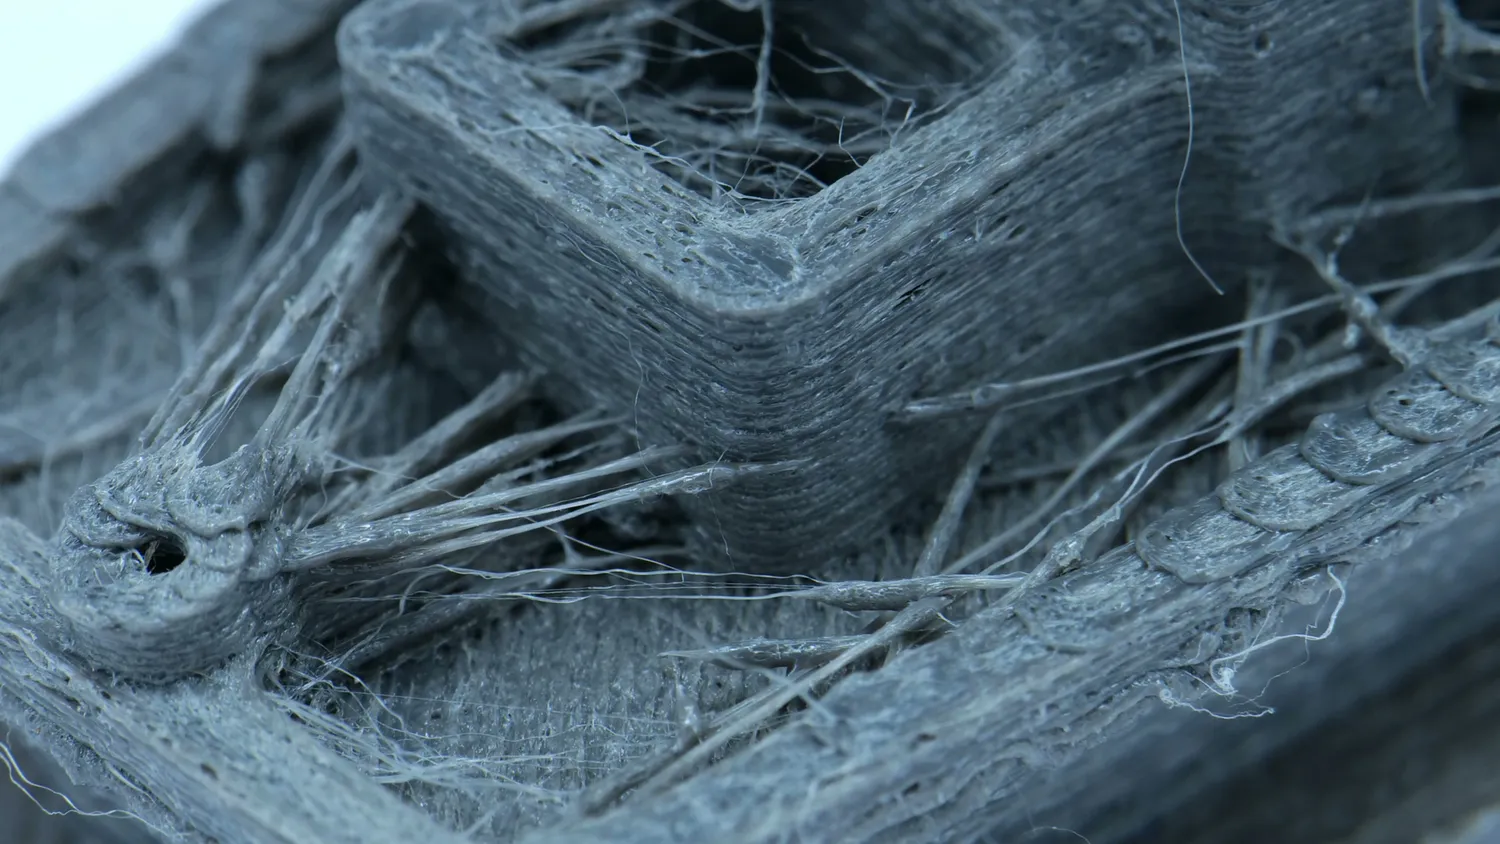 Stringing from wet filament
The other, more hidden problem is hydrolysis. At high temperatures, the water breaks up the long polymer chains. Those shorter chains can make your parts more brittle and also reduce the viscosity of the molten material, which causes even more stringing. I actually tested this years ago in a video with a significant cringe factor, and it showed lower layer adhesion and lower impact strength when printing PETG that wasn’t properly dried. One thing I’ve learned is that if you have a printer where you can see the filament during a filament change, definitely look out for bubbles. From my experience, if you see them, you probably need to dry the spool. If you look closely, you can even spot the difference in the wider purge lines. So if you decide to dry your filament, the go-to solution these days is some sort of heated dryer, where the moisture is driven out of the plastic over the course of a few hours. And that’s not only how we dry filament. It’s also how pellets are dried in industry before extrusion. But heat drying comes with three caveats.
Heat drying, desiccant boxes and my solid-state AMS
First, it’s not super energy efficient. Drying two spools of PETG for six hours at 60 °C, for example, used 0.6 kWh in my test. Second, repeatedly heat-drying your filament can cause similar damage to the polymer chains as moisture does during extrusion. You slowly break down the polymer, making it more brittle and eventually affecting how well it prints. If you heat your filament once or twice, that’s typically not a problem. But continuously holding it at elevated temperatures, or repeatedly cycling it in the storage mode that some dryers offer, can damage the material over time. And lastly, once you’ve dried your filament and load it into your printer, it will simply start absorbing moisture again unless you print from a dry box.
Which brings us to storing filament. Again, I usually store PLA out in the open. But more critical materials, starting with PETG, I normally keep in vacuum bags, cereal containers, or large sealed boxes with a suitable amount of desiccant. That’s inexpensive and efficient, but it requires maintenance. To reach the low humidity levels needed to properly store filament, those desiccant bags need to be dry themselves and regenerated regularly. So just tossing a random silica bag into your vacuum bag might do more harm than good, and I made a whole video about that a while ago. The amount of desiccant also plays a role. I’m currently running tests for another project that show that, to keep the relative humidity below 20%, your desiccant needs to stay below roughly 10% saturation.
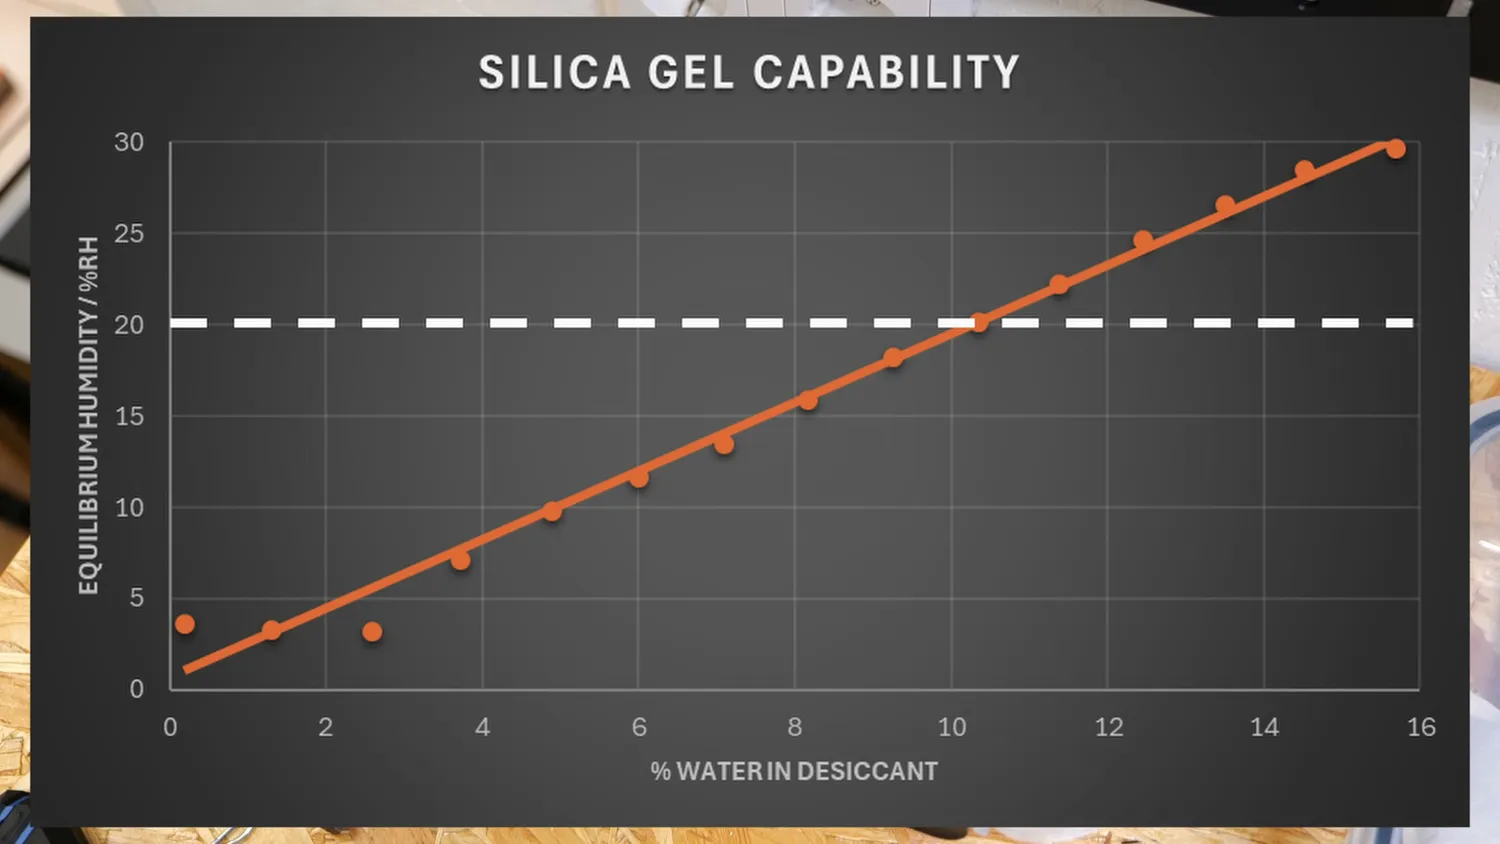 Equilibrium humidity vs. water content of silica gel
And as you’ll see later, even the moisture trapped in a single cardboard spool can overwhelm the capacity of several of these desiccant bags. This is why I’ve really started loving the AMS I modified with a solid-state dehumidifier. It uses a special membrane that electrolyzes water from the air and continuously transports the hydrogen to the outside, slowly removing moisture from the box. And that thing is amazing. Any spool that sits inside is not only kept perfectly dry but slowly dries out more and more over time. After a few days or weeks, many filaments give me basically perfect printing results. And the best part is that it’s completely maintenance-free as long as you keep it powered.
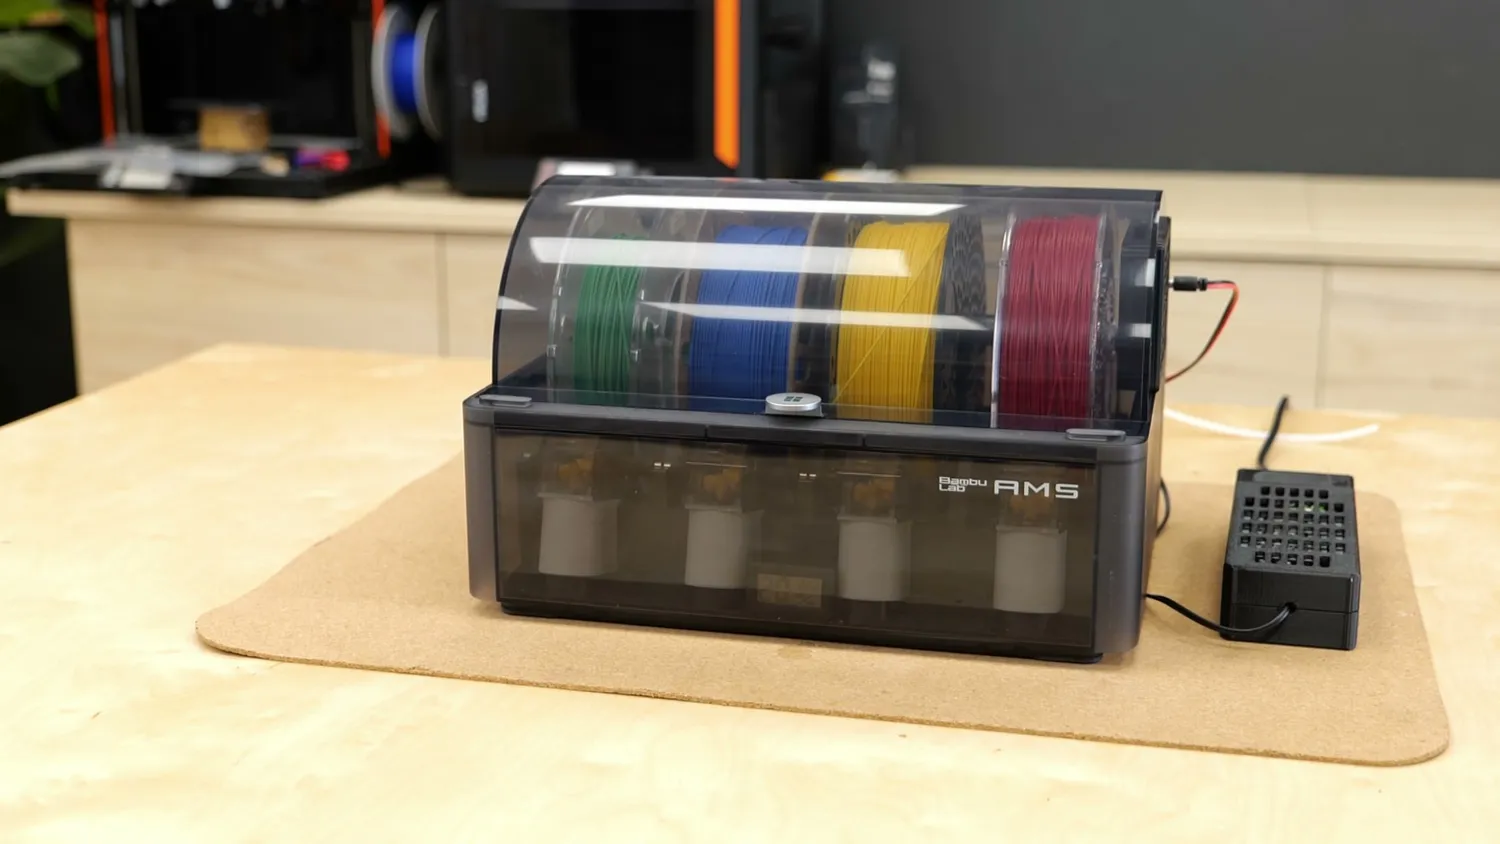 My AMS with the solid-state dehumidifier
But there are three significant problems. First, it’s prohibitively expensive. The membrane alone easily costs 200 euros. Second, it’s not particularly fast. If I add filament spools that weren’t pre-dried, it can take days for the humidity to fall below 20%. And third, these membranes wear out over time. I’ve had viewers build the same system as mine and have the membrane fail after only around two years, apparently because VOCs released by the filament damaged it.
How the SUNLU i10 works
And this finally brings us to the SUNLU i10, which SUNLU developed together with Inslogic as a more affordable, efficient, and basically maintenance-free solution for filament storage and even gentle drying. The i10 is a fully injection-molded cabinet with space for ten regular 1-kilogram filament rolls, five on the top rack and five on the bottom. You can even stack multiple units if you want.
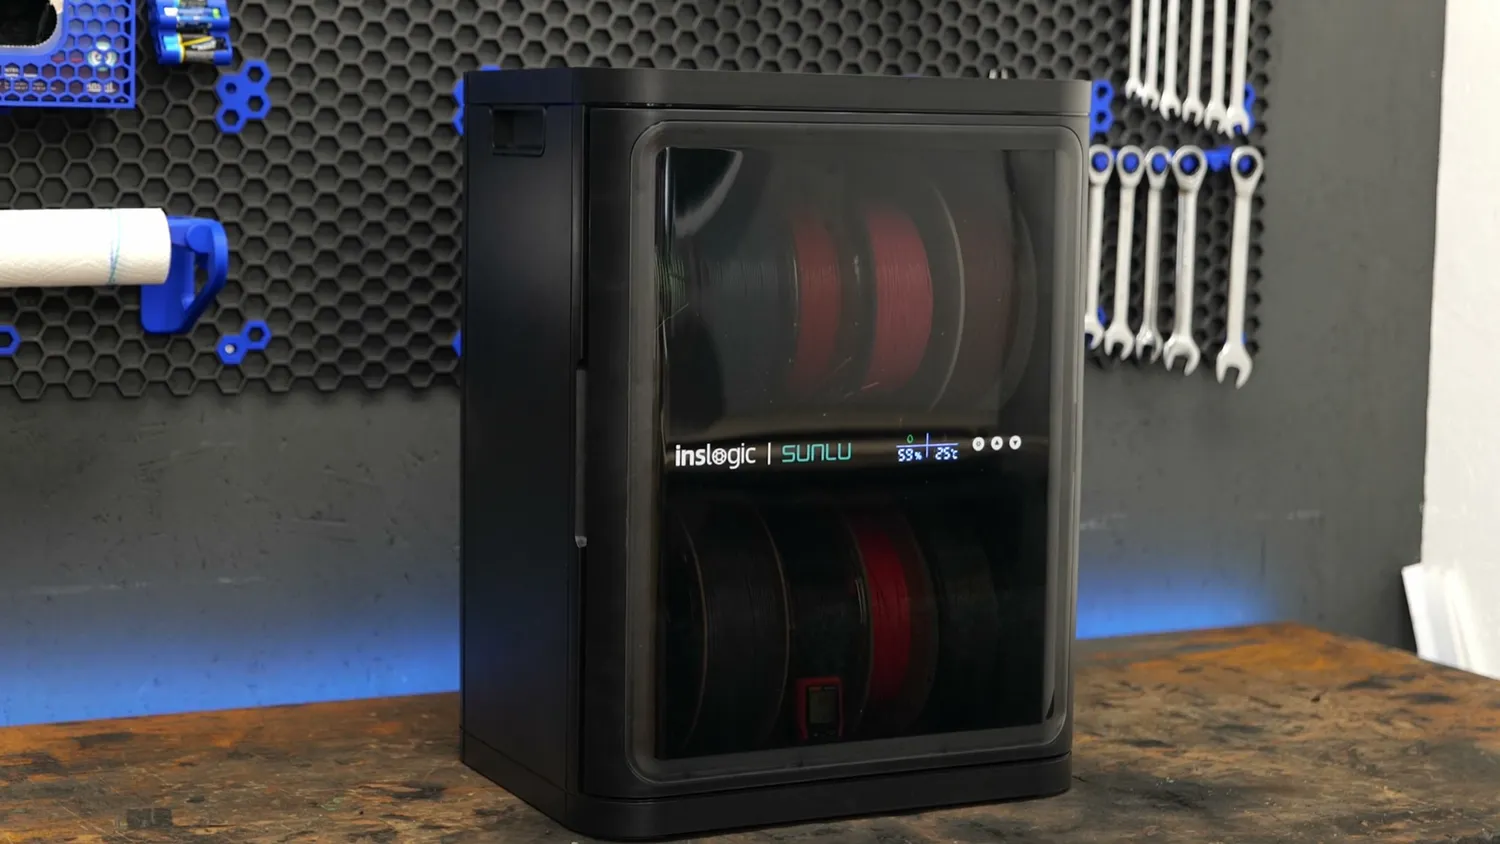
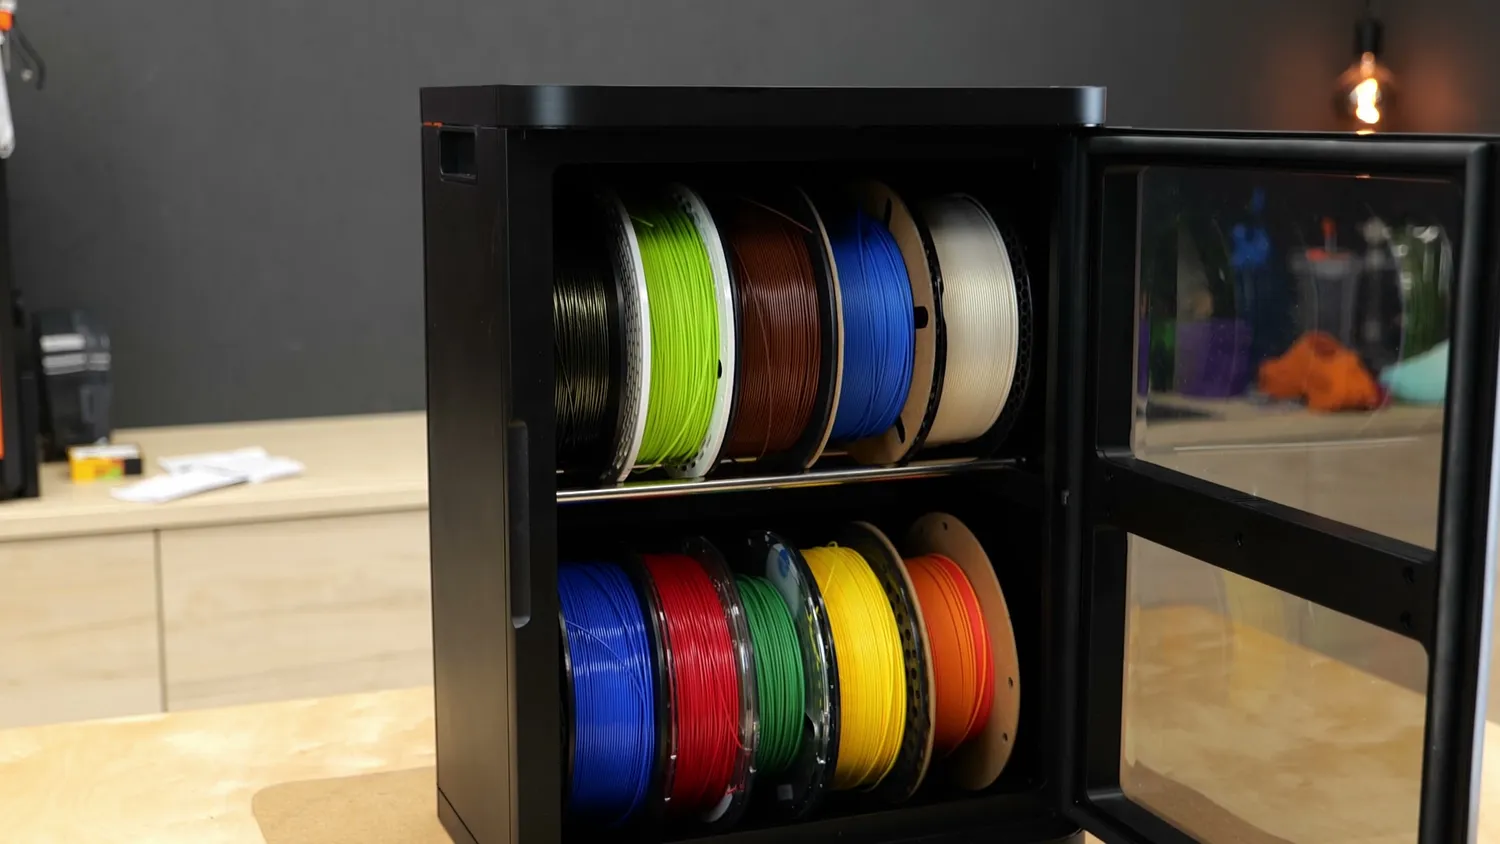
The interesting part is the actively managed desiccant unit in the back. It’s filled with molecular sieve, which is another type of desiccant similar to silica gel. It’s especially good at adsorbing moisture at low humidity levels and can also handle being regenerated over and over again. And that regeneration is the key to how the i10 works. The unit actively monitors the condition of the desiccant. Once it becomes so saturated that it can no longer keep the cabinet below the target humidity, shutters close to separate the desiccant from the inside of the box. At the same time, a vent to the outside opens and a PTC heater turns on. The heater drives the moisture out of the molecular sieve, and that moist air escapes through a vent on the back. That’s also why the i10 needs some space behind it and can’t sit completely flush against a wall.
How the i10 dehumidifies and regenerates its desiccant
This regeneration process warms up the inside slightly, but typically not above around 30 °C. Even close to the hot dehumidifier housing, temperatures stay far below anything that could damage or soften the filament. Once regeneration is finished, the system switches back into dehumidification mode and keeps the internal humidity around the set value.
The controls are very simple. There’s a screen on the front that shows the current temperature and humidity inside the box. The only thing you can really adjust is the target humidity, anywhere between 10 and 50%. For filament storage, I don’t really see a reason to set it to anything other than the lowest value, apart from maybe power consumption. But as you’ll see later, that’s basically negligible anyway. Higher settings might be interesting if you live in a very humid environment and want to use the i10 to store sensitive electronics instead. And that’s basically it.
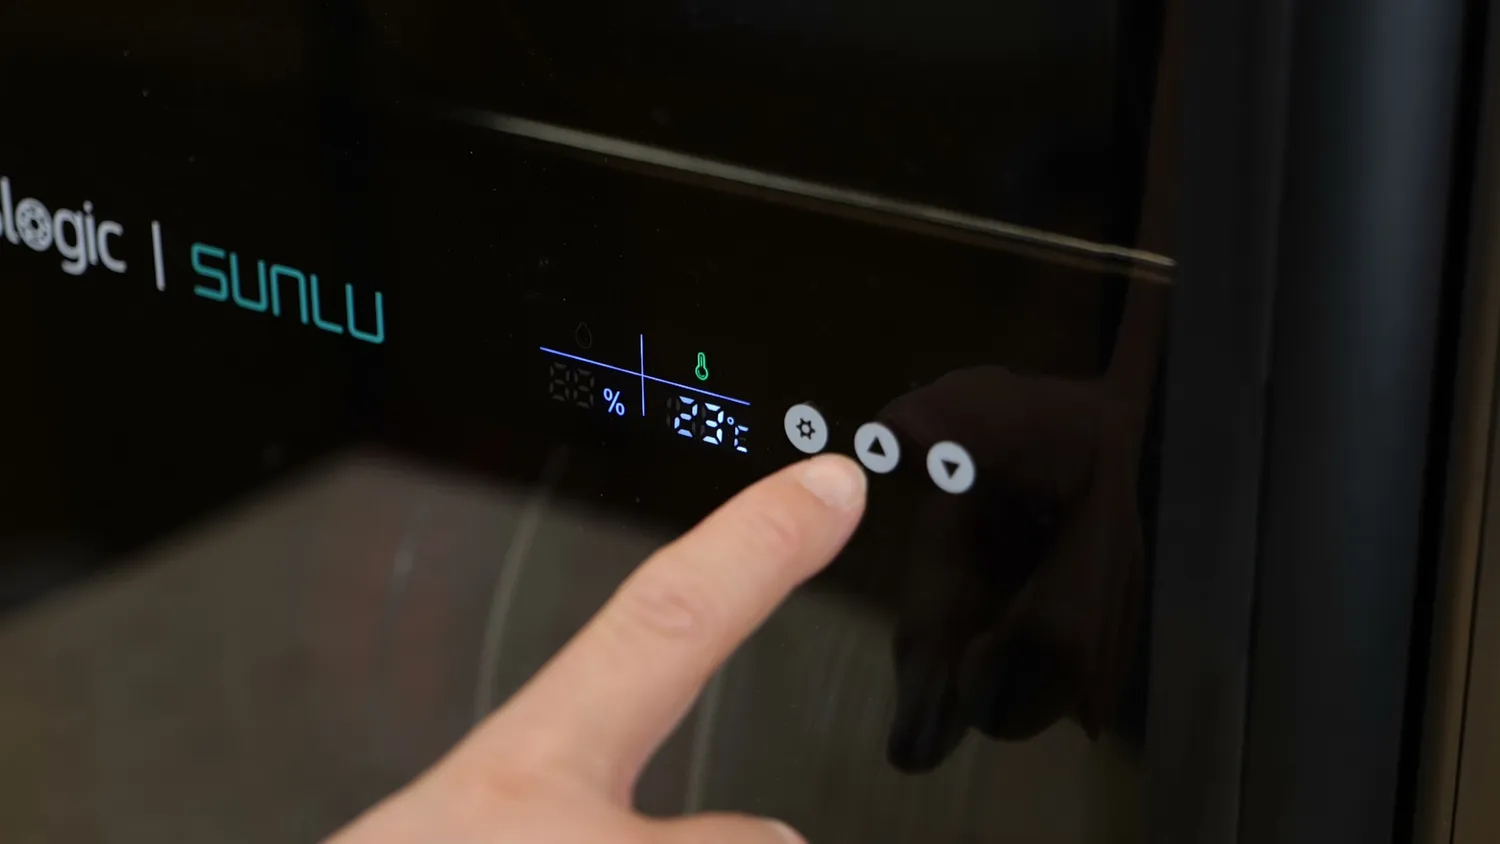 The only setting: the target humidity
The whole unit is powered directly from mains, with a socket and switch on the back. The door has a slightly tinted window and a thick rubber seal, and magnets hold it closed.
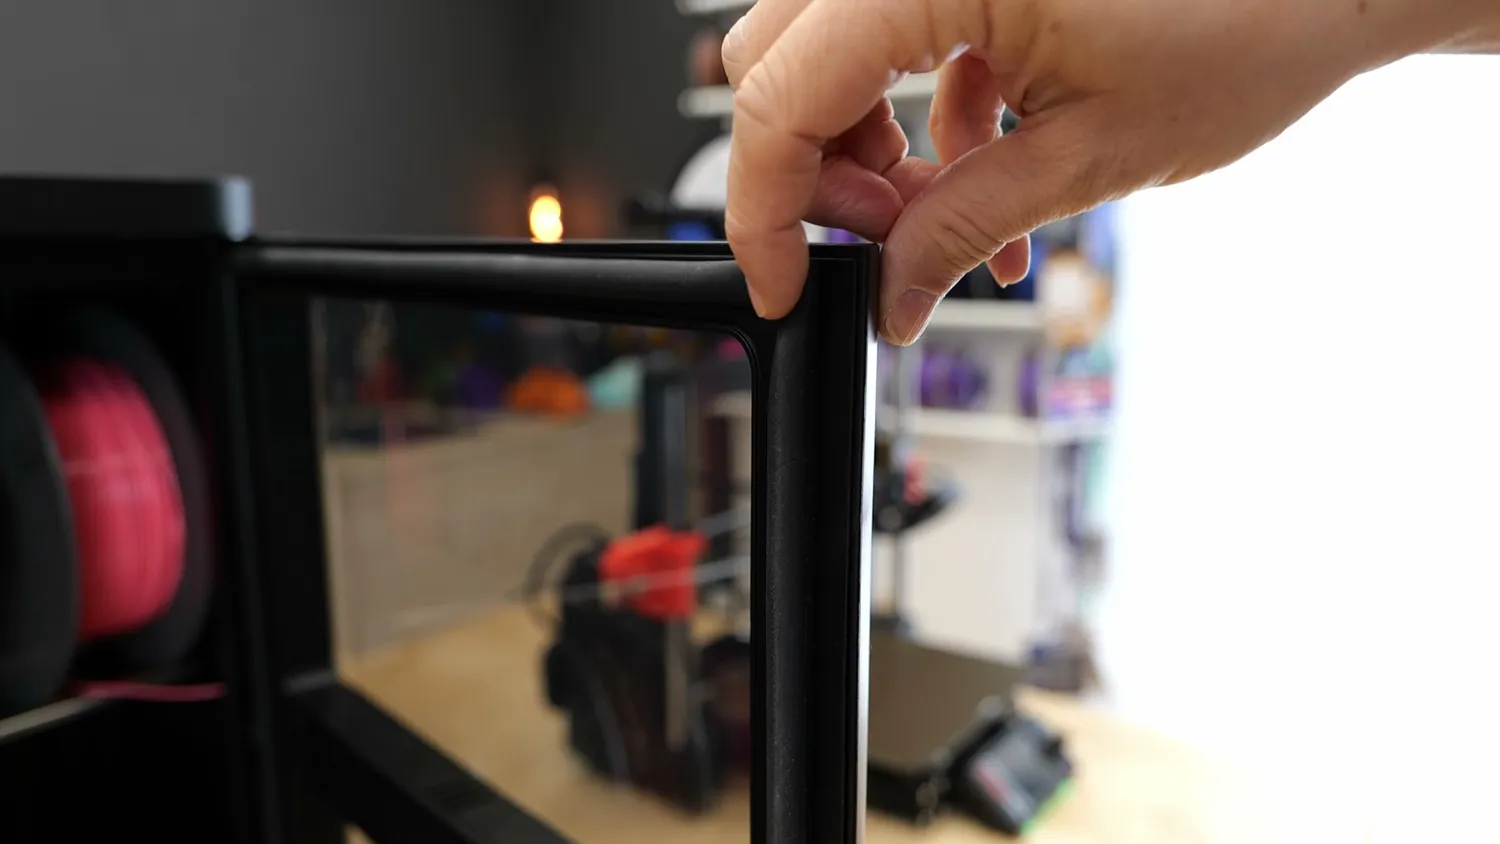 The rubber door seal
There are two fans on the inside, one in the desiccant unit that will run from time to time to quickly remove moisture from the inside of the box and obviously during regeneration. The other small one in the front that’s probably used to cause a bit of constant circulation in the box and which makes sure that the hygrometer reacts quickly to environmental changes. Both fans are pretty quiet. Unless you plan to put the i10 in your bedroom, I don’t think they’ll bother you. There are no filament outlets and no lighting inside. So this box is clearly designed for storing filament, not for printing directly out of it.
Does it work? Empty run and sponge test
So, does it work? Let’s first do a dry run with no filament inside. Whenever the unit has been turned off and you switch it back on, it first runs through a regeneration cycle. Once the heat is turned off, it will first idle a bit until the desiccant has cooled off so we don’t dump the hot air into the chamber. Once it switches over to dehumidification mode by opening the shutters, the humidity quickly drops to below 20% and then further creeps down to around 15%, at least that I measured with my loggers.
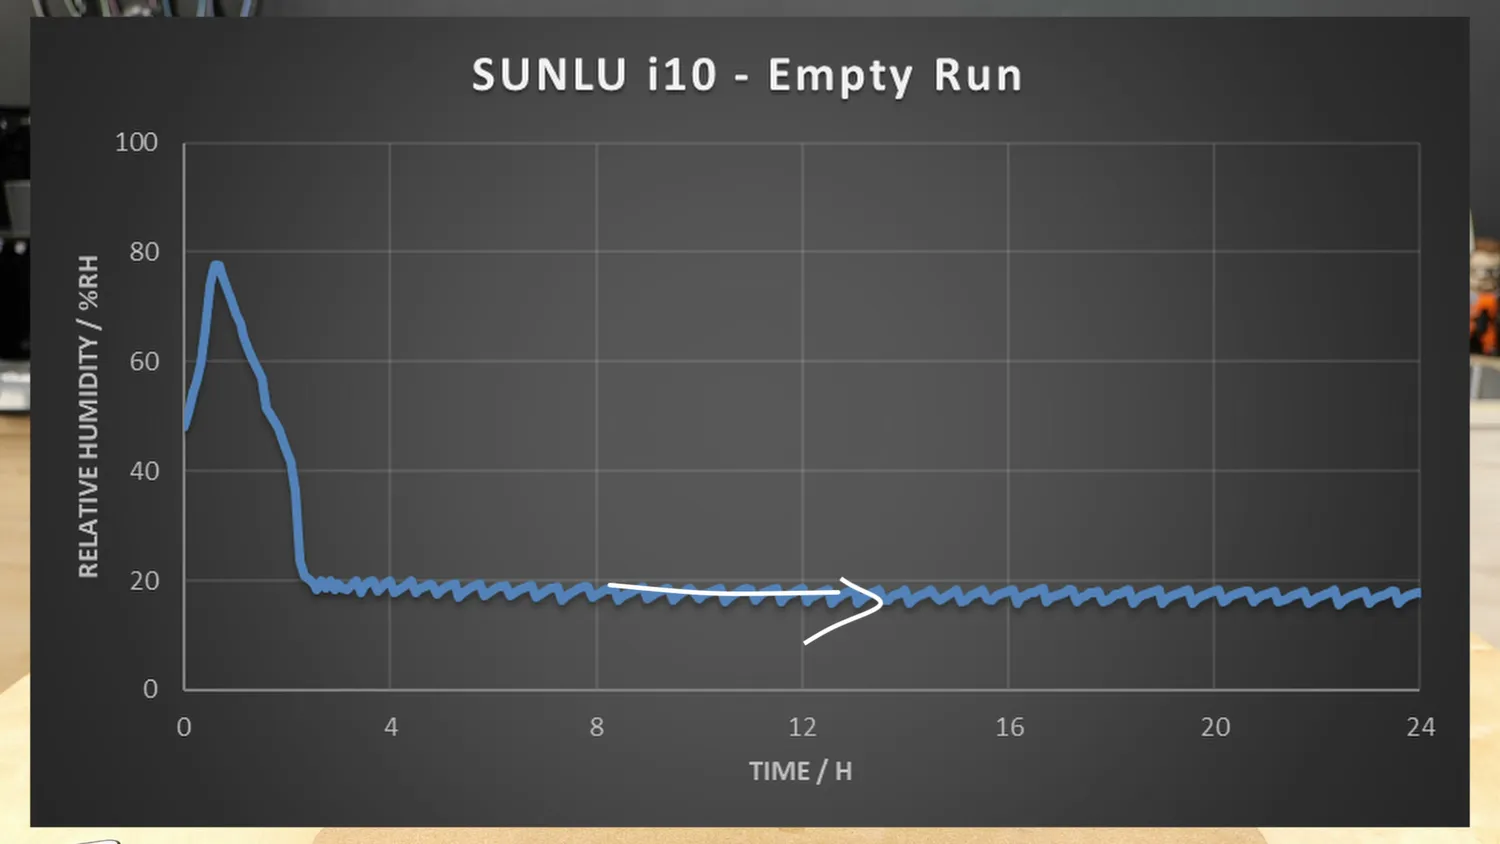 Humidity inside the empty cabinet over 24 hours
I’m using professional loggers whose values I actually trust, but keep in mind that even they can be off by plus or minus 5 percentage points at these very low humidity levels. If I open the box, let humid room air in for a minute, and then close it again, it only takes a few minutes to get back down to the set humidity level. Because I was curious how much moisture the i10 could actually extract, I placed a wet sponge in a bowl of water inside the cabinet. I did the same thing in my solid-state dehumidifier AMS and let both systems run for a good day.
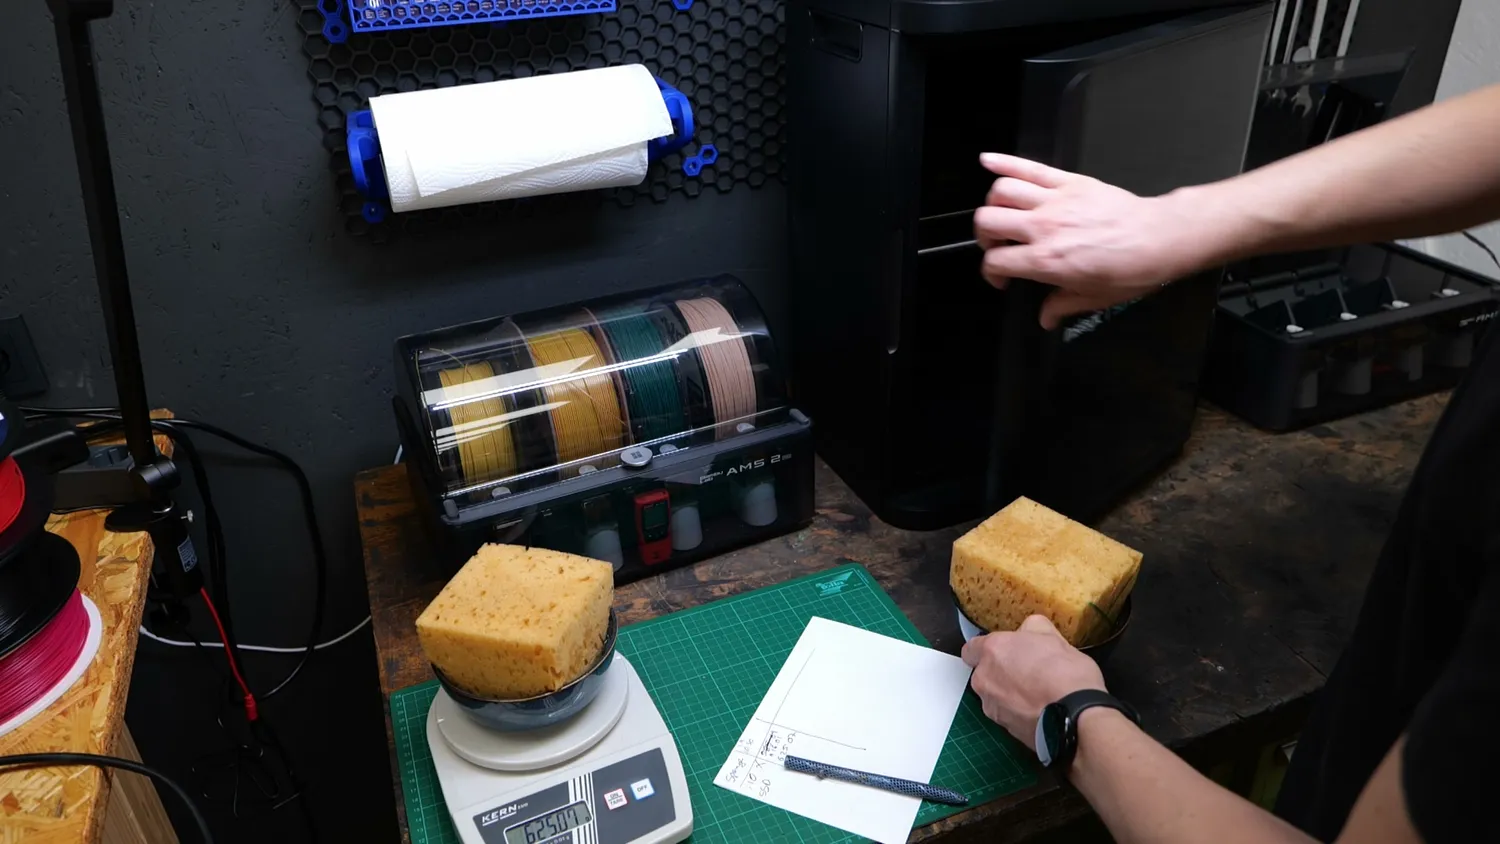 The wet sponge test
After that day, the bowl and sponge in the i10 weighed roughly 50 grams less. The solid-state dehumidifier managed to extract around 9 grams of moisture. Both systems are obviously more efficient at these very high humidity levels than they are under normal conditions, but this still gives us a rough idea of what they can do and how they compare.
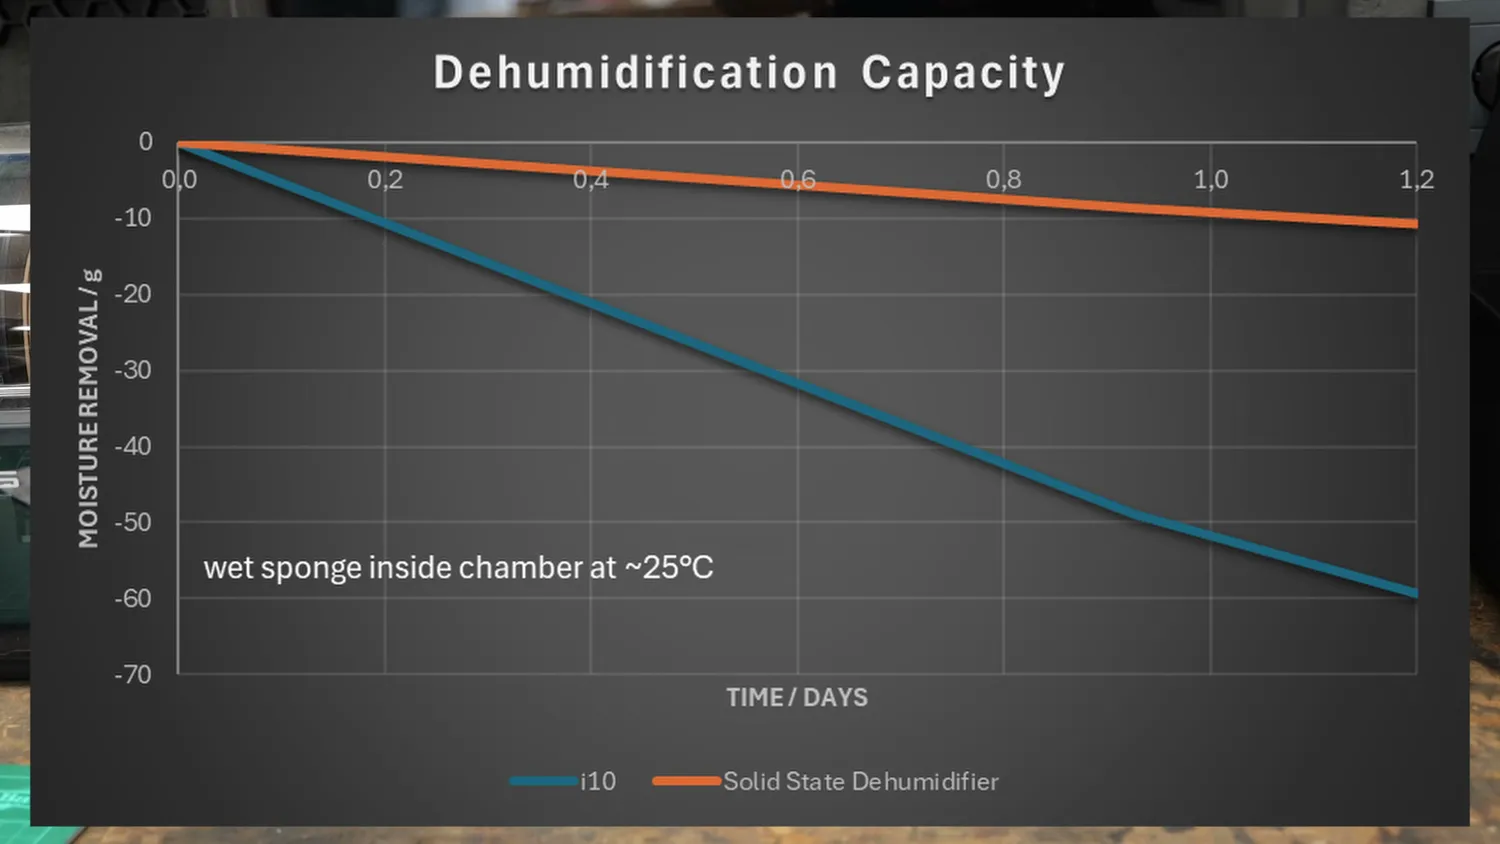 Dehumidification capacity: i10 vs. solid-state dehumidifier
Drying ten spools for twelve days
Next came the big test, which I split into four steps. First, I wanted to know how quickly the humidity falls with real filament spools inside, how much power the unit uses, and, most importantly, whether we can actually dry filament in the i10. So I regularly weighed every spool to track the amount of moisture leaving it. Second, I printed samples using filament stored outside and compared them with the filament stored inside the box. For the third step, I took the spools that had spent almost two weeks in the i10 and put them into a heated dryer. This let me measure how much moisture was still left that the i10 couldn’t remove. And finally, I put those completely dried spools back into the SUNLU i10 for a few days to see whether it could keep them dry.
For the test, I gathered ten spools of PLA, PETG, ASA, TPU, and Nylon from around the studio. All of them had been stored out in the open for months.
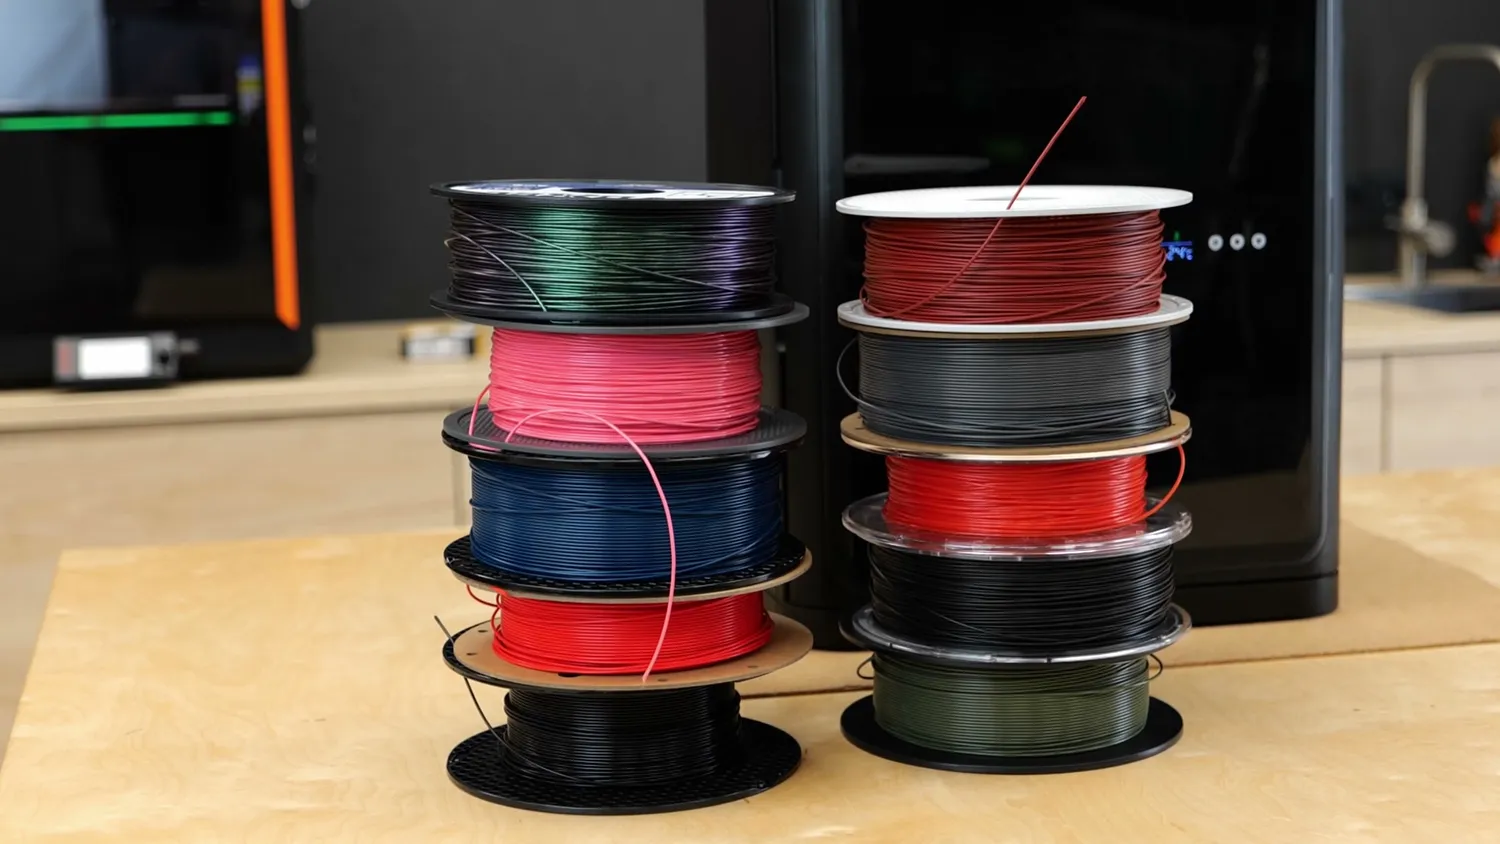 The ten test spools
From each spool, I cut off roughly five meters of filament, enough to later print a 3D Benchy and a stringing test. Then I weighed all ten spools on a precision scale, put them into the SUNLU i10 together with a temperature and humidity logger, and connected the cabinet to a power meter. Over the next twelve days, I opened the cabinet once a day, weighed every spool, and put everything back. The results were really interesting.
Let’s start with the humidity inside the chamber. With all ten undried spools inside, it took roughly half a day for the i10 to get below 20% relative humidity, and another half day to reach the minimum level of around 16% measured by my logger. During that first day, it went through several regeneration cycles to get rid of all the moisture the desiccant had adsorbed.
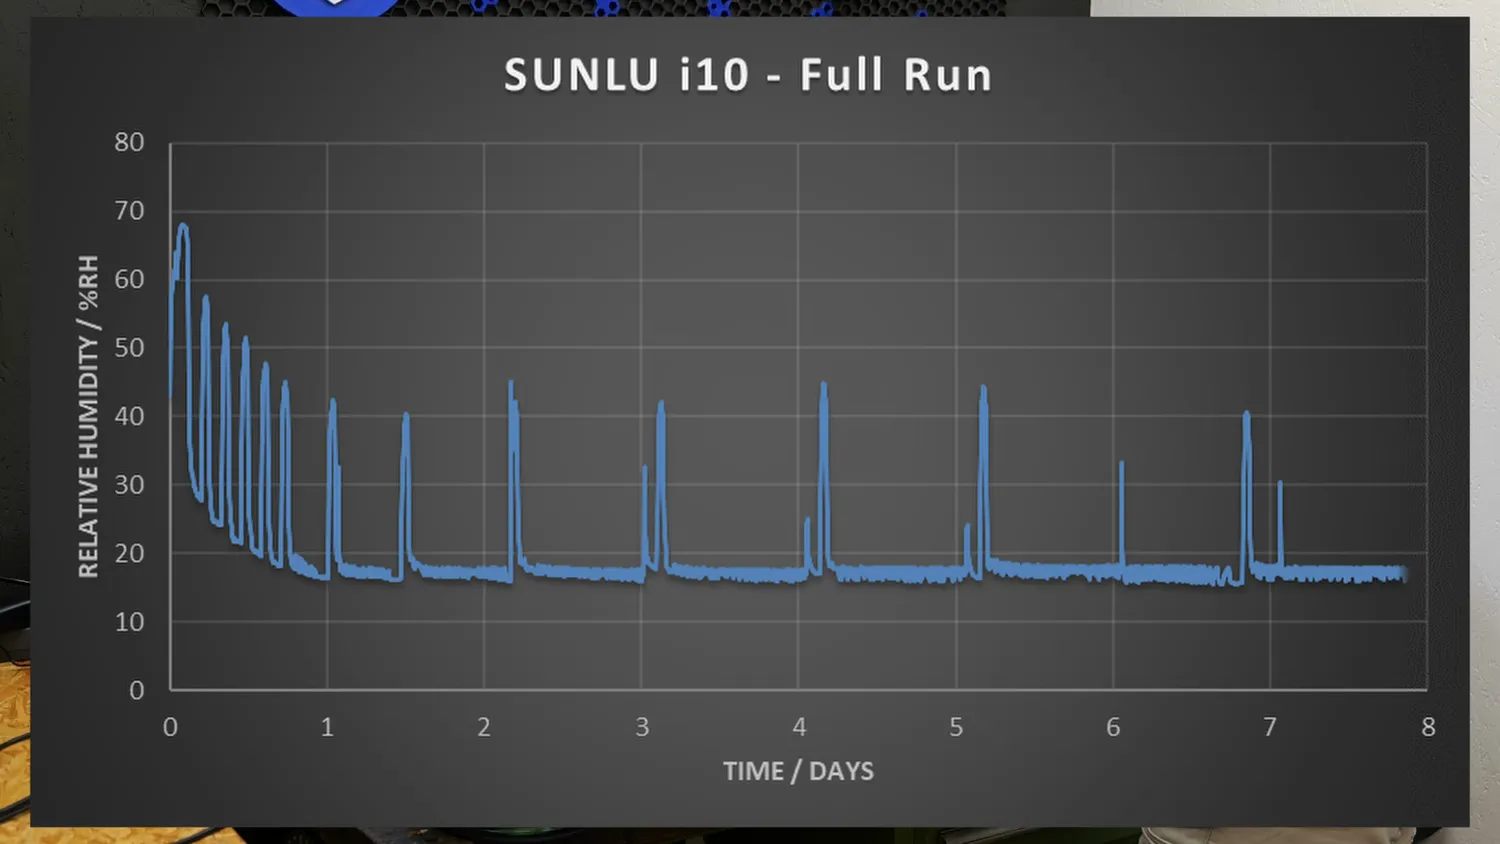 Humidity inside the loaded cabinet, every spike is a regeneration cycle
And one of my complaints about the i10 is visible right here. Every time a regeneration cycle runs, the humidity inside the cabinet spikes. This doesn’t seem to come simply from the filament releasing moisture. My guess is that the shutters don’t seal perfectly and some of that humid regeneration air leaks back into the chamber. It’s not a dealbreaker. The spike only lasts for around an hour, and the moisture is quickly removed again once dehumidification starts. But it definitely reduces the drying efficiency of the system, and that’s something I think SUNLU should improve. Anyway, after the first day, the humidity inside the box stays nicely around 16%. The regeneration cycles also become less frequent, and toward the end there’s really only one every other day.
And that behavior already tells us something interesting. If the i10 were only removing moisture from the air, the humidity should have dropped just as quickly as it did with the empty cabinet. But it didn’t. So there has to be another source of moisture, and that is, of course, the filament itself. The weight difference after just the first day was impressive. Together, all ten spools lost almost 27 grams of weight in the form of trapped moisture.
But was there a difference between the materials? I expected the two Nylon spools to lose the most, because Nylon normally holds a lot of moisture. But number one was actually the Snapmaker PLA, which lost more than 1% of its weight.
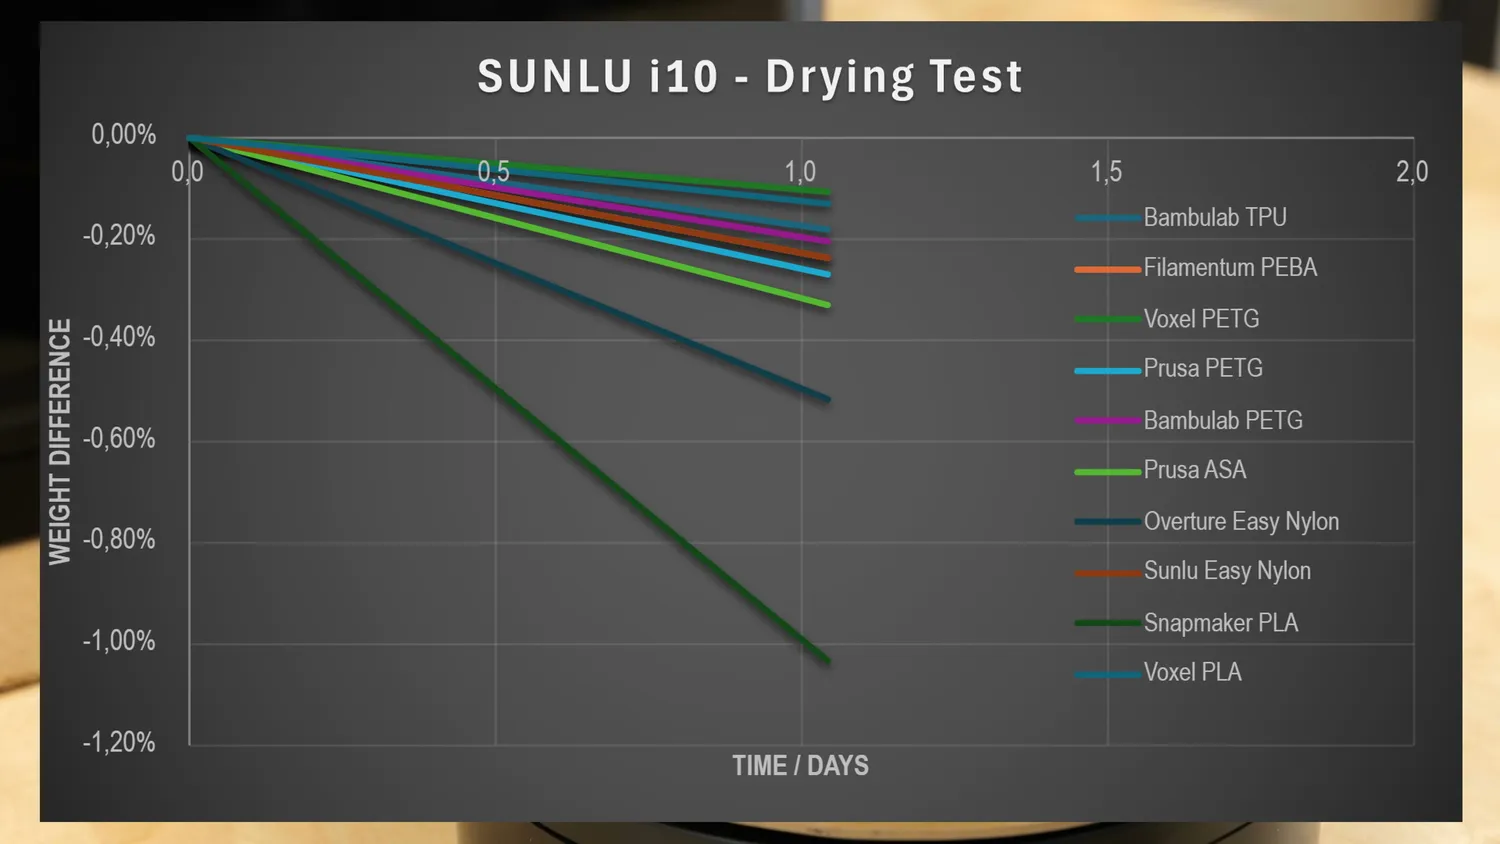 Weight loss per spool after the first day
At first, that sounds completely counterintuitive because PLA itself should only contain around 0.2 to 0.3% moisture. But if we look more closely at the spool, we can see that it’s made from cardboard. And this highlights one of the reasons why I’m not a huge fan of cardboard spools. I’m pretty sure most of the weight we removed from that roll wasn’t moisture from the PLA. It was moisture trapped in the cardboard. The second-highest weight loss came from the Overture Nylon, which was also on a cardboard spool. After that came the Prusa ASA with a cardboard core, followed by the PETG with the same type of cardboard core. Only then do we get to the first material on a plastic spool, which was the SUNLU Easy Nylon. Cardboard might be more environmentally friendly, but it can trap a ton of moisture. That makes drying a spool and keeping it dry more difficult. For PLA, that’s probably not a big issue. But with more moisture-sensitive materials, I think it can become a real problem.
So let’s look at how the weight changed over the following days. The Snapmaker PLA stabilized pretty quickly, probably after most of the moisture had been pulled out of the cardboard spool. The same was true for almost all the other filaments. After about a week, there was barely any change in weight anymore, except for three of the ten filaments. And unsurprisingly, those were the materials where moisture is normally the biggest problem: the two rolls of Nylon and the Bambu Lab TPU. Those kept getting lighter and lighter. In the end, I removed around 0.2 to 0.5% of moisture from most of the standard materials. Only the two Nylon spools and the PLA on the cardboard spool lost more than 1% of their weight over the twelve days. Altogether, the ten spools lost more than 60 grams. That’s pretty impressive if you ask me, and it clearly shows that the i10 doesn’t just store your filament dry. If you leave it in there long enough, it actually dries it as well.
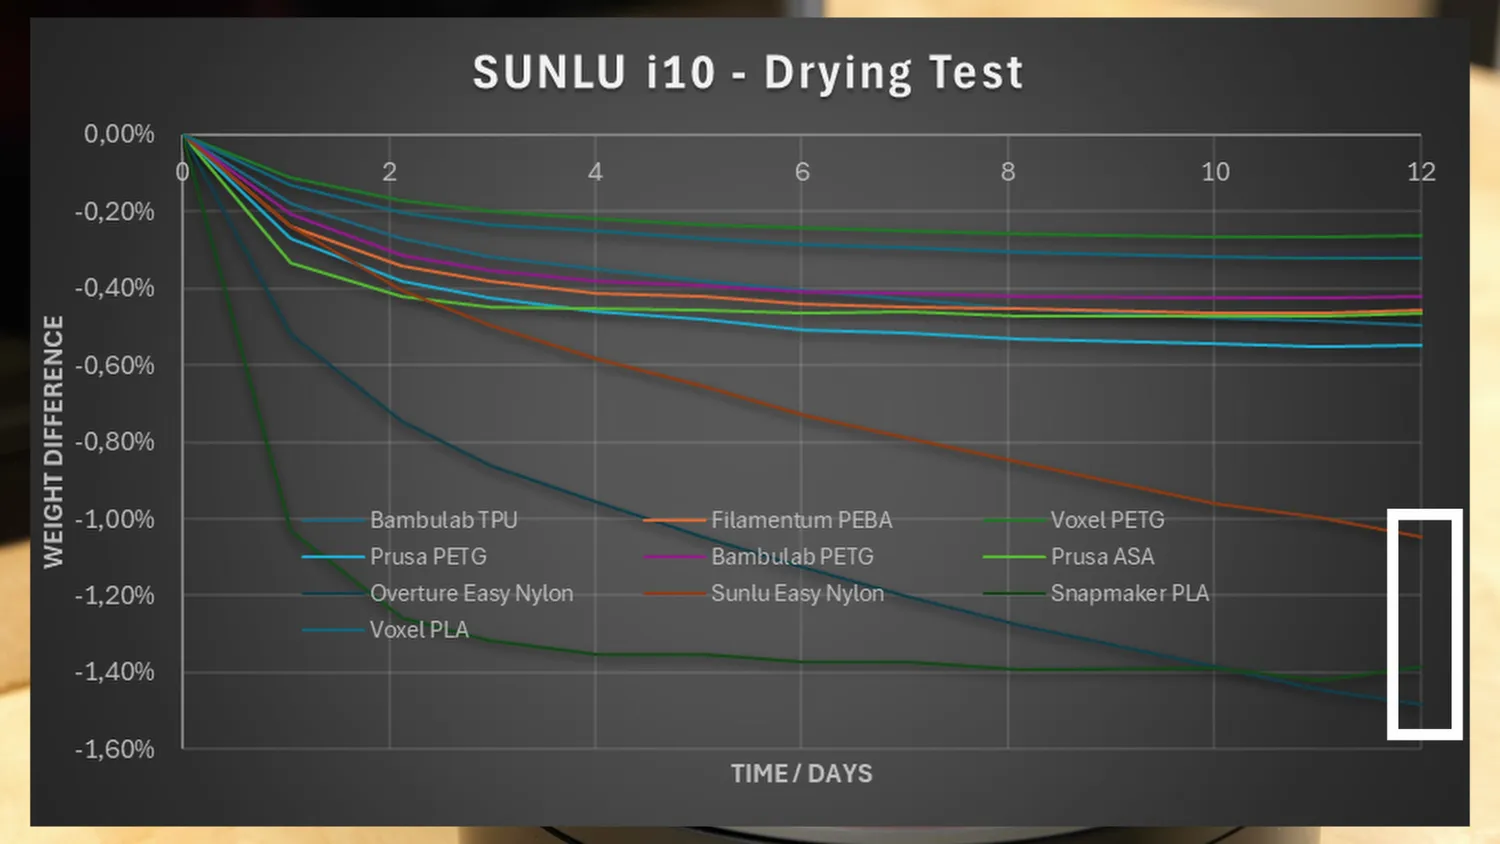 Weight change of the ten spools over twelve days
Let’s also compare this with my solid-state dehumidifier, which I had running in parallel with four spools of similar materials. It took the AMS roughly two weeks to pull out enough moisture that the humidity inside finally dropped below 20%. The filament spools also lost significantly less weight over the same period. I already know how well my modified AMS can dry filament if you’re patient. So the i10 seems to do the same thing, just faster.
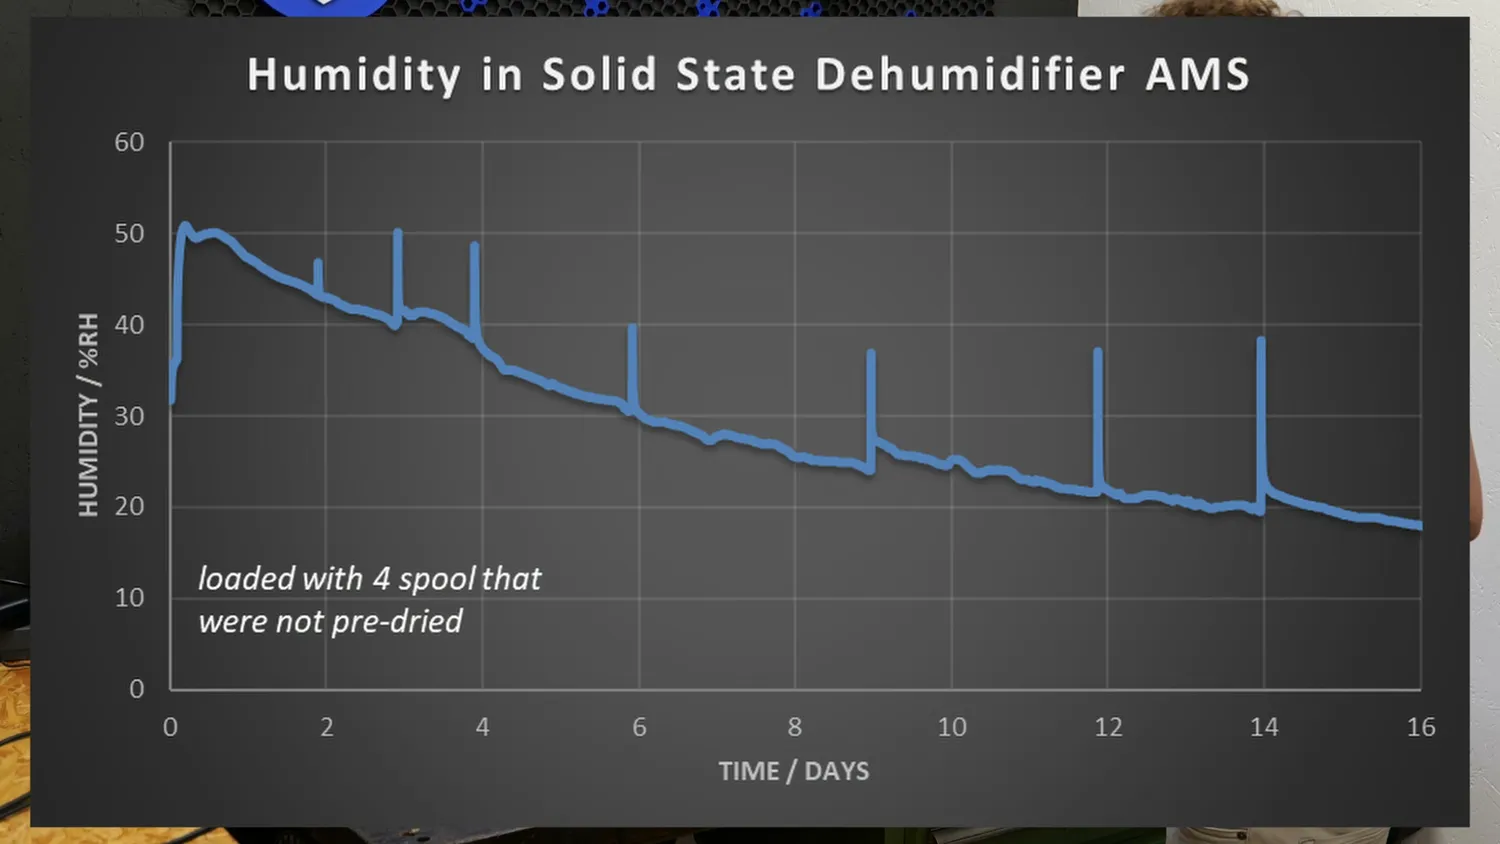 The solid-state AMS took two weeks to get below 20%
By the way, during the twelve-day test, the i10 used around 1 kWh of electricity. Almost half of that was consumed during the first two days when it removed most of the moisture.
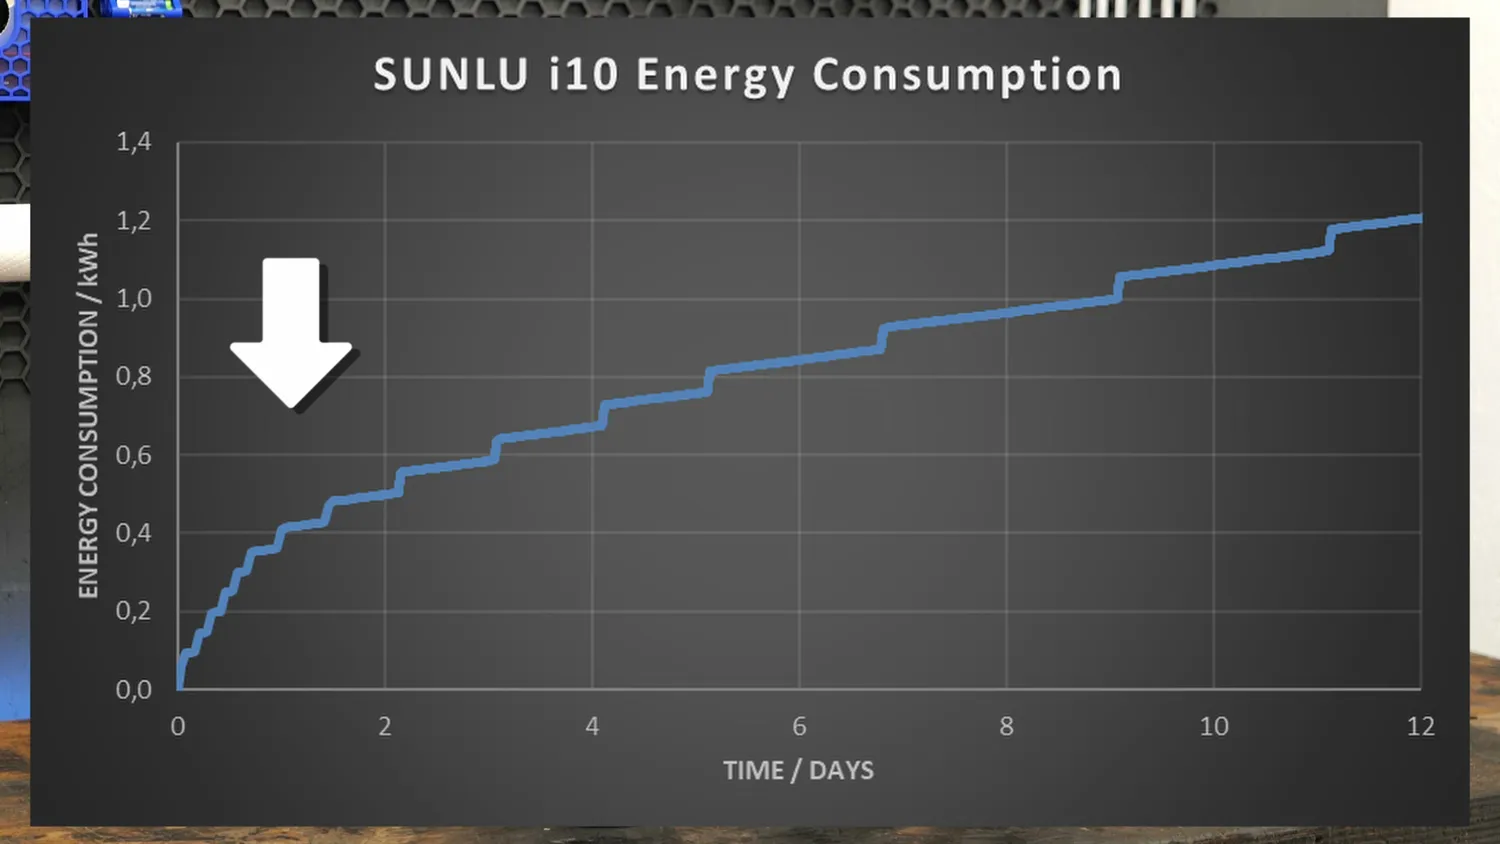 Energy consumption over the twelve-day test
One regeneration cycle takes around 40 minutes, with an initial power draw of up to 450 W which then settles over time to around 60 W. This is because they use a PTC, so positive temperature coefficient heating element, which increases its resistance the hotter it gets and this way should also prevent overheating, because the hotter it gets, the less power it draws.
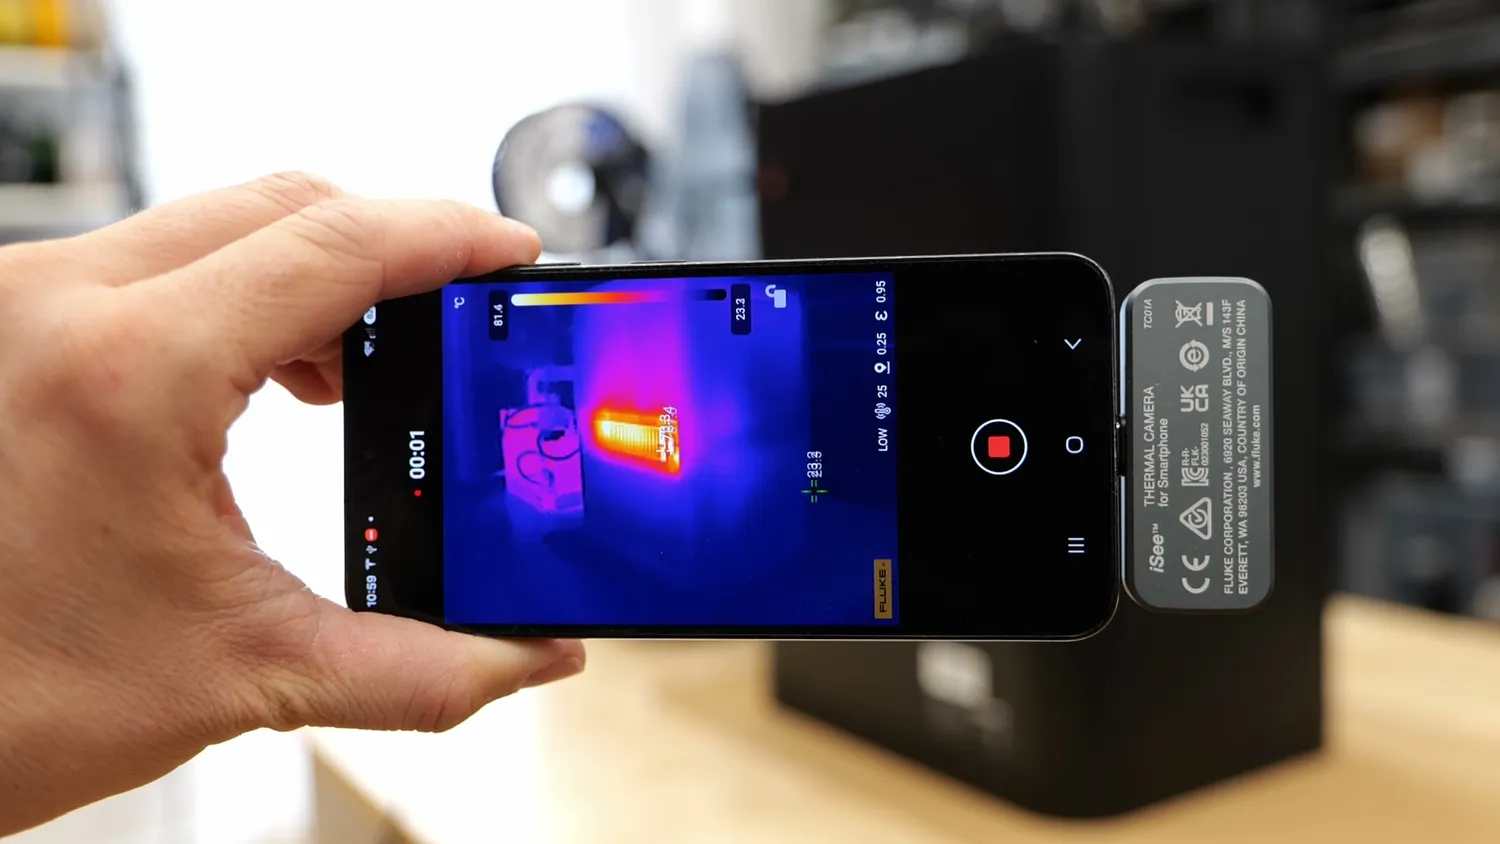 The PTC heater during regeneration
After that it gets back into idle where the power draw is only 1-2 W for the screen and the fans, which is very efficient. I had the unit running now for a month in total where it used 2 kWh but with only little change of filaments every day. In a realistic scenario where you add and remove spools a few times a week, the i10 will probably draw 100 Wh per day which means roughly 35 kWh per year which is around $10-15 in energy costs every year. If you consider that a single six-hour cycle in a heated dryer can already use half a kilowatt-hour, I think that’s very reasonable. But back to the tests.
Print quality: stored outside vs. in the i10
The big question is whether the dehumidifier cabinet dries the materials enough that you can actually see a difference in the prints. To find out, I took the five-meter samples that I had stored outside in the studio during those twelve days and printed a 3D Benchy and a stringing test. Then I used the exact same G-code and printed the exact same parts using filament that had been sitting in the i10.
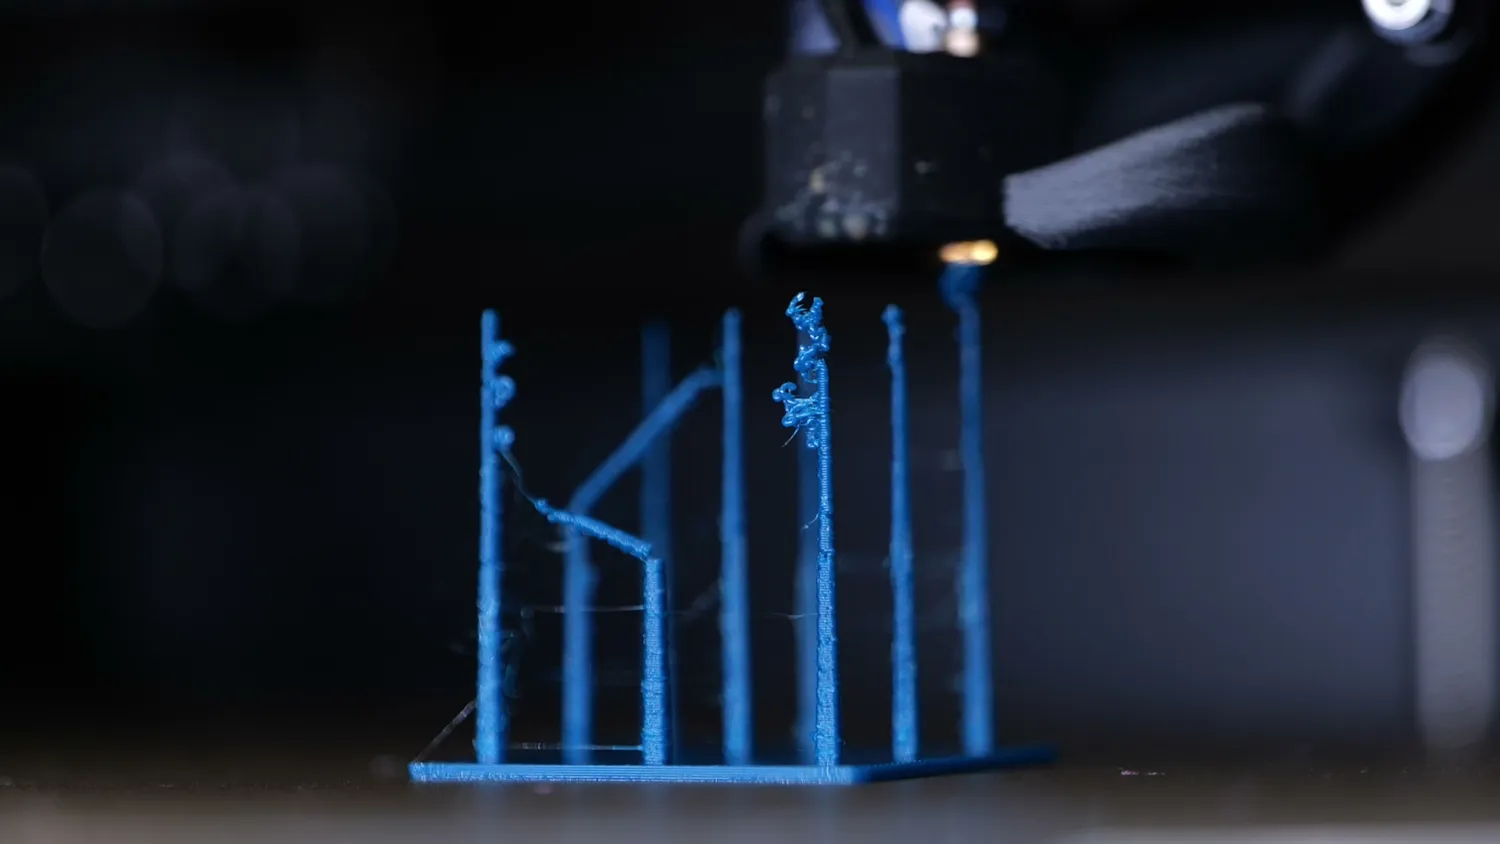 Printing the stringing tests
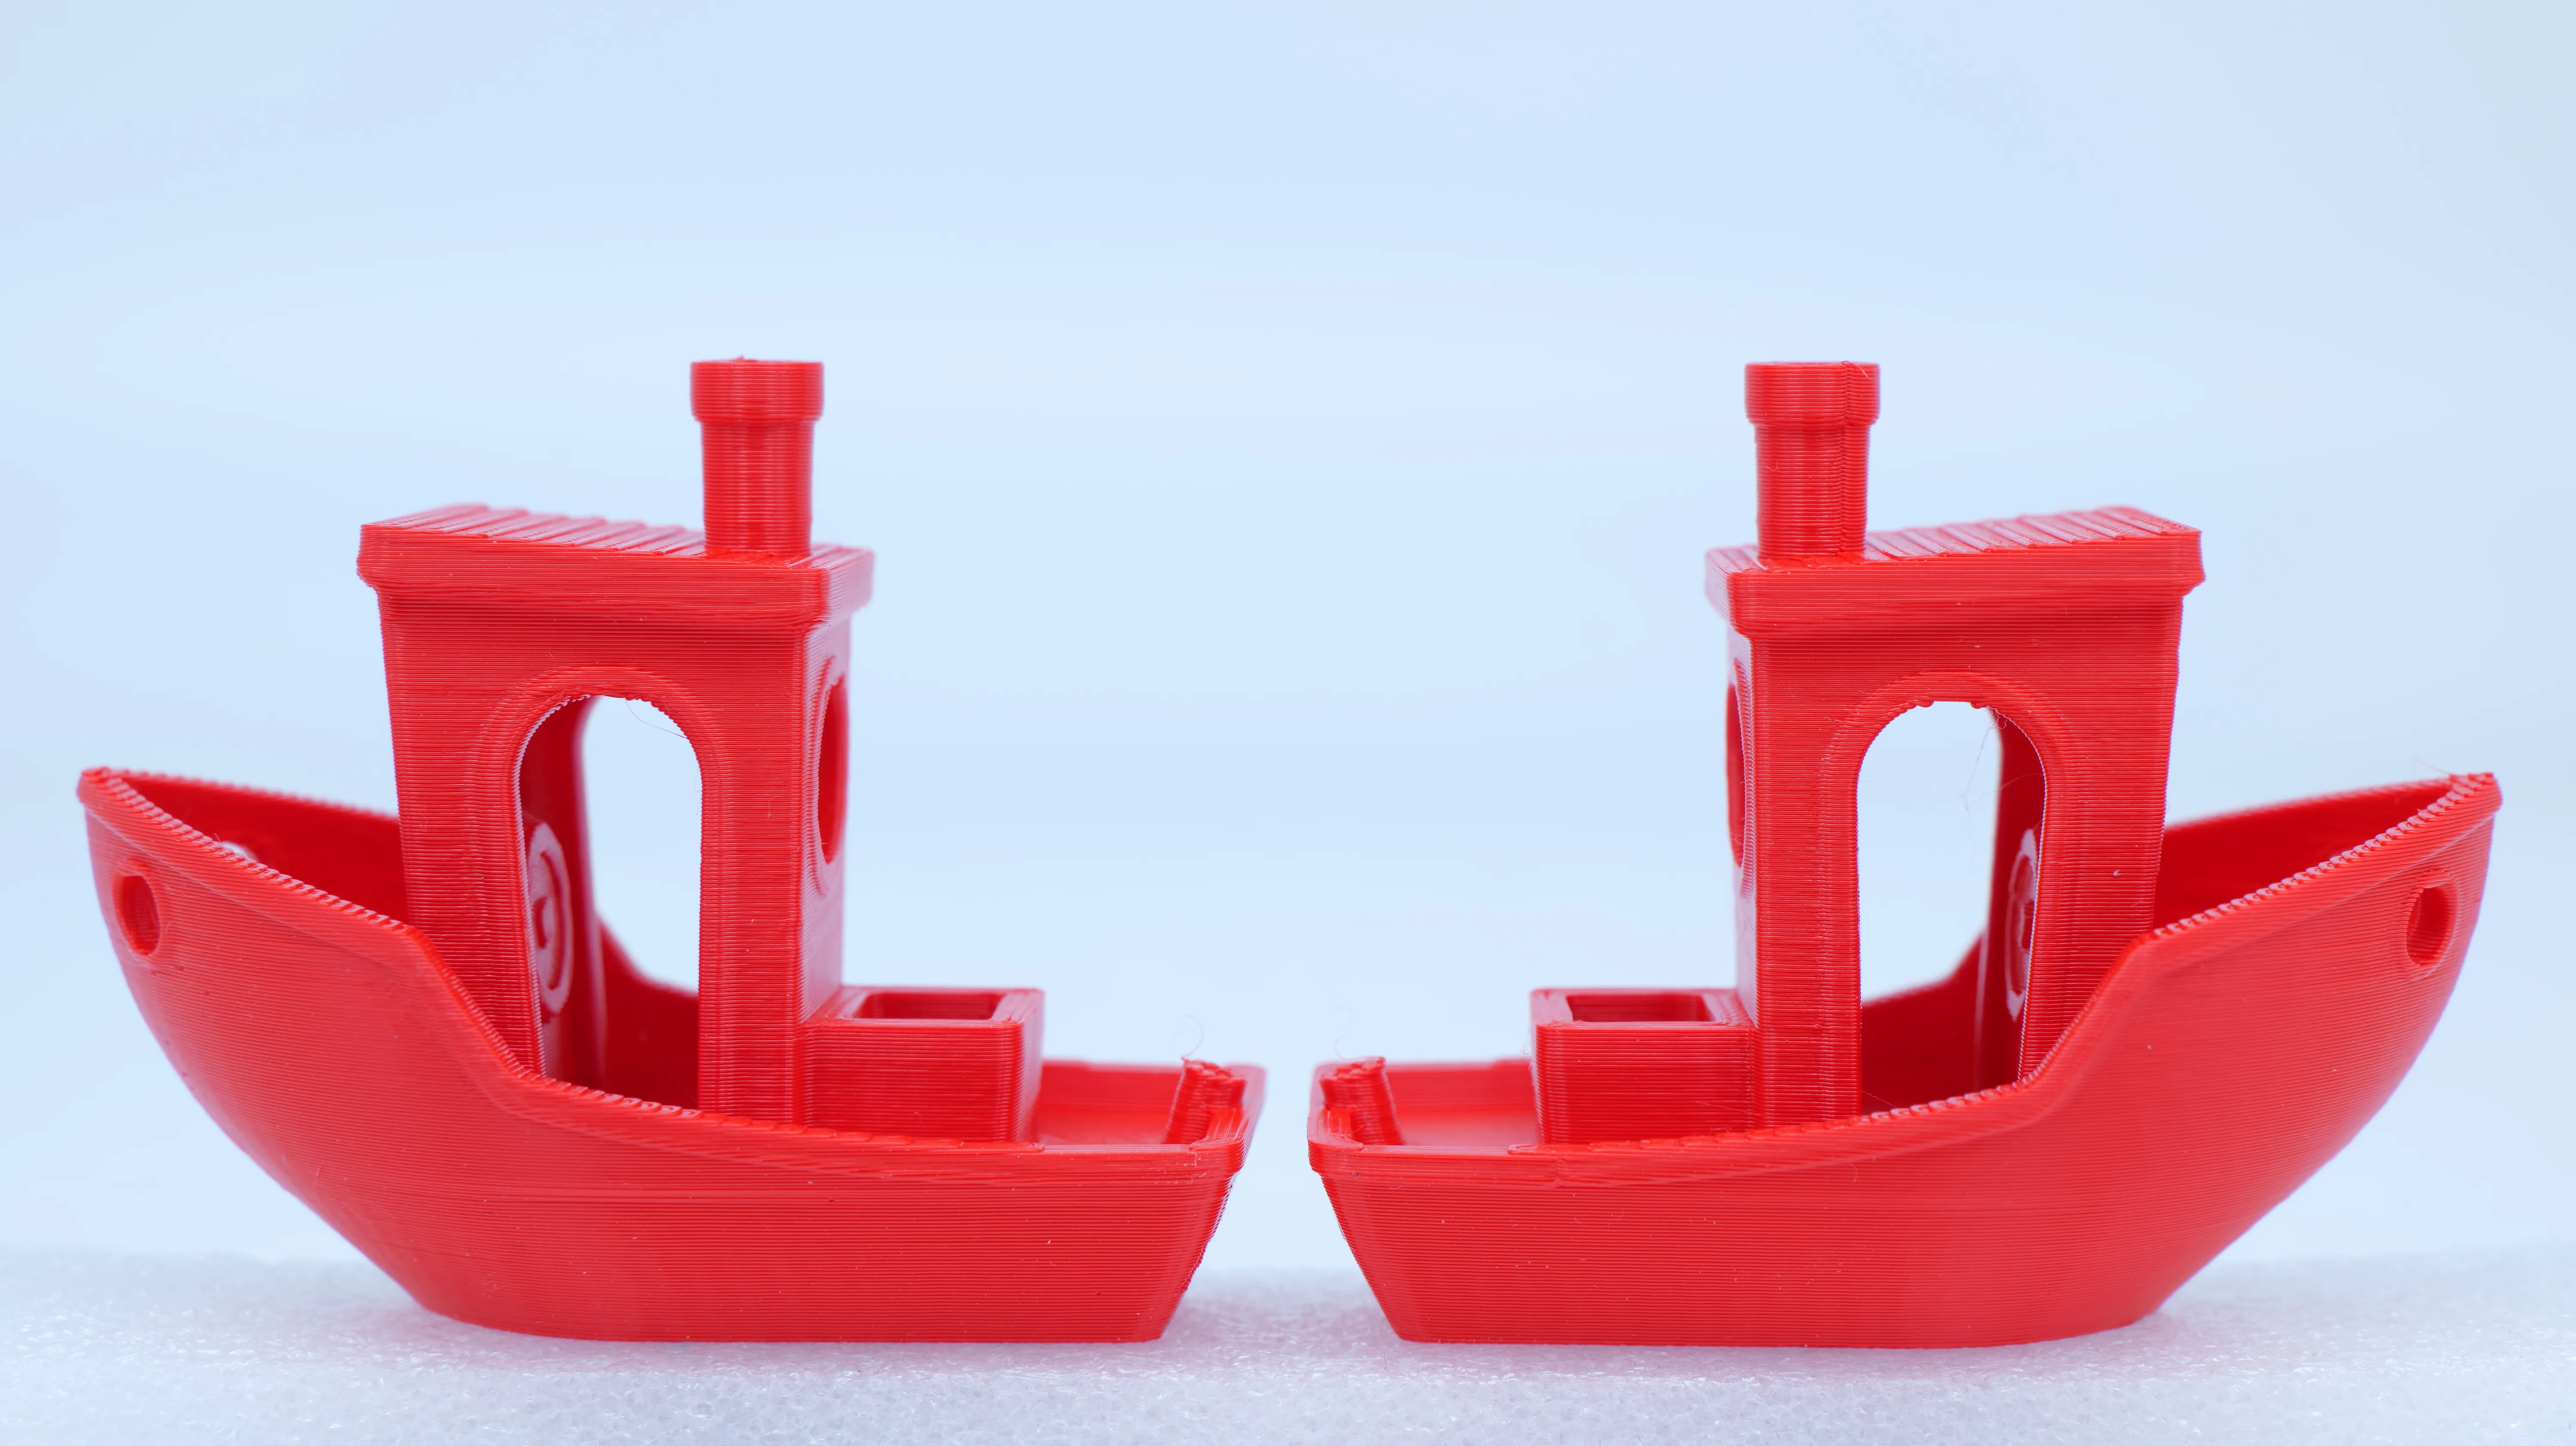
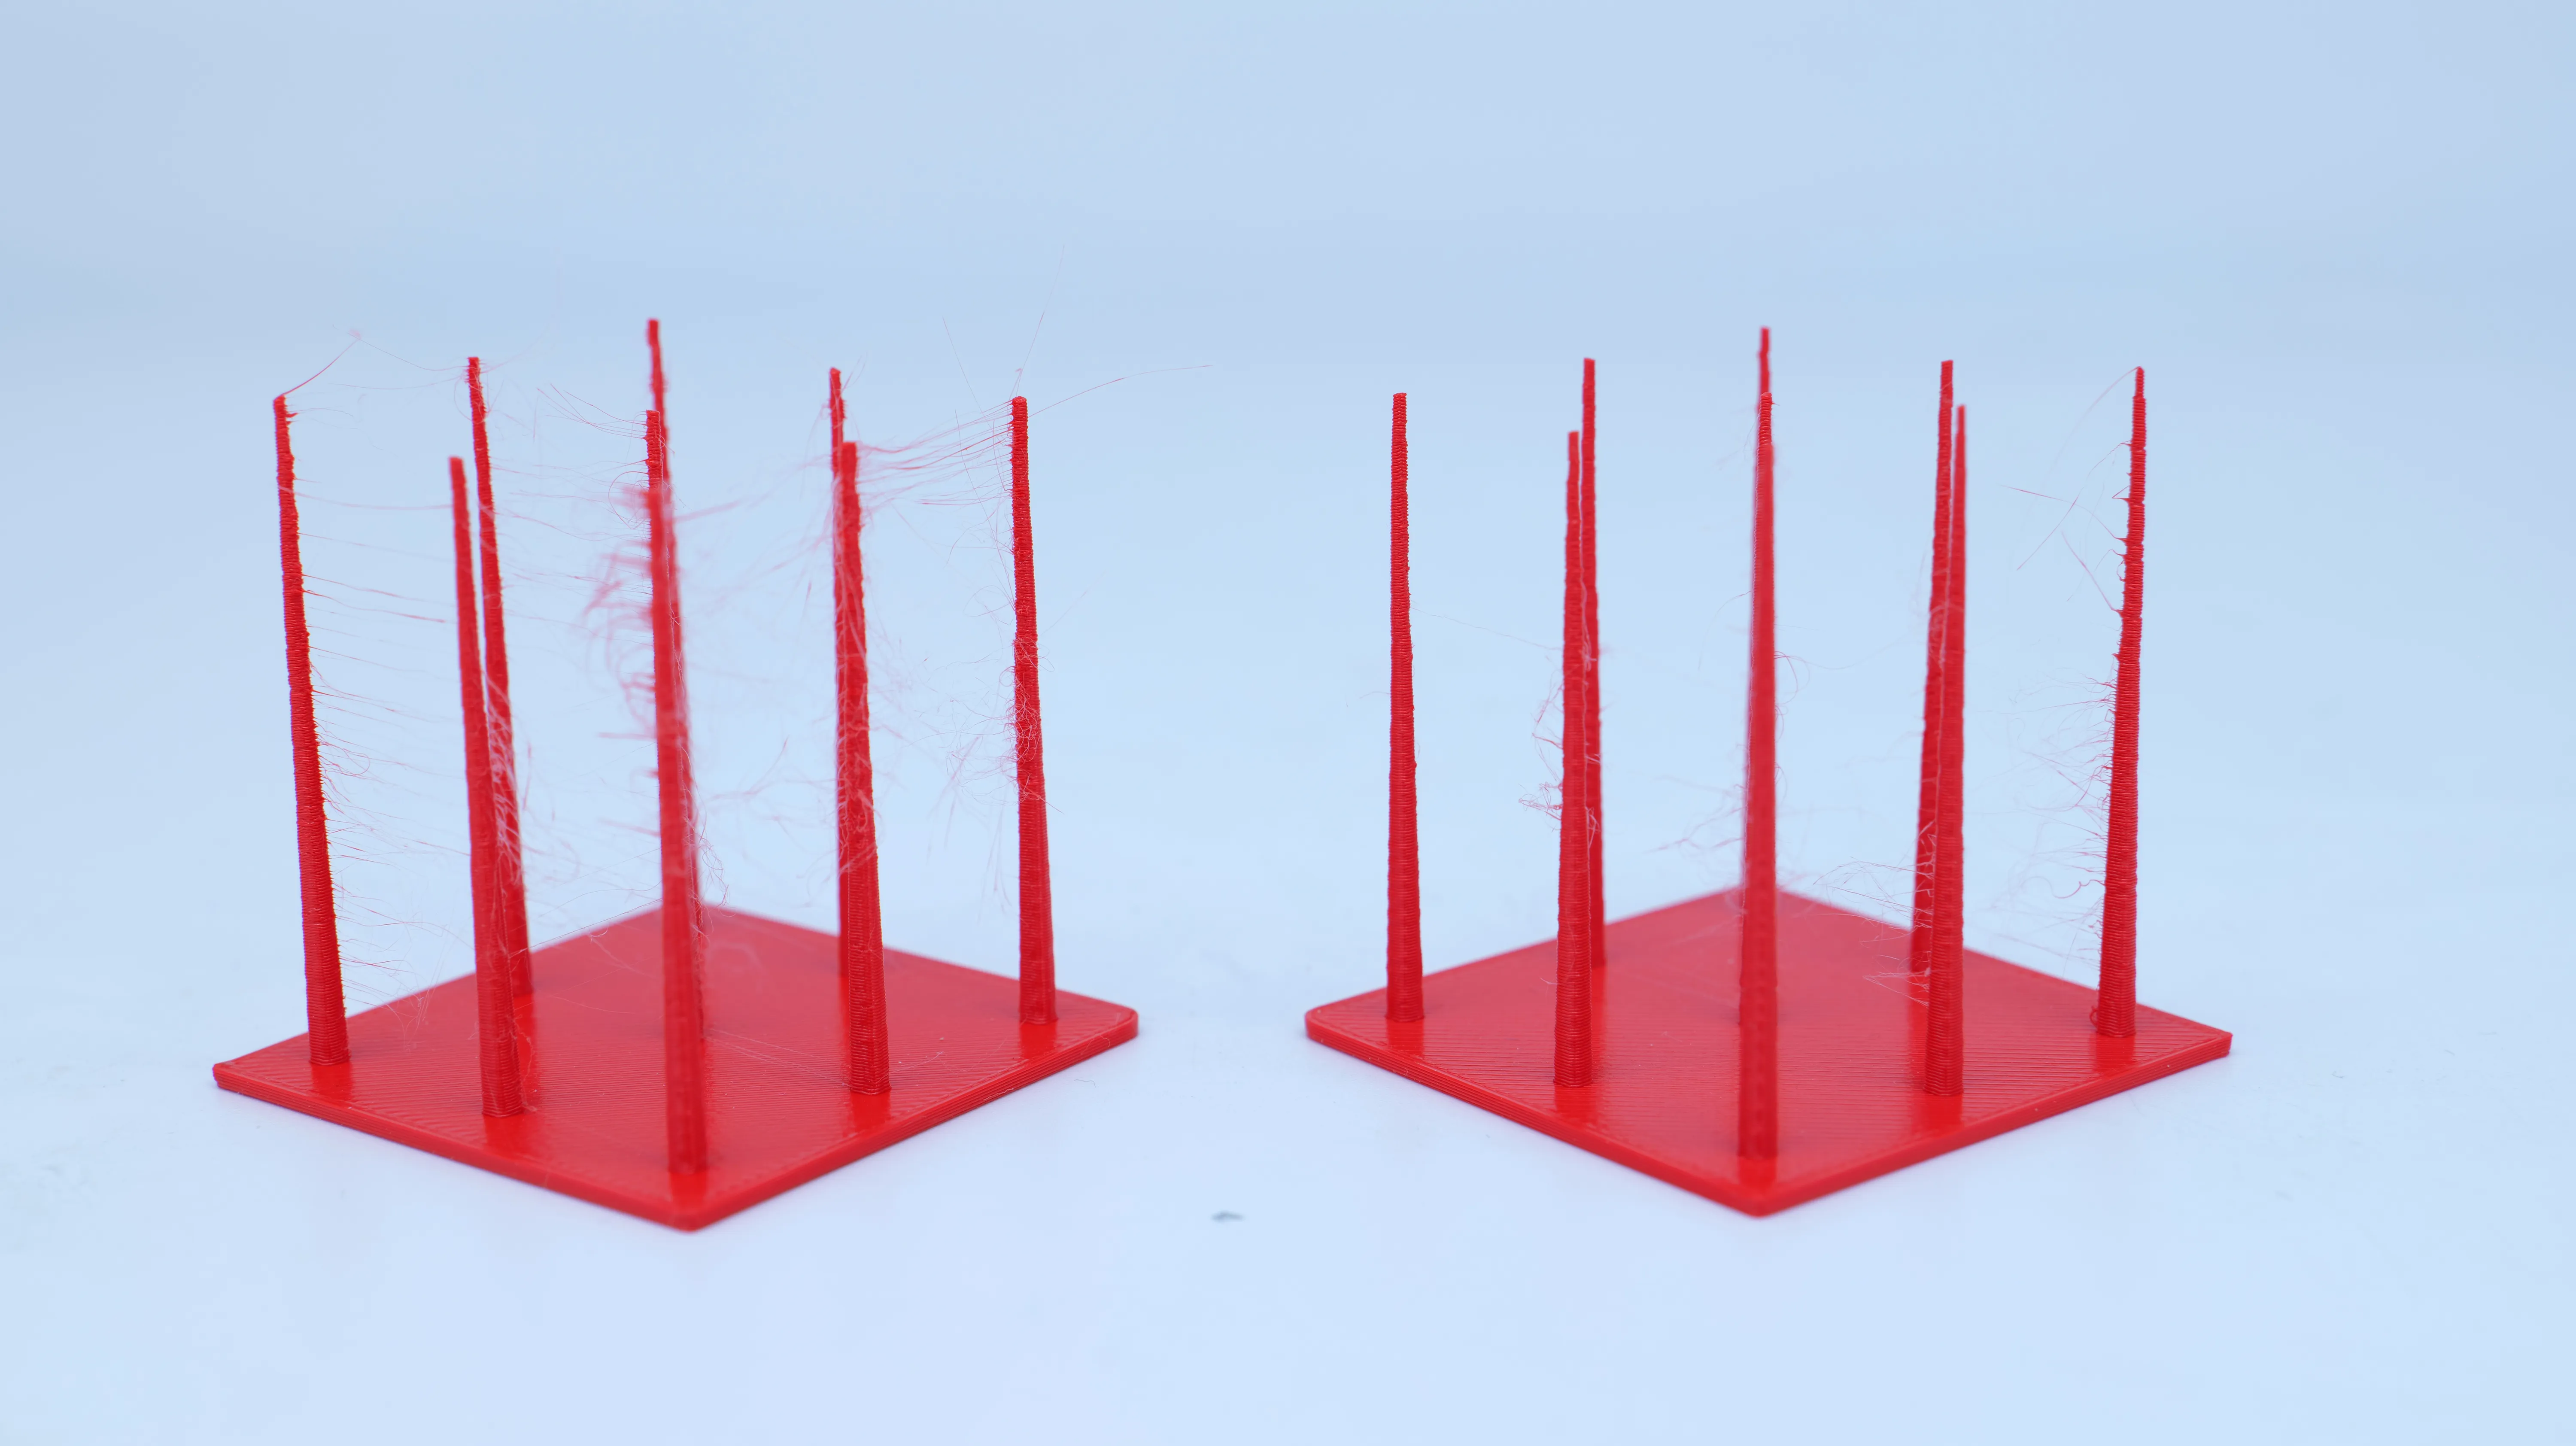
Let’s start with the easier materials and then work our way up to Nylon and TPU. If you want to take a closer look at all the differences, you can zoom into the full-resolution comparison shots below each material. With PLA, the 3D Benchy results were kind of boring. They looked pretty much the same whether the filament had been stored inside the cabinet or not. The stringing test was more telling, though. Both samples printed with the filament from the i10 showed less stringing.
 Stored outsideStored in the i10
PETG showed a much bigger difference right from the start. I tested three different materials: Bambu PETG CF, VoxelPETG, and Prusament PETG. First, I printed the PETG CF that had been stored outside, and honestly, it didn’t look too bad. But once I printed the comparison parts using the filament from the dry cabinet, the difference became very obvious. Even though the original stringing test wasn’t terrible, the one printed from the i10 filament came out super clean. The bigger difference on the Benchy was the surface texture. The part printed with the undried filament had a slightly rough surface, while the one from the spool stored in the dehumidification cabinet was ultra-smooth. The microscope shots make this even clearer. You can actually see the bubbles that create that rough texture, as well as the apparent overextrusion they cause on the top layers.
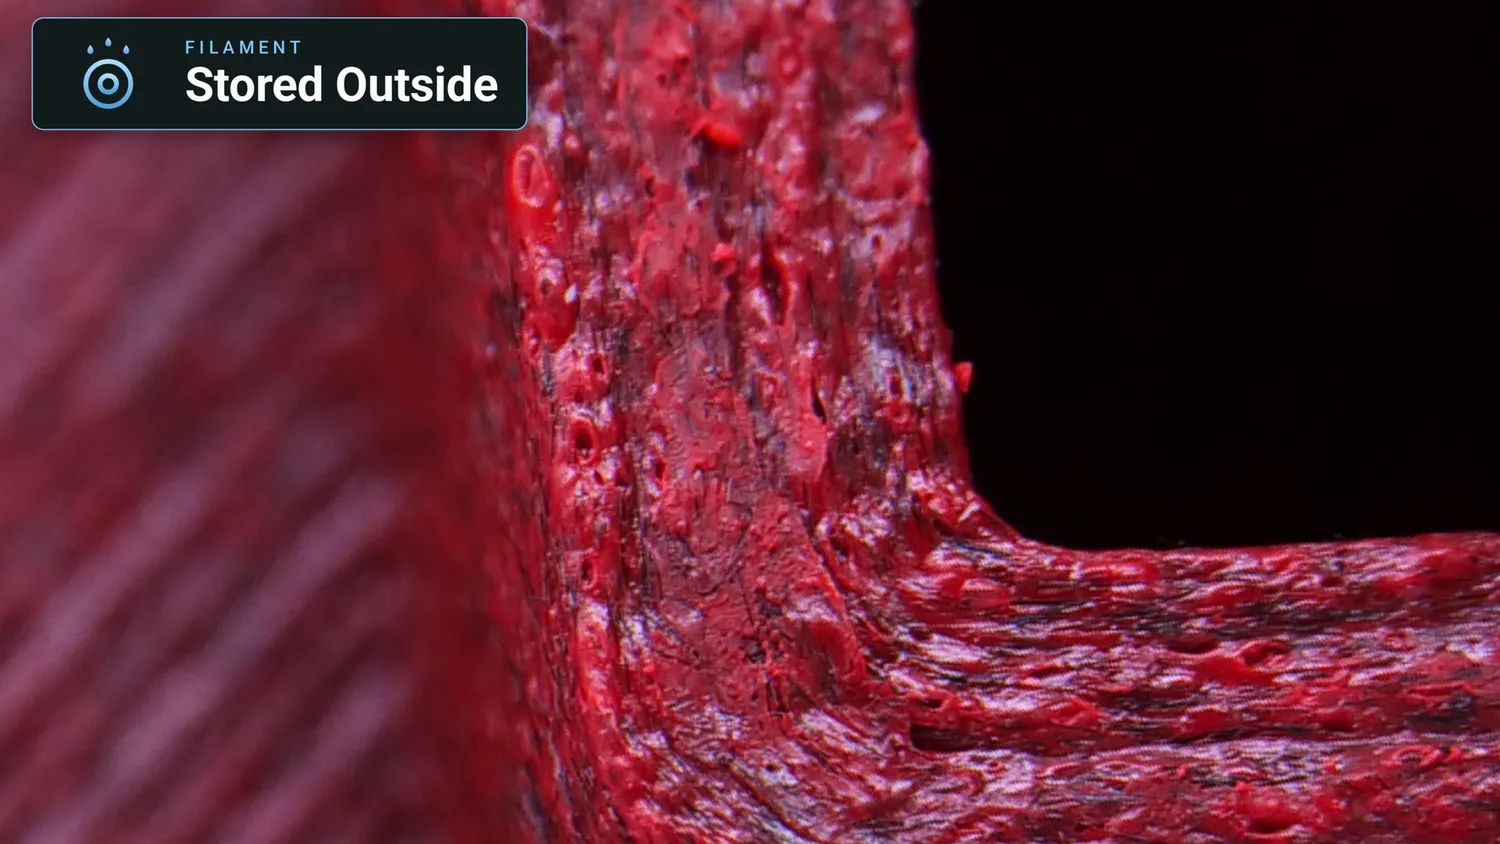 Bubbles on the surface of the wet PETG CF print
On the other two PETG filaments the difference was even more noticeable because both filaments stored in the open showed a significant amount of stringing but also significant foaming in the parts of the model where the print speed was reduced and bubbles had more time to form.
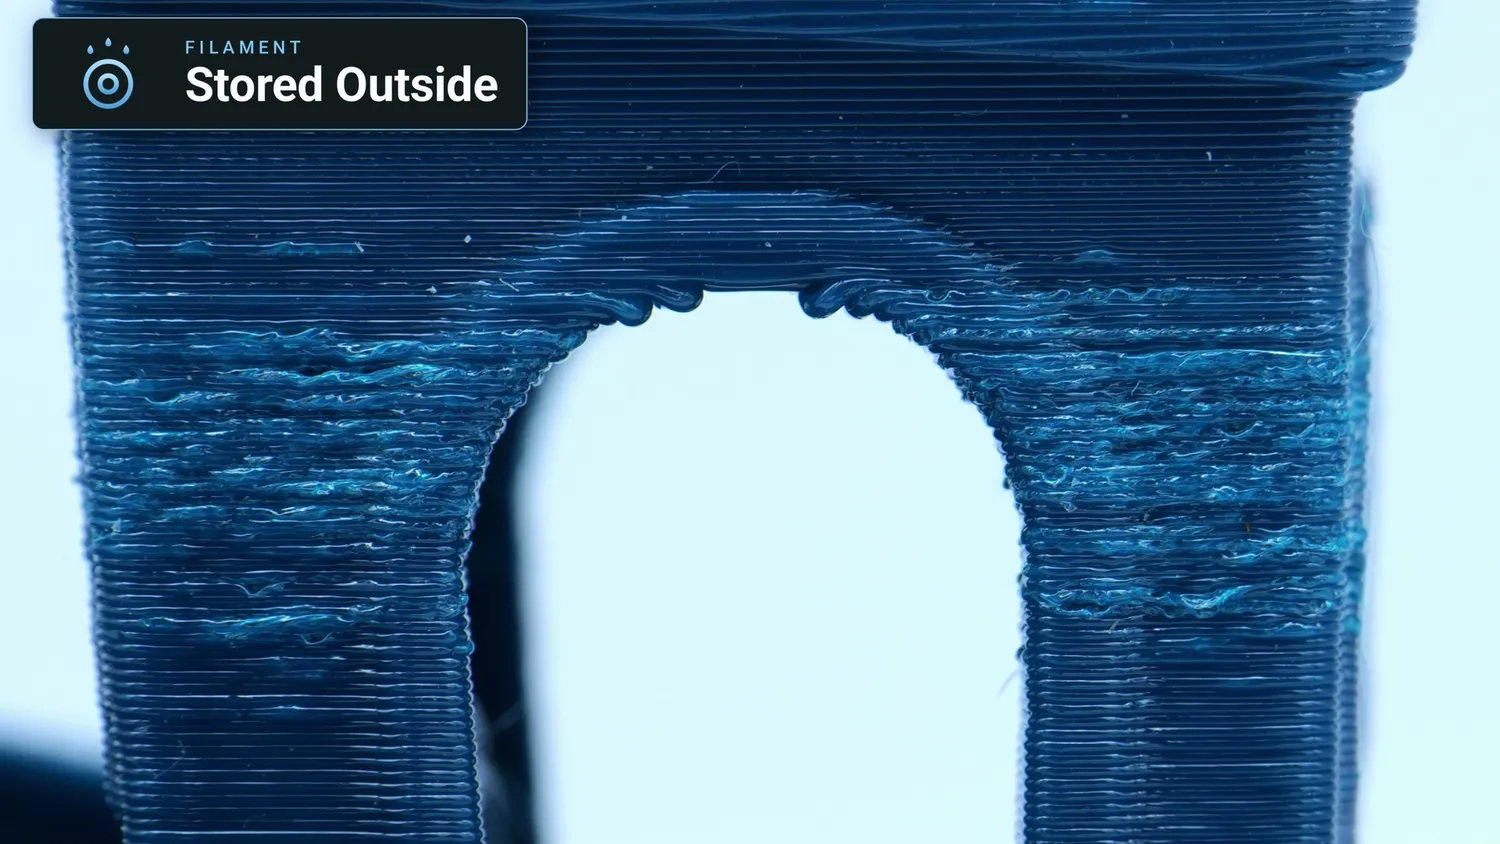 Foaming where the print slowed down
With the filament from the SUNLU cabinet, the prints came out almost perfectly. There was barely any stringing, and the surfaces were smooth enough that you could basically only see the VFAs from the printer.
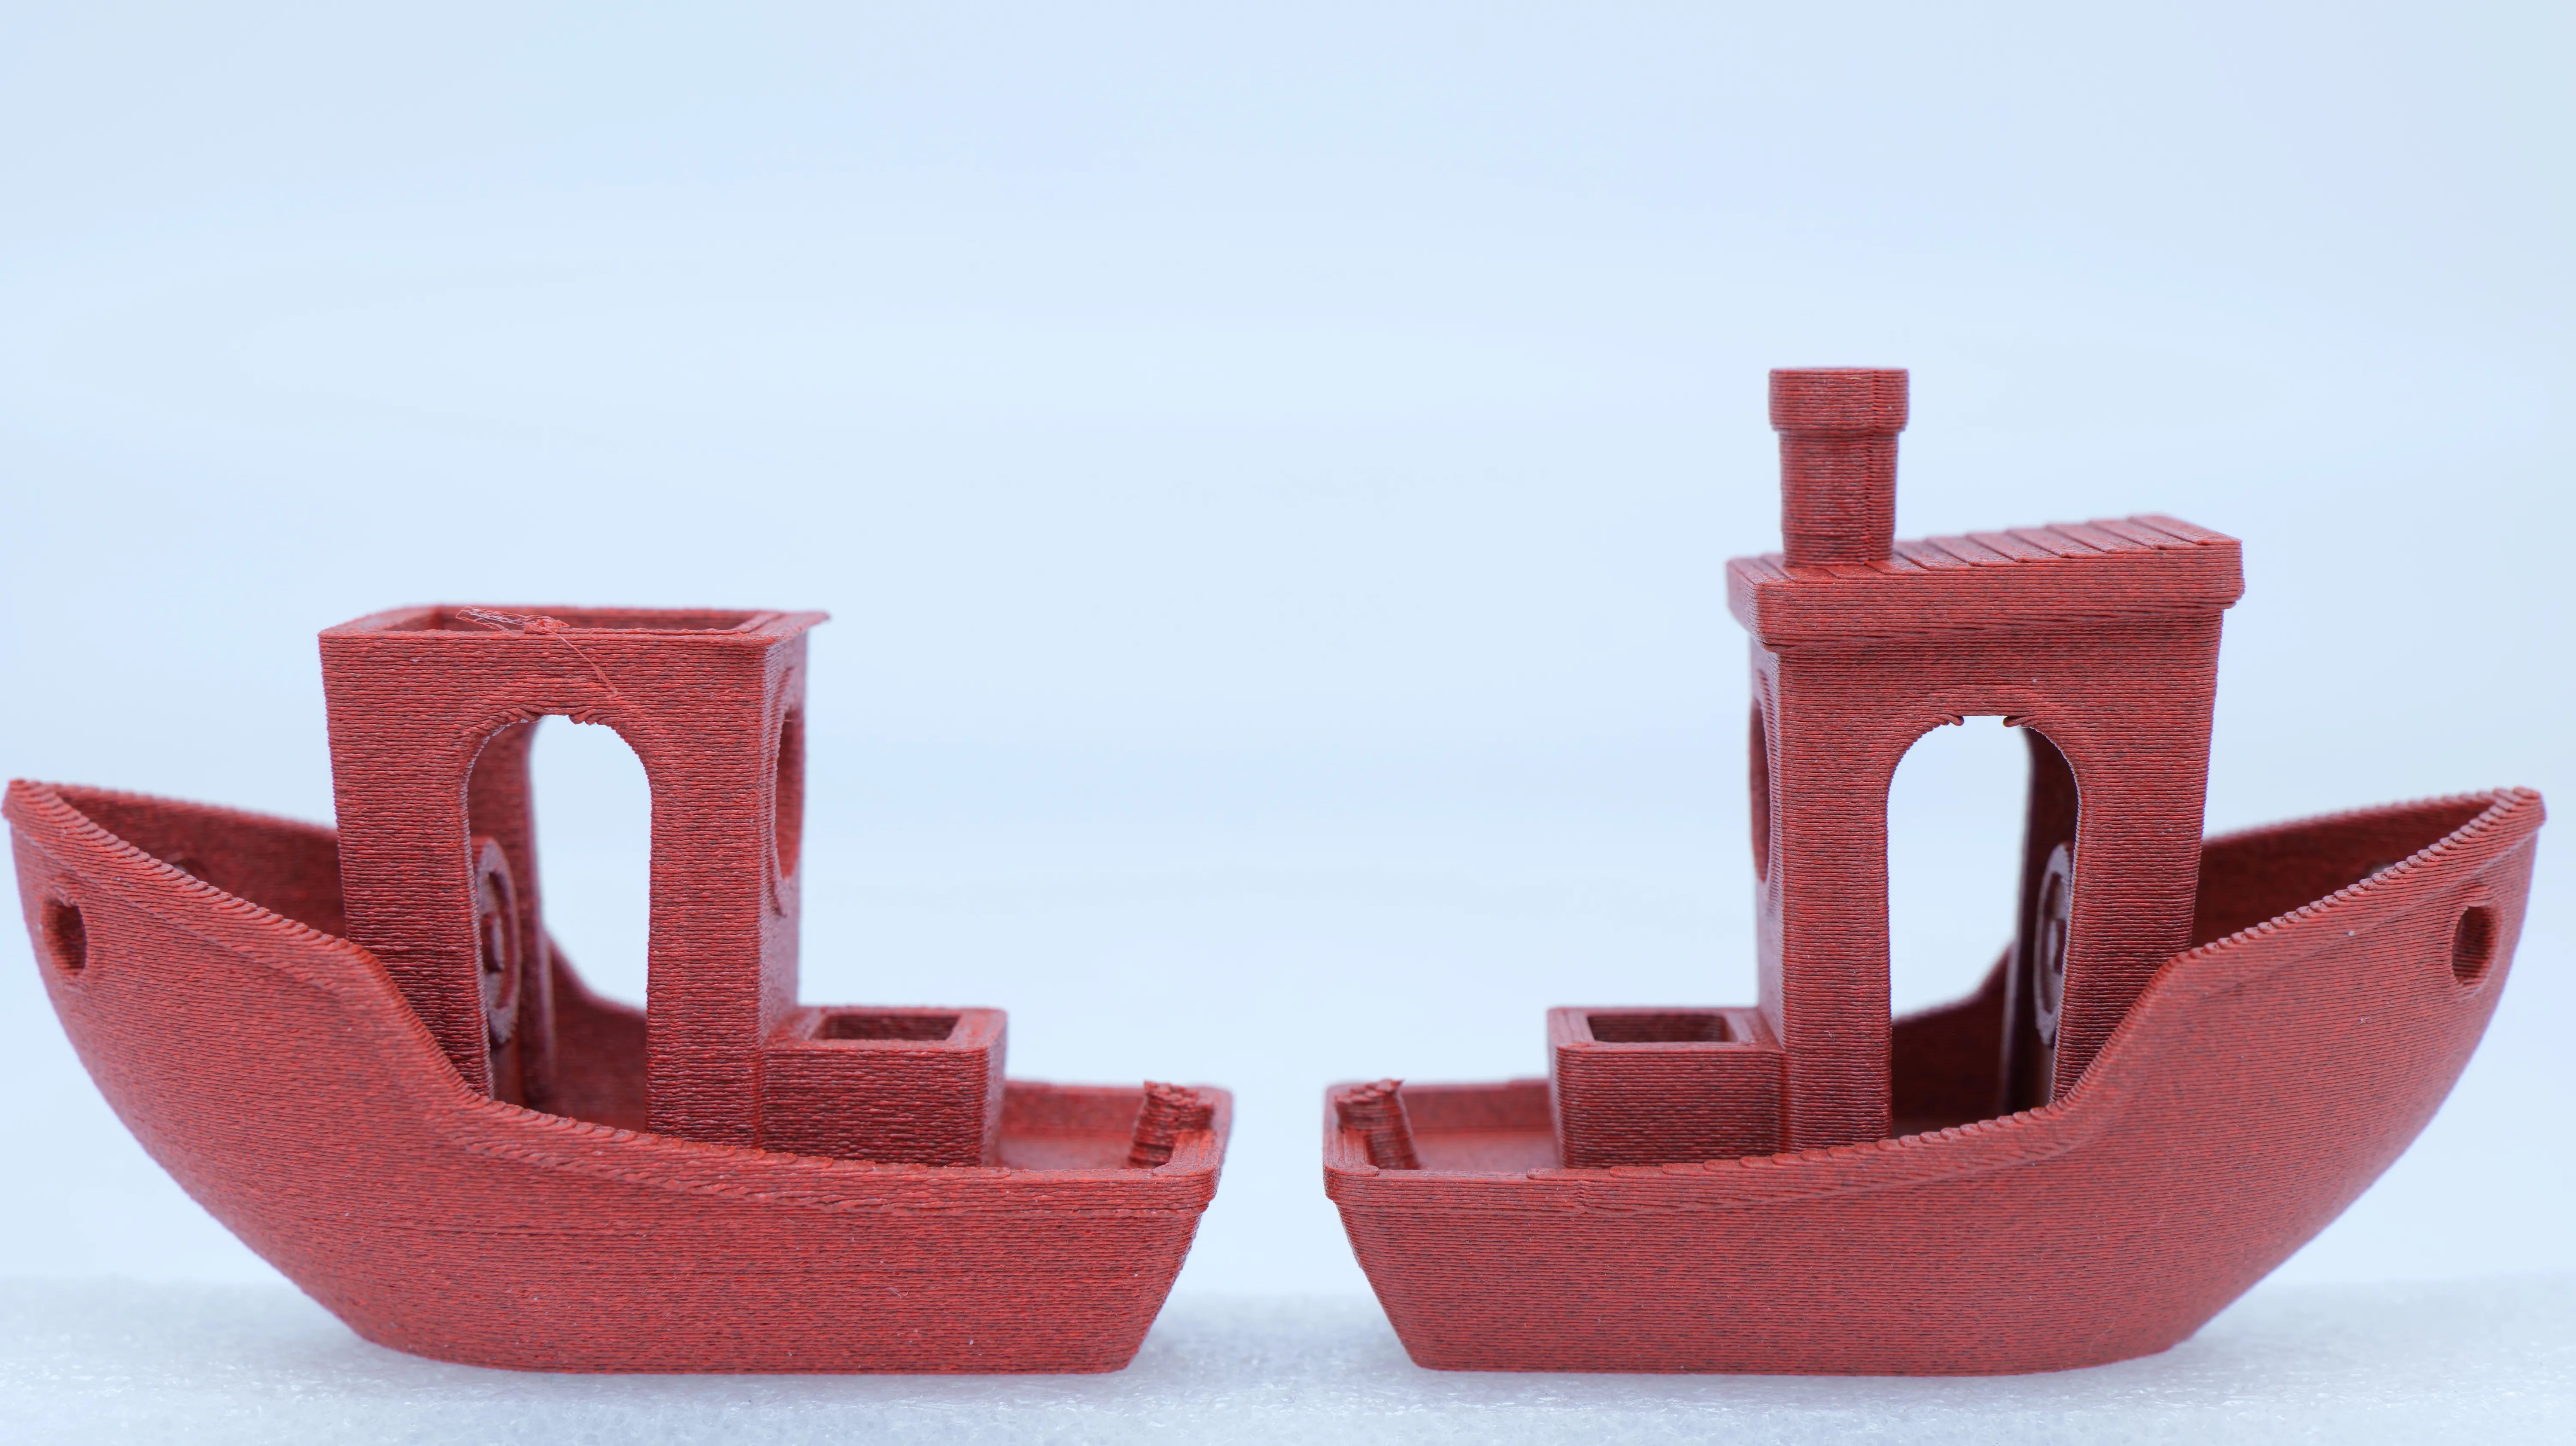 Stored outsideStored in the i10
 Bambu Lab PETG-CF, Benchy
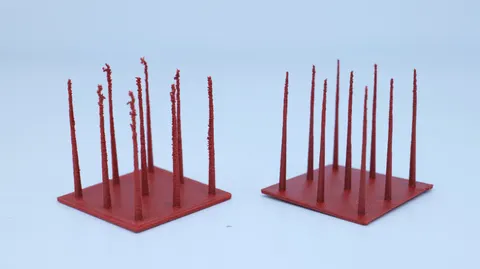 Bambu Lab PETG-CF, stringing test
 VoxelPETG, Benchy
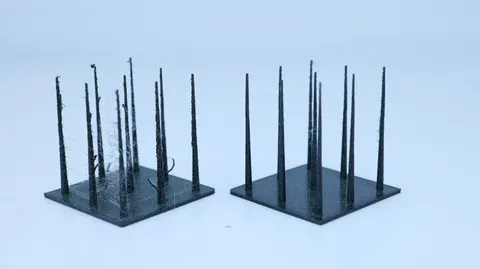 VoxelPETG, stringing test
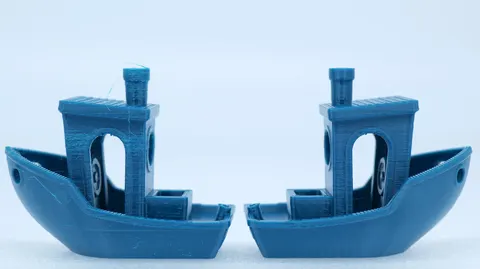 Prusament PETG, Benchy
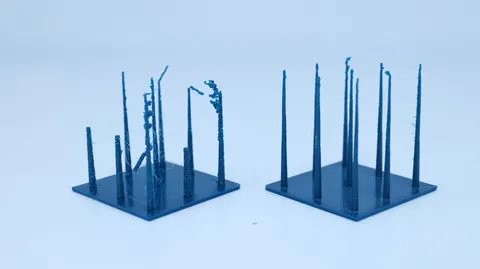 Prusament PETG, stringing test
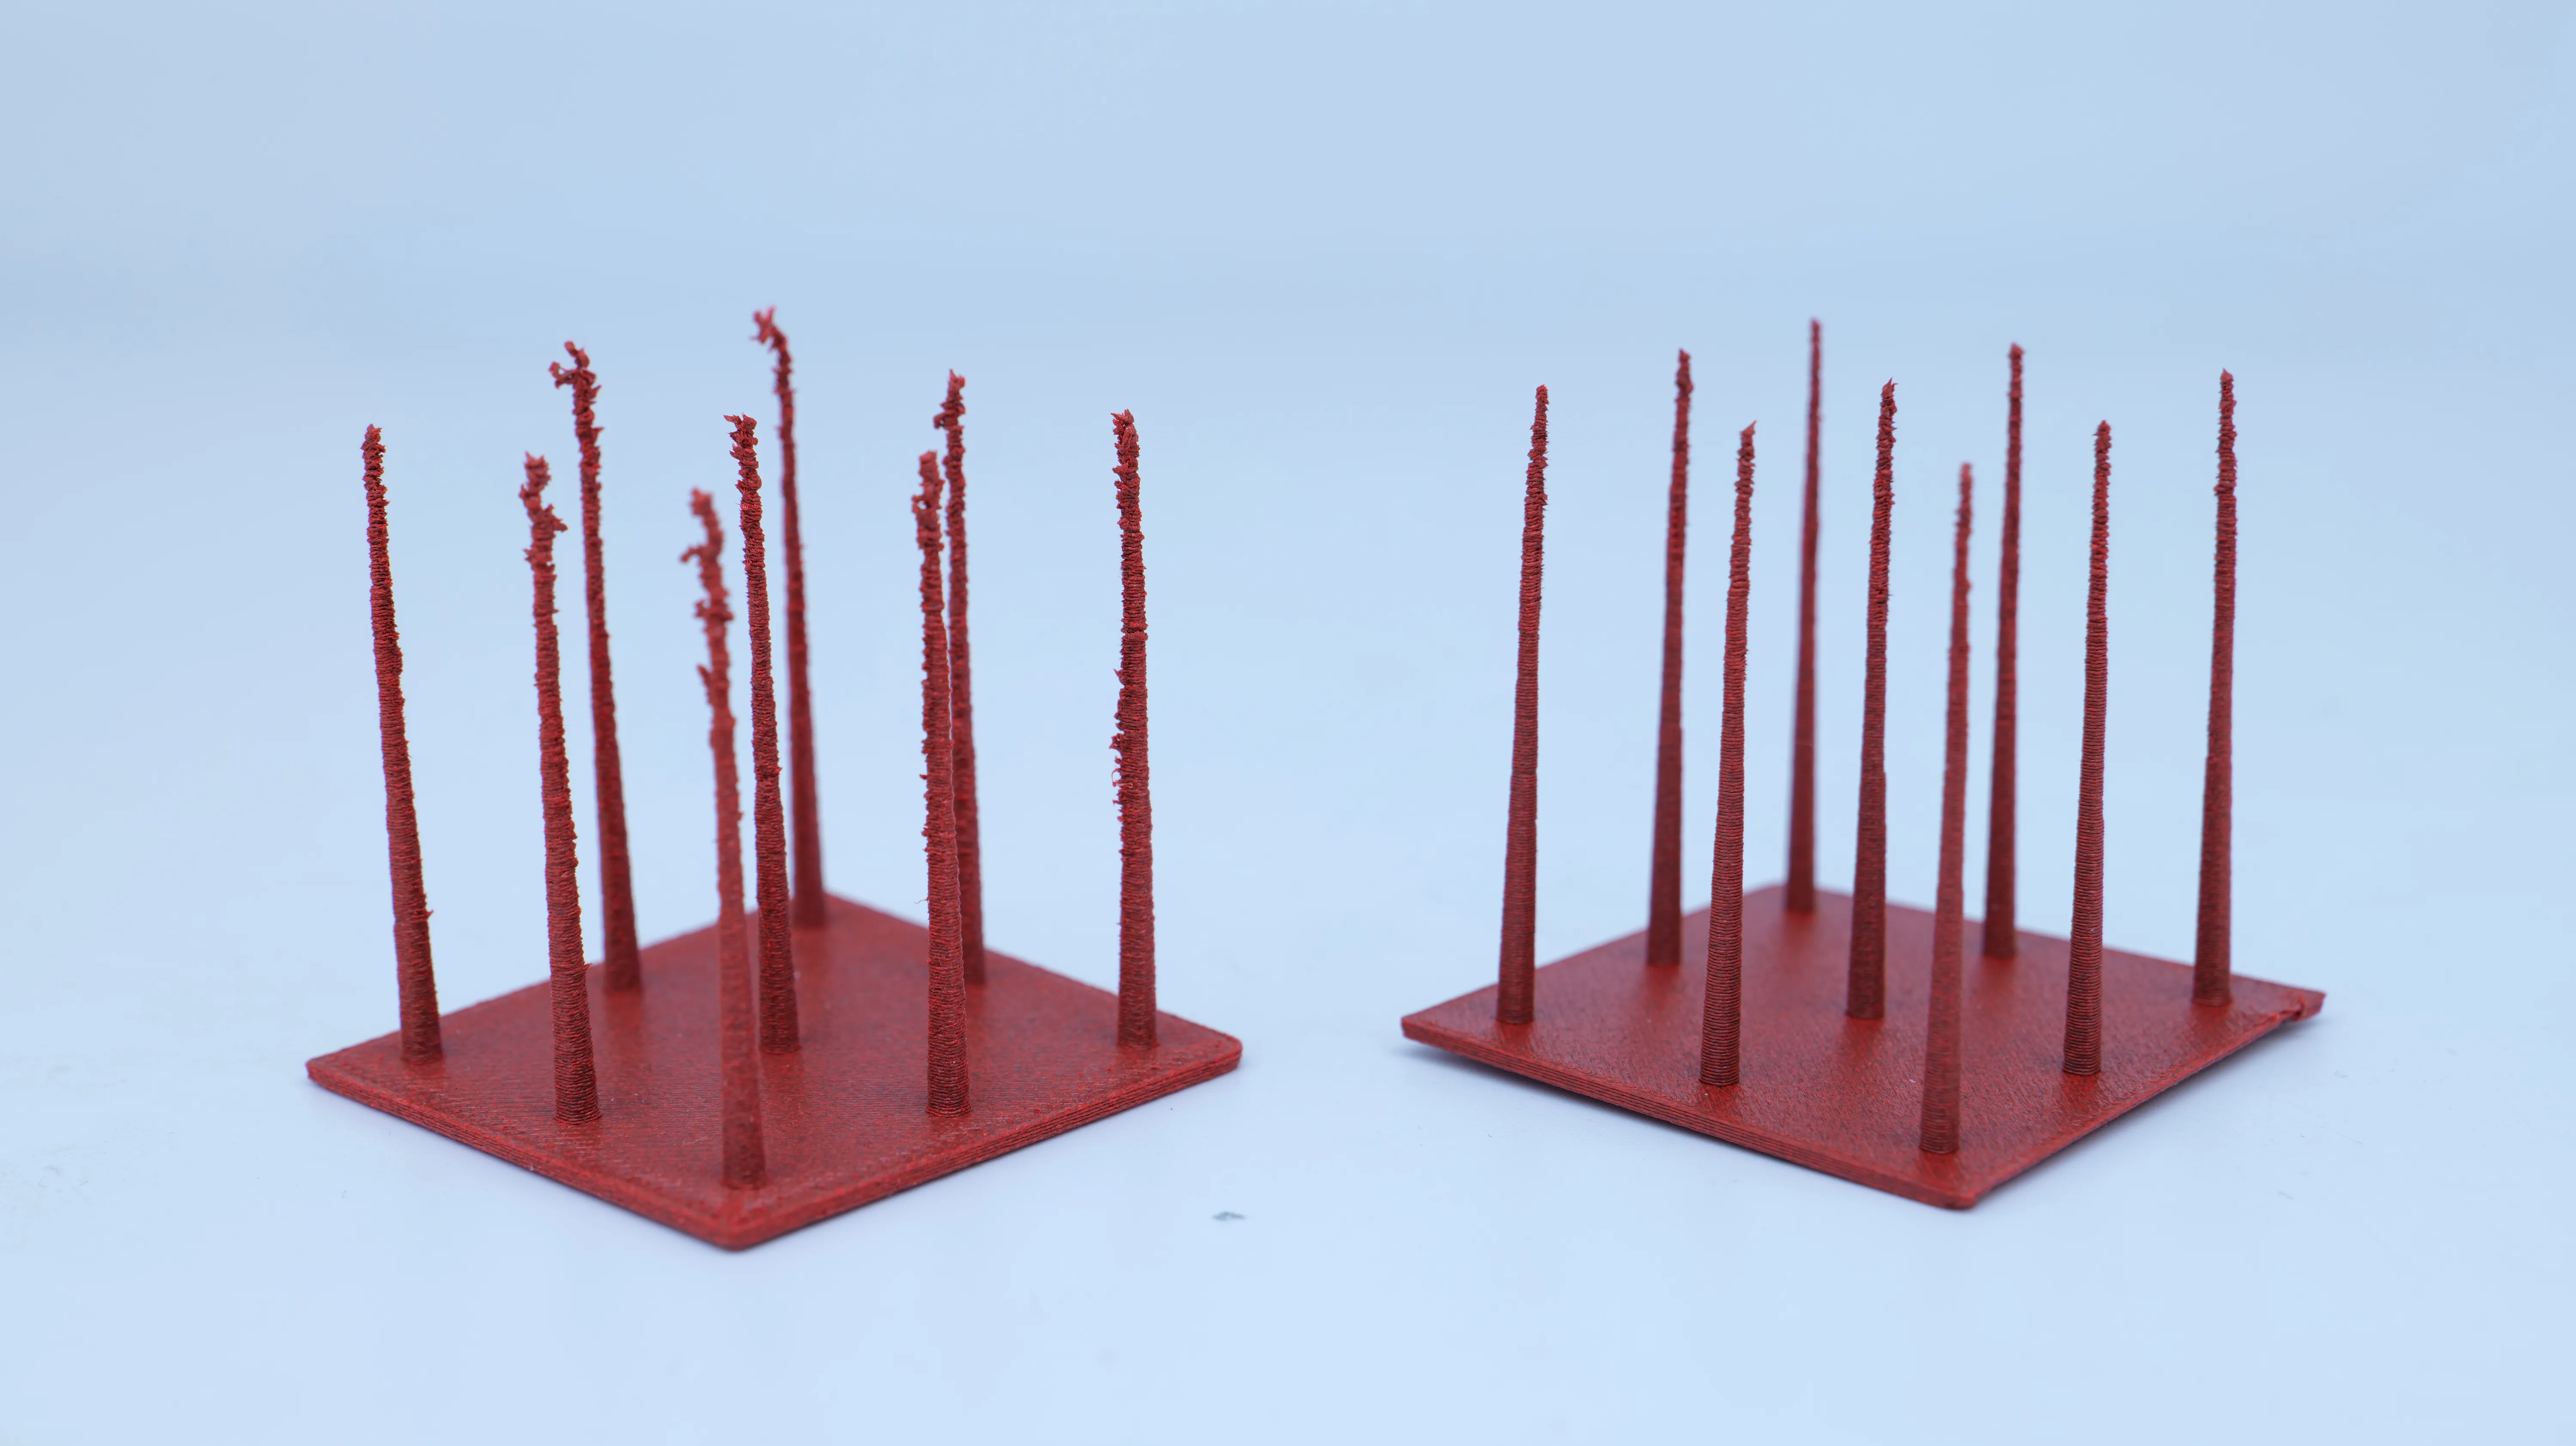
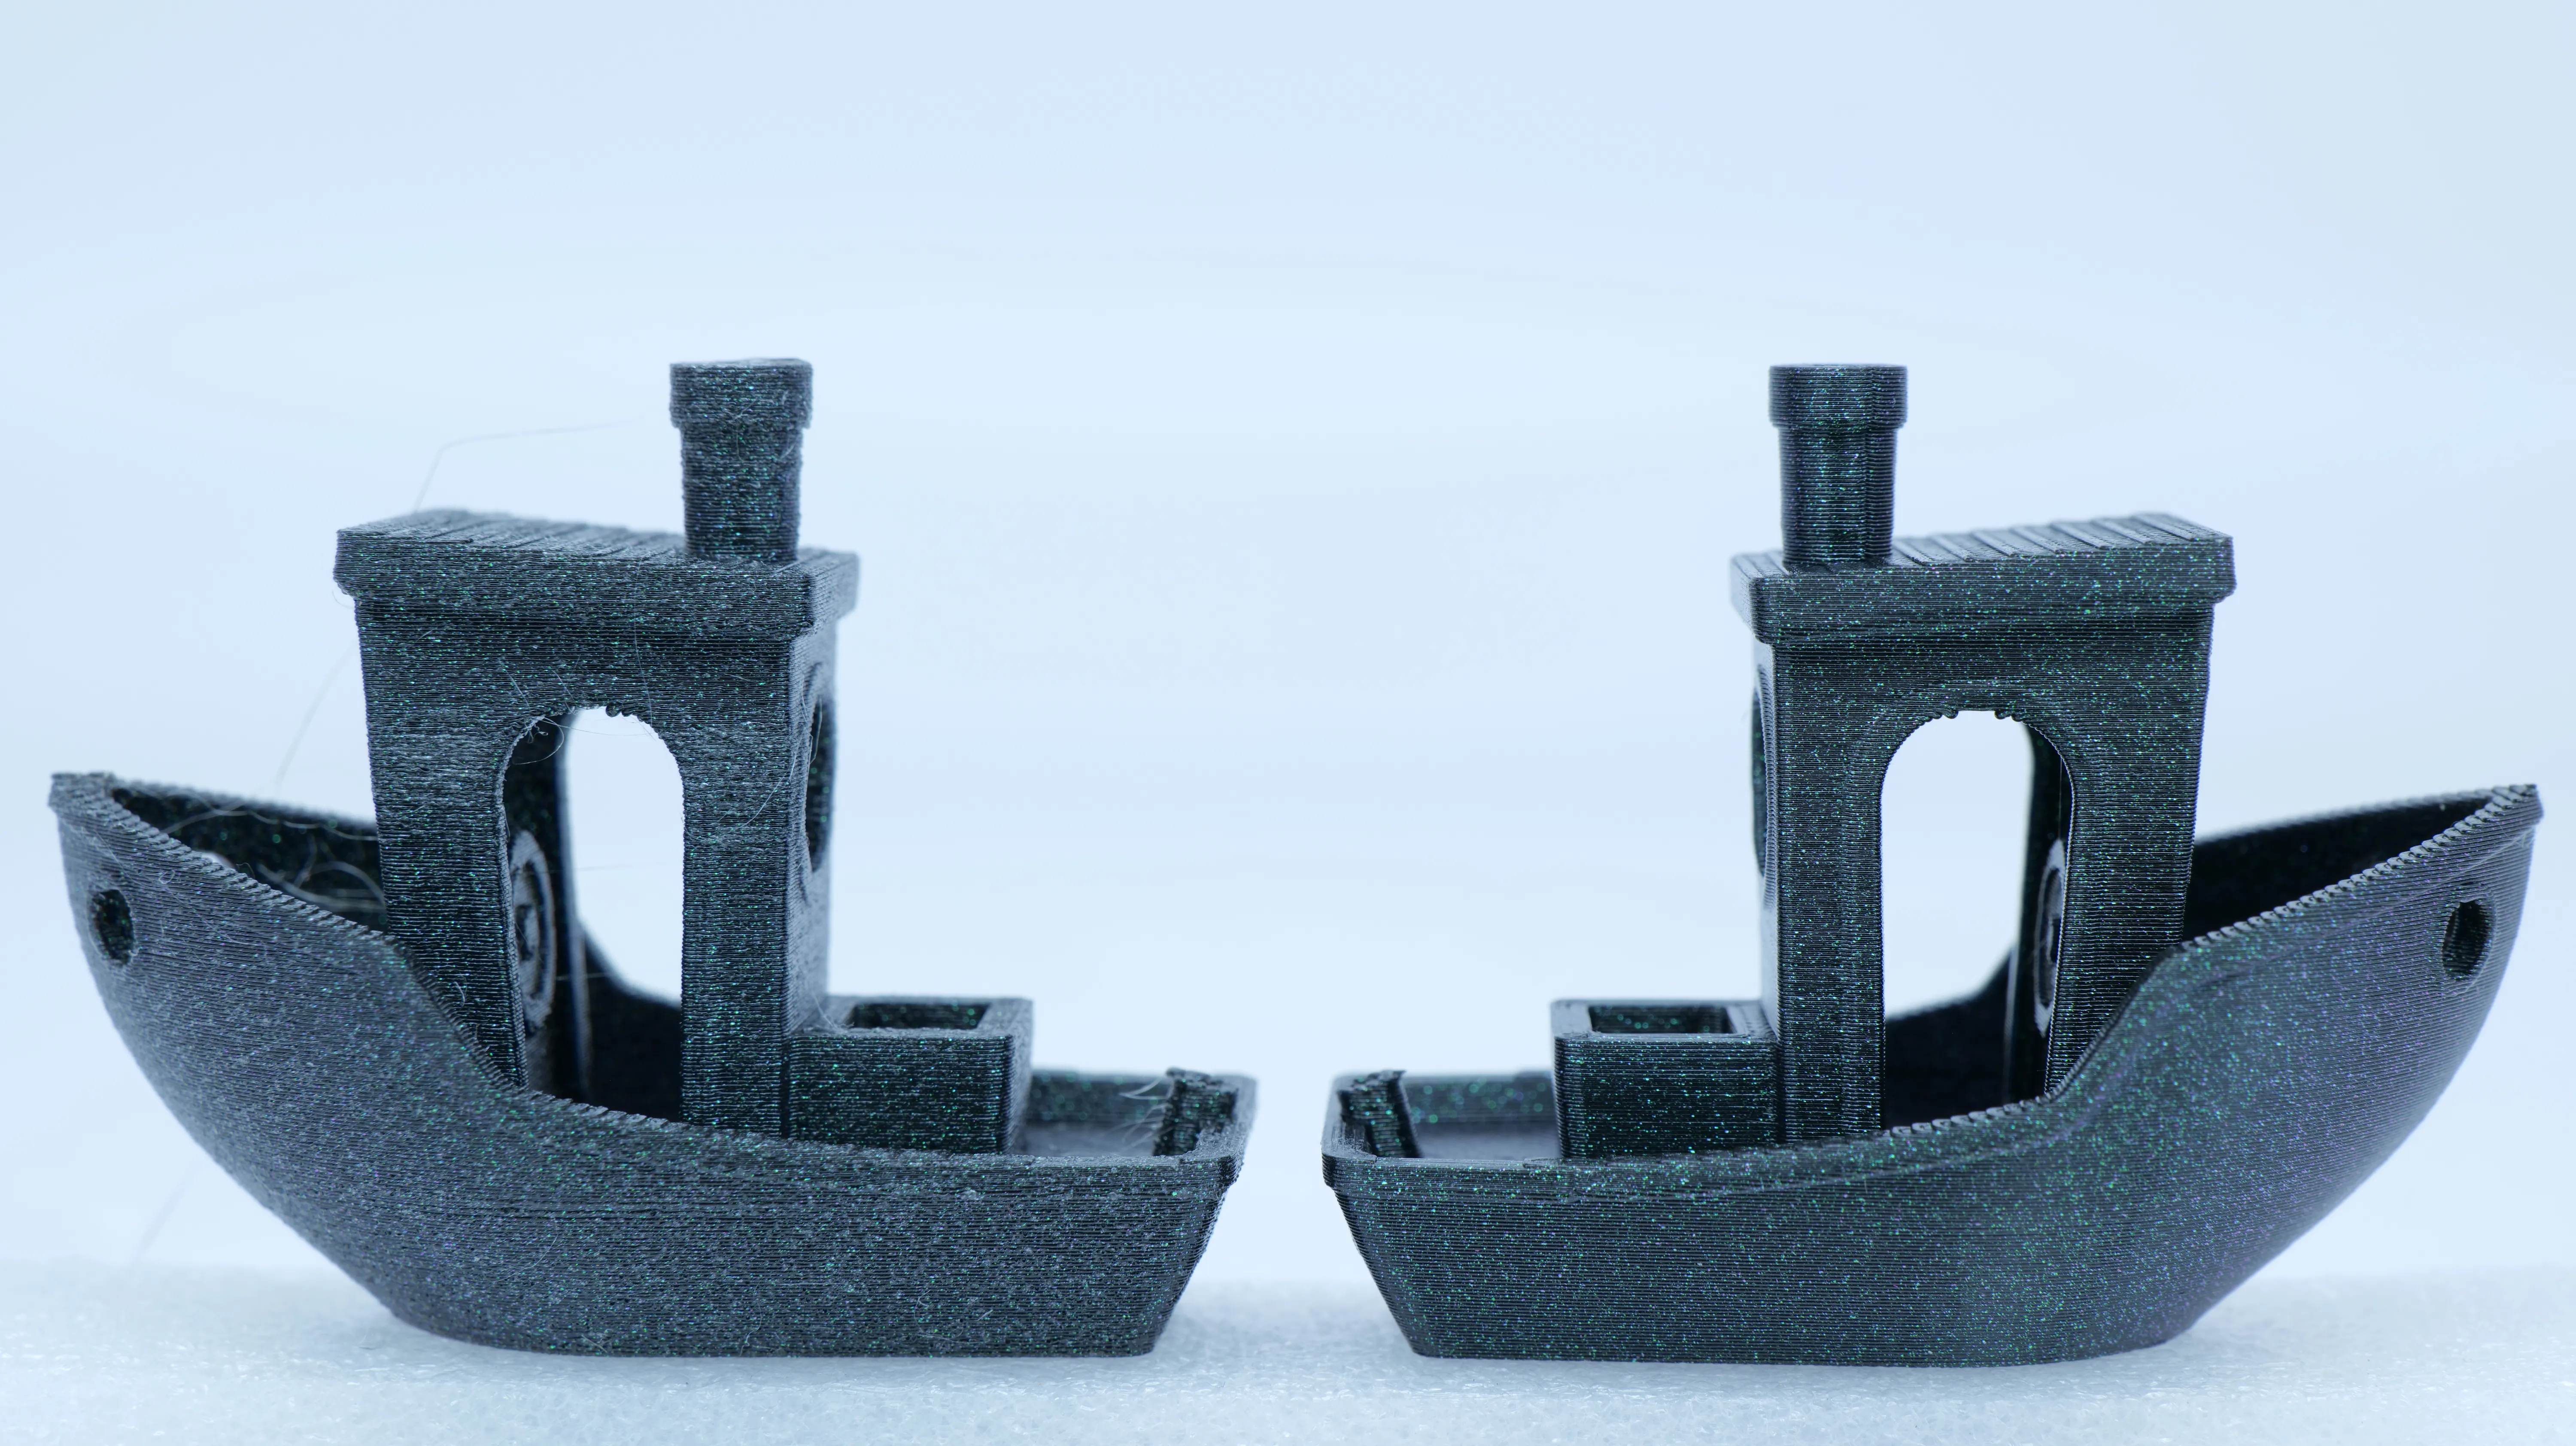
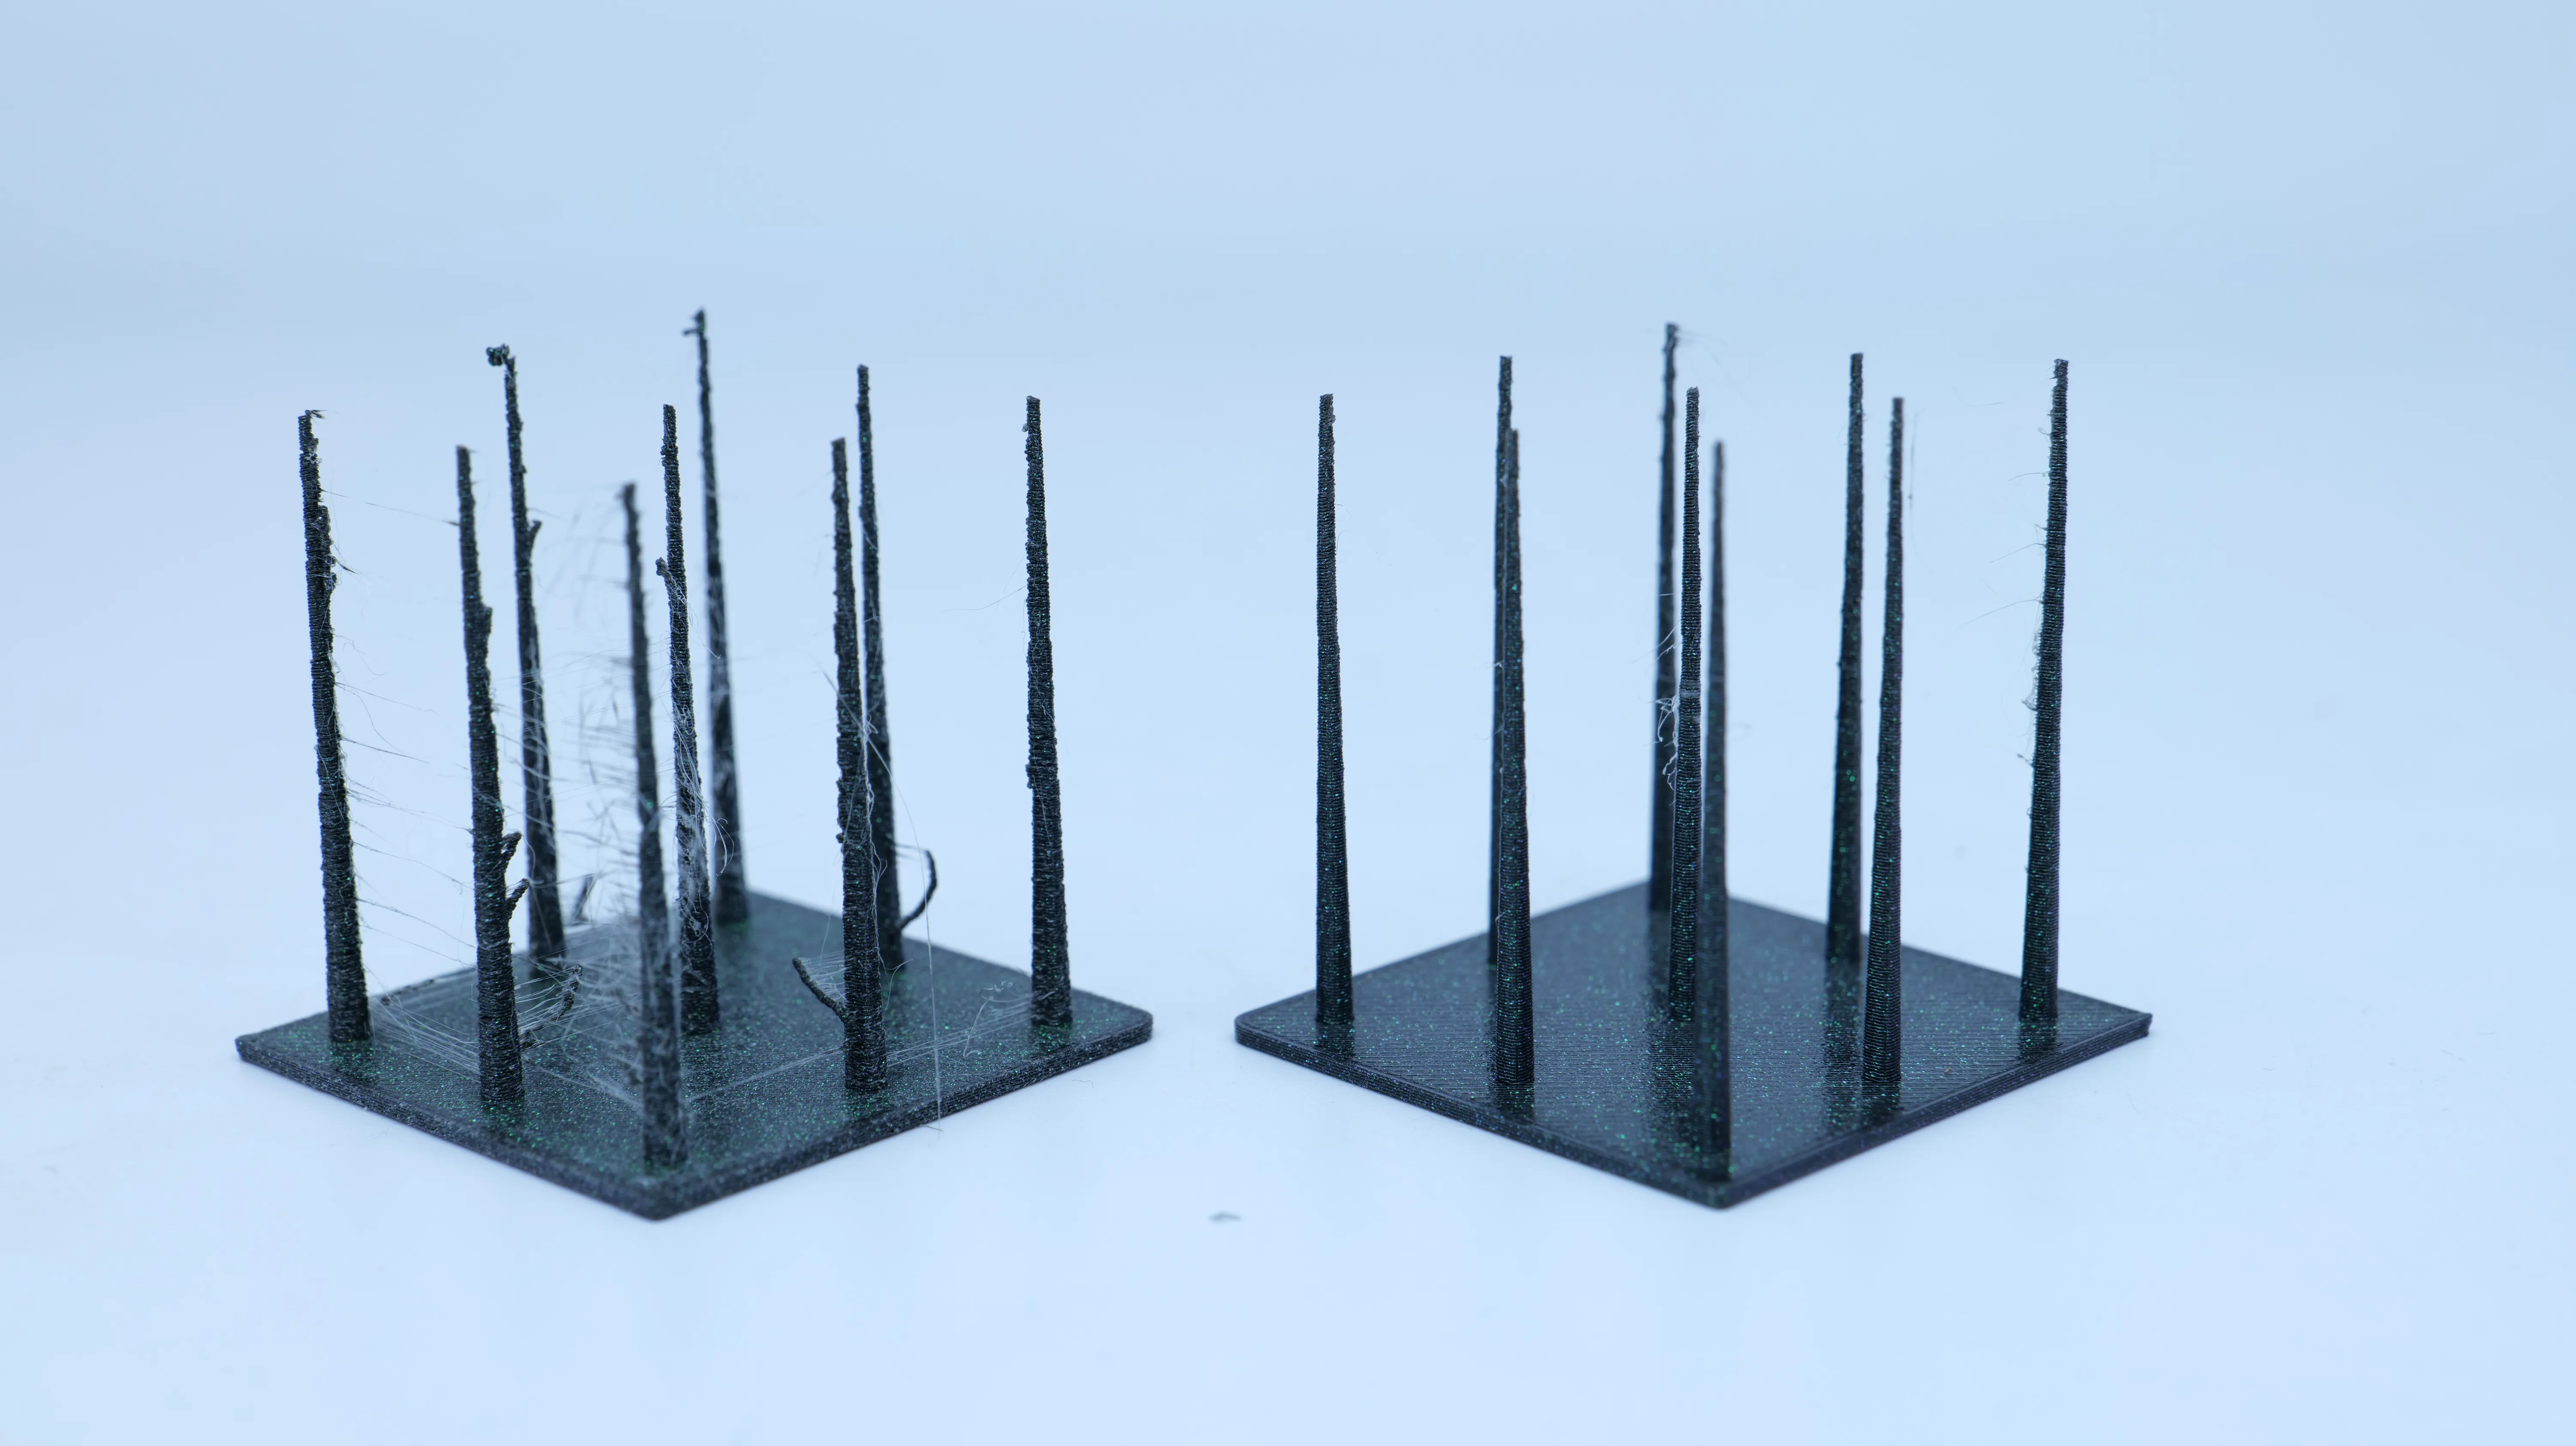
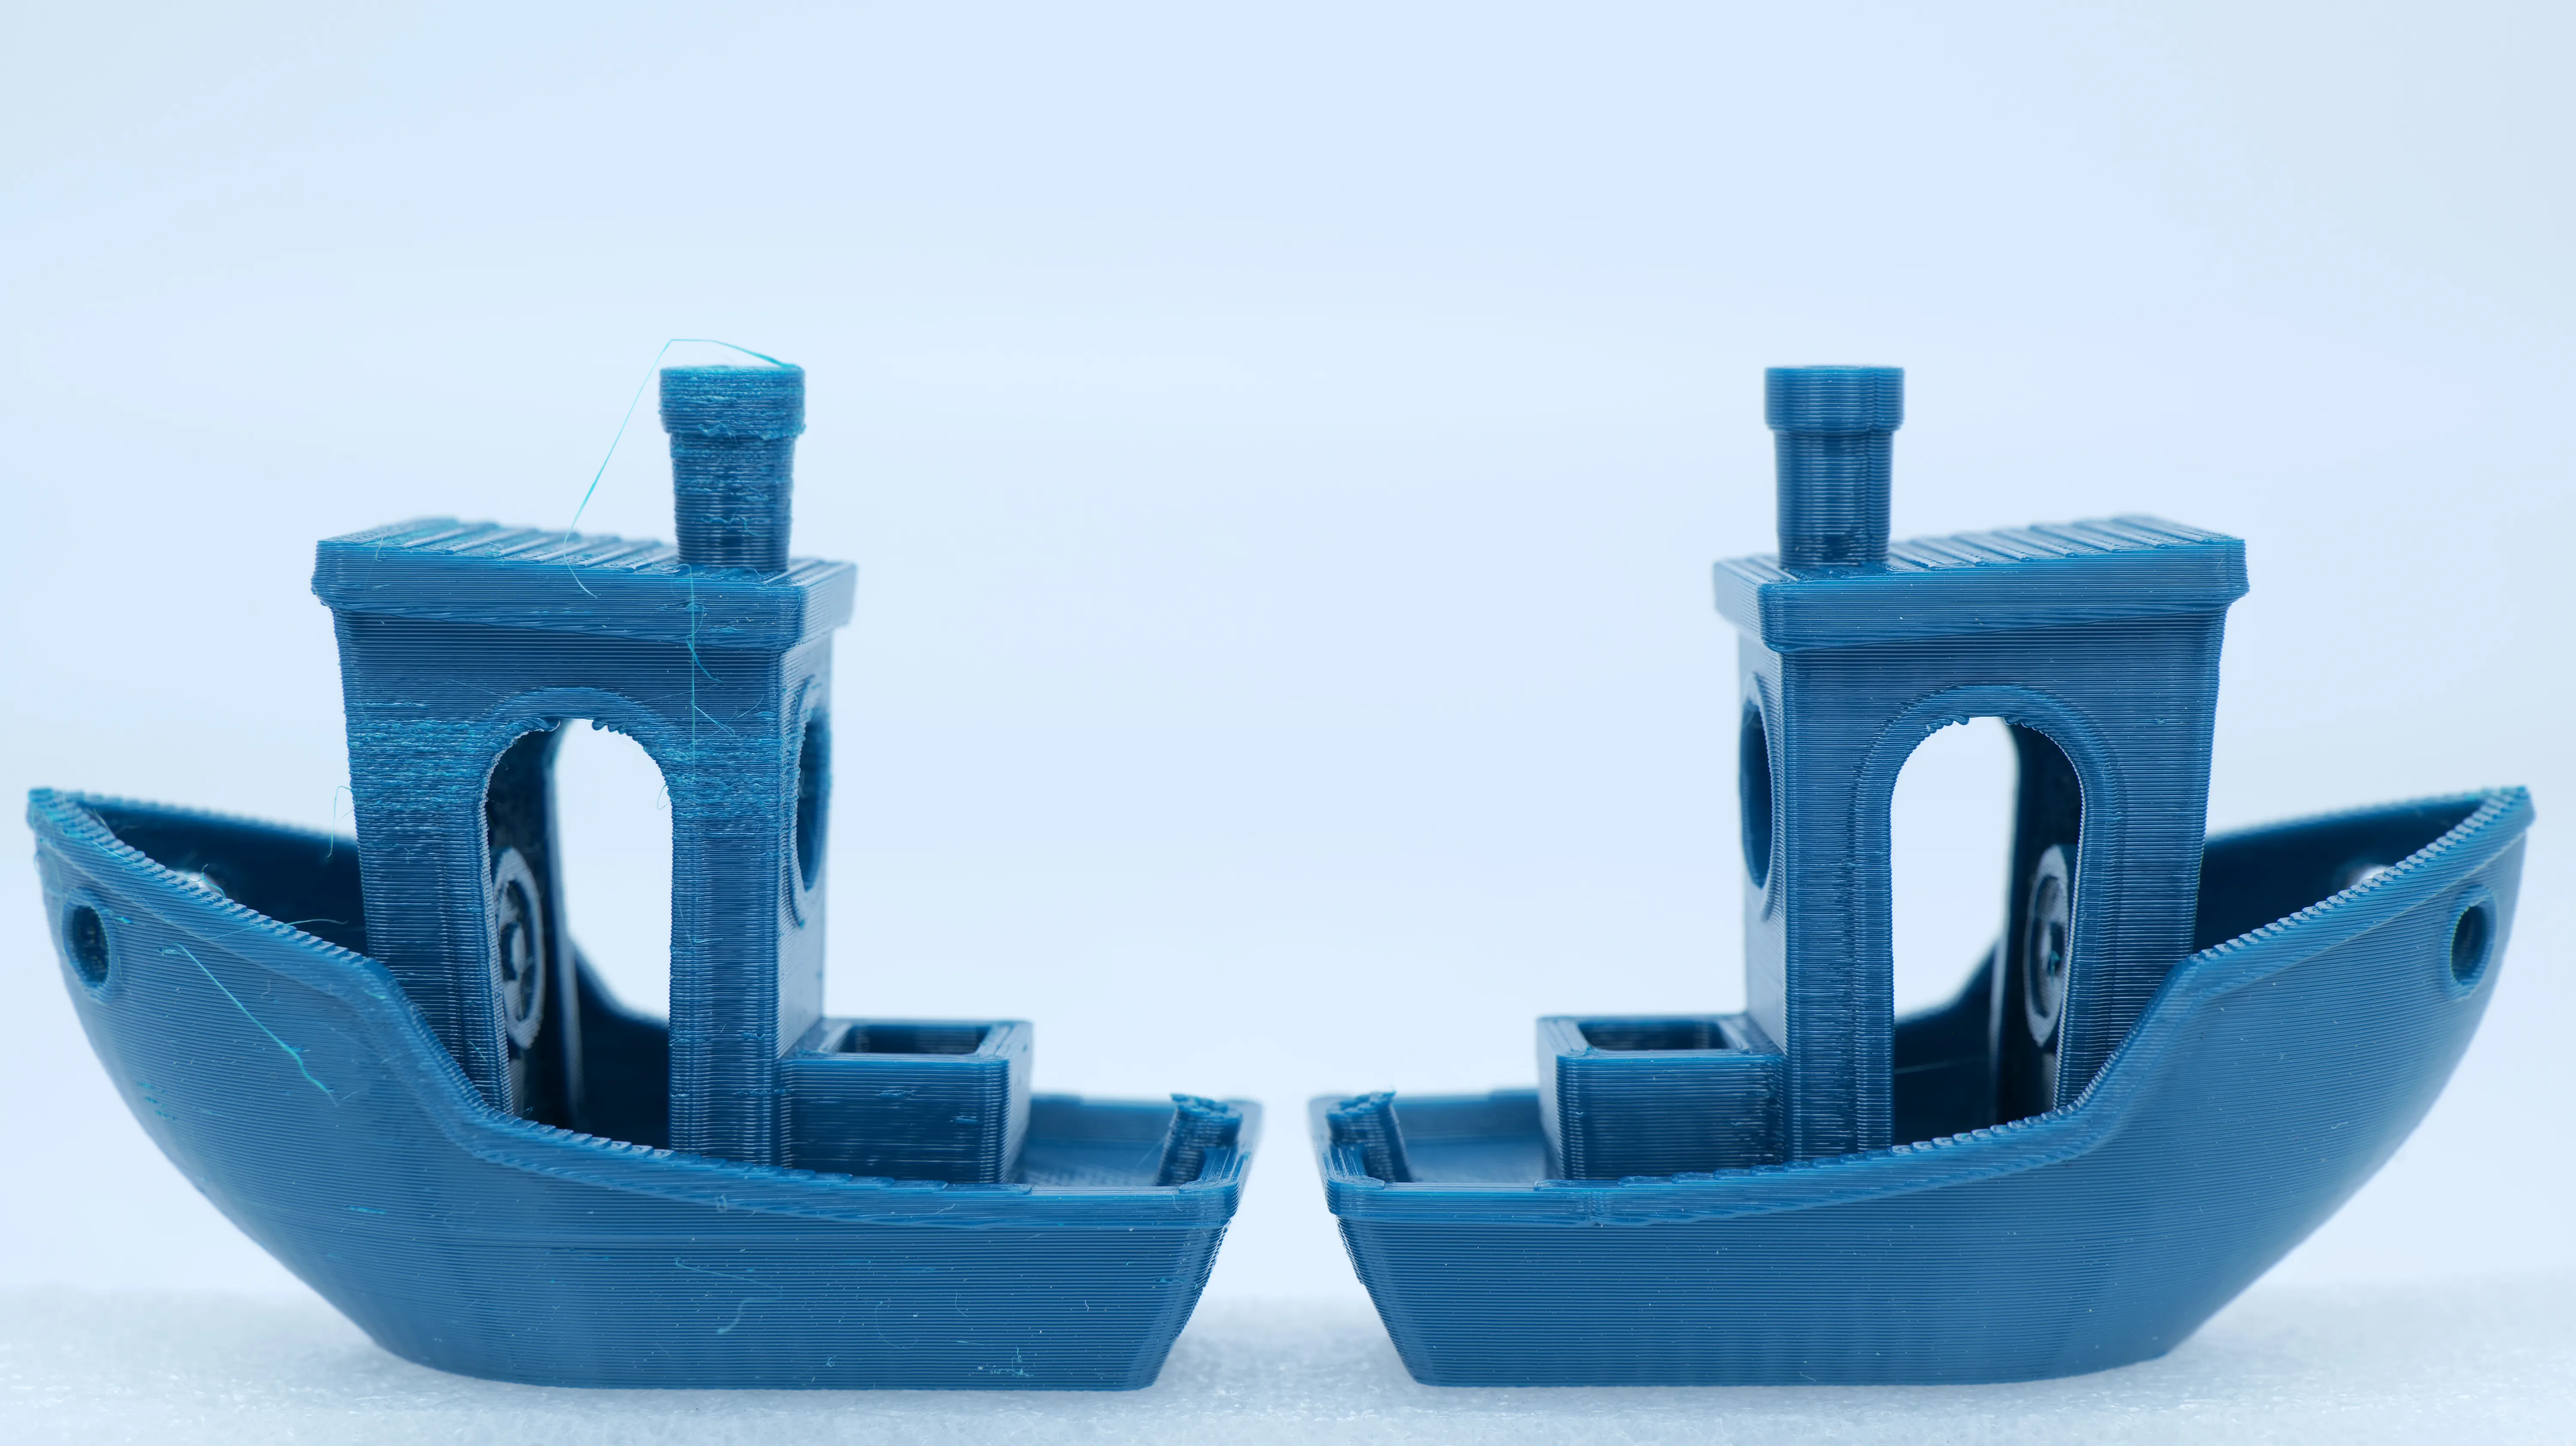
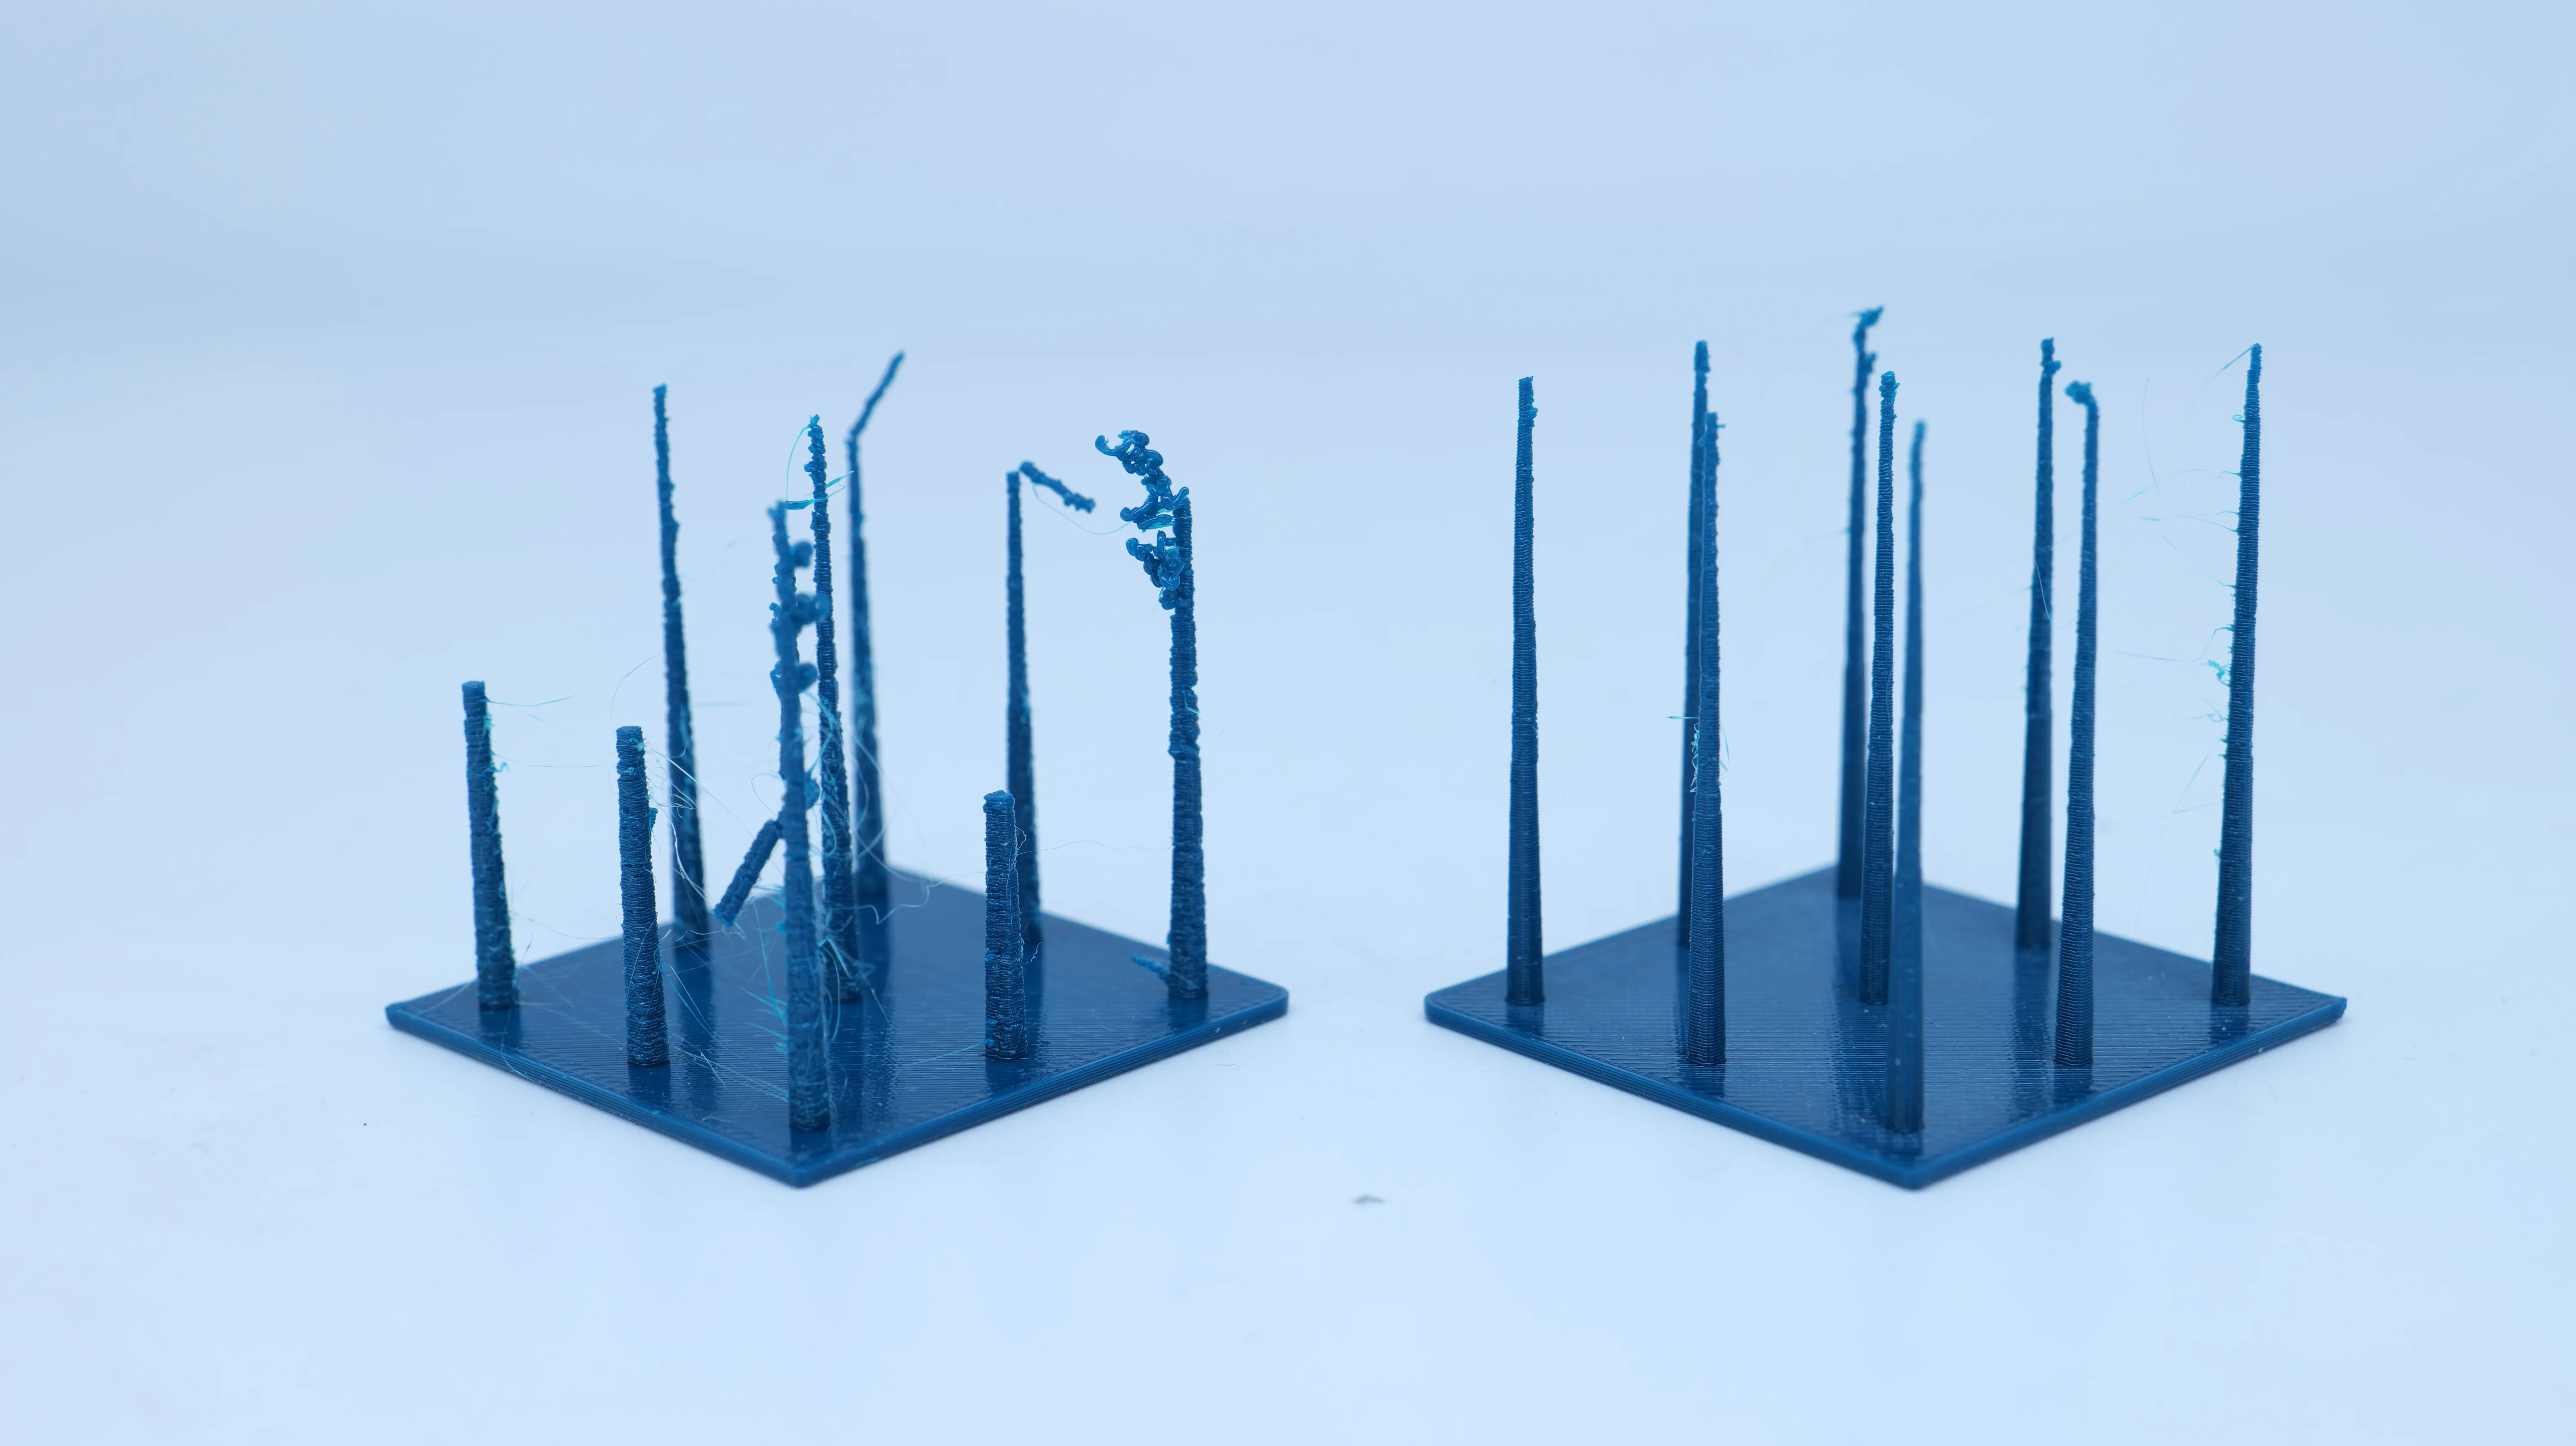
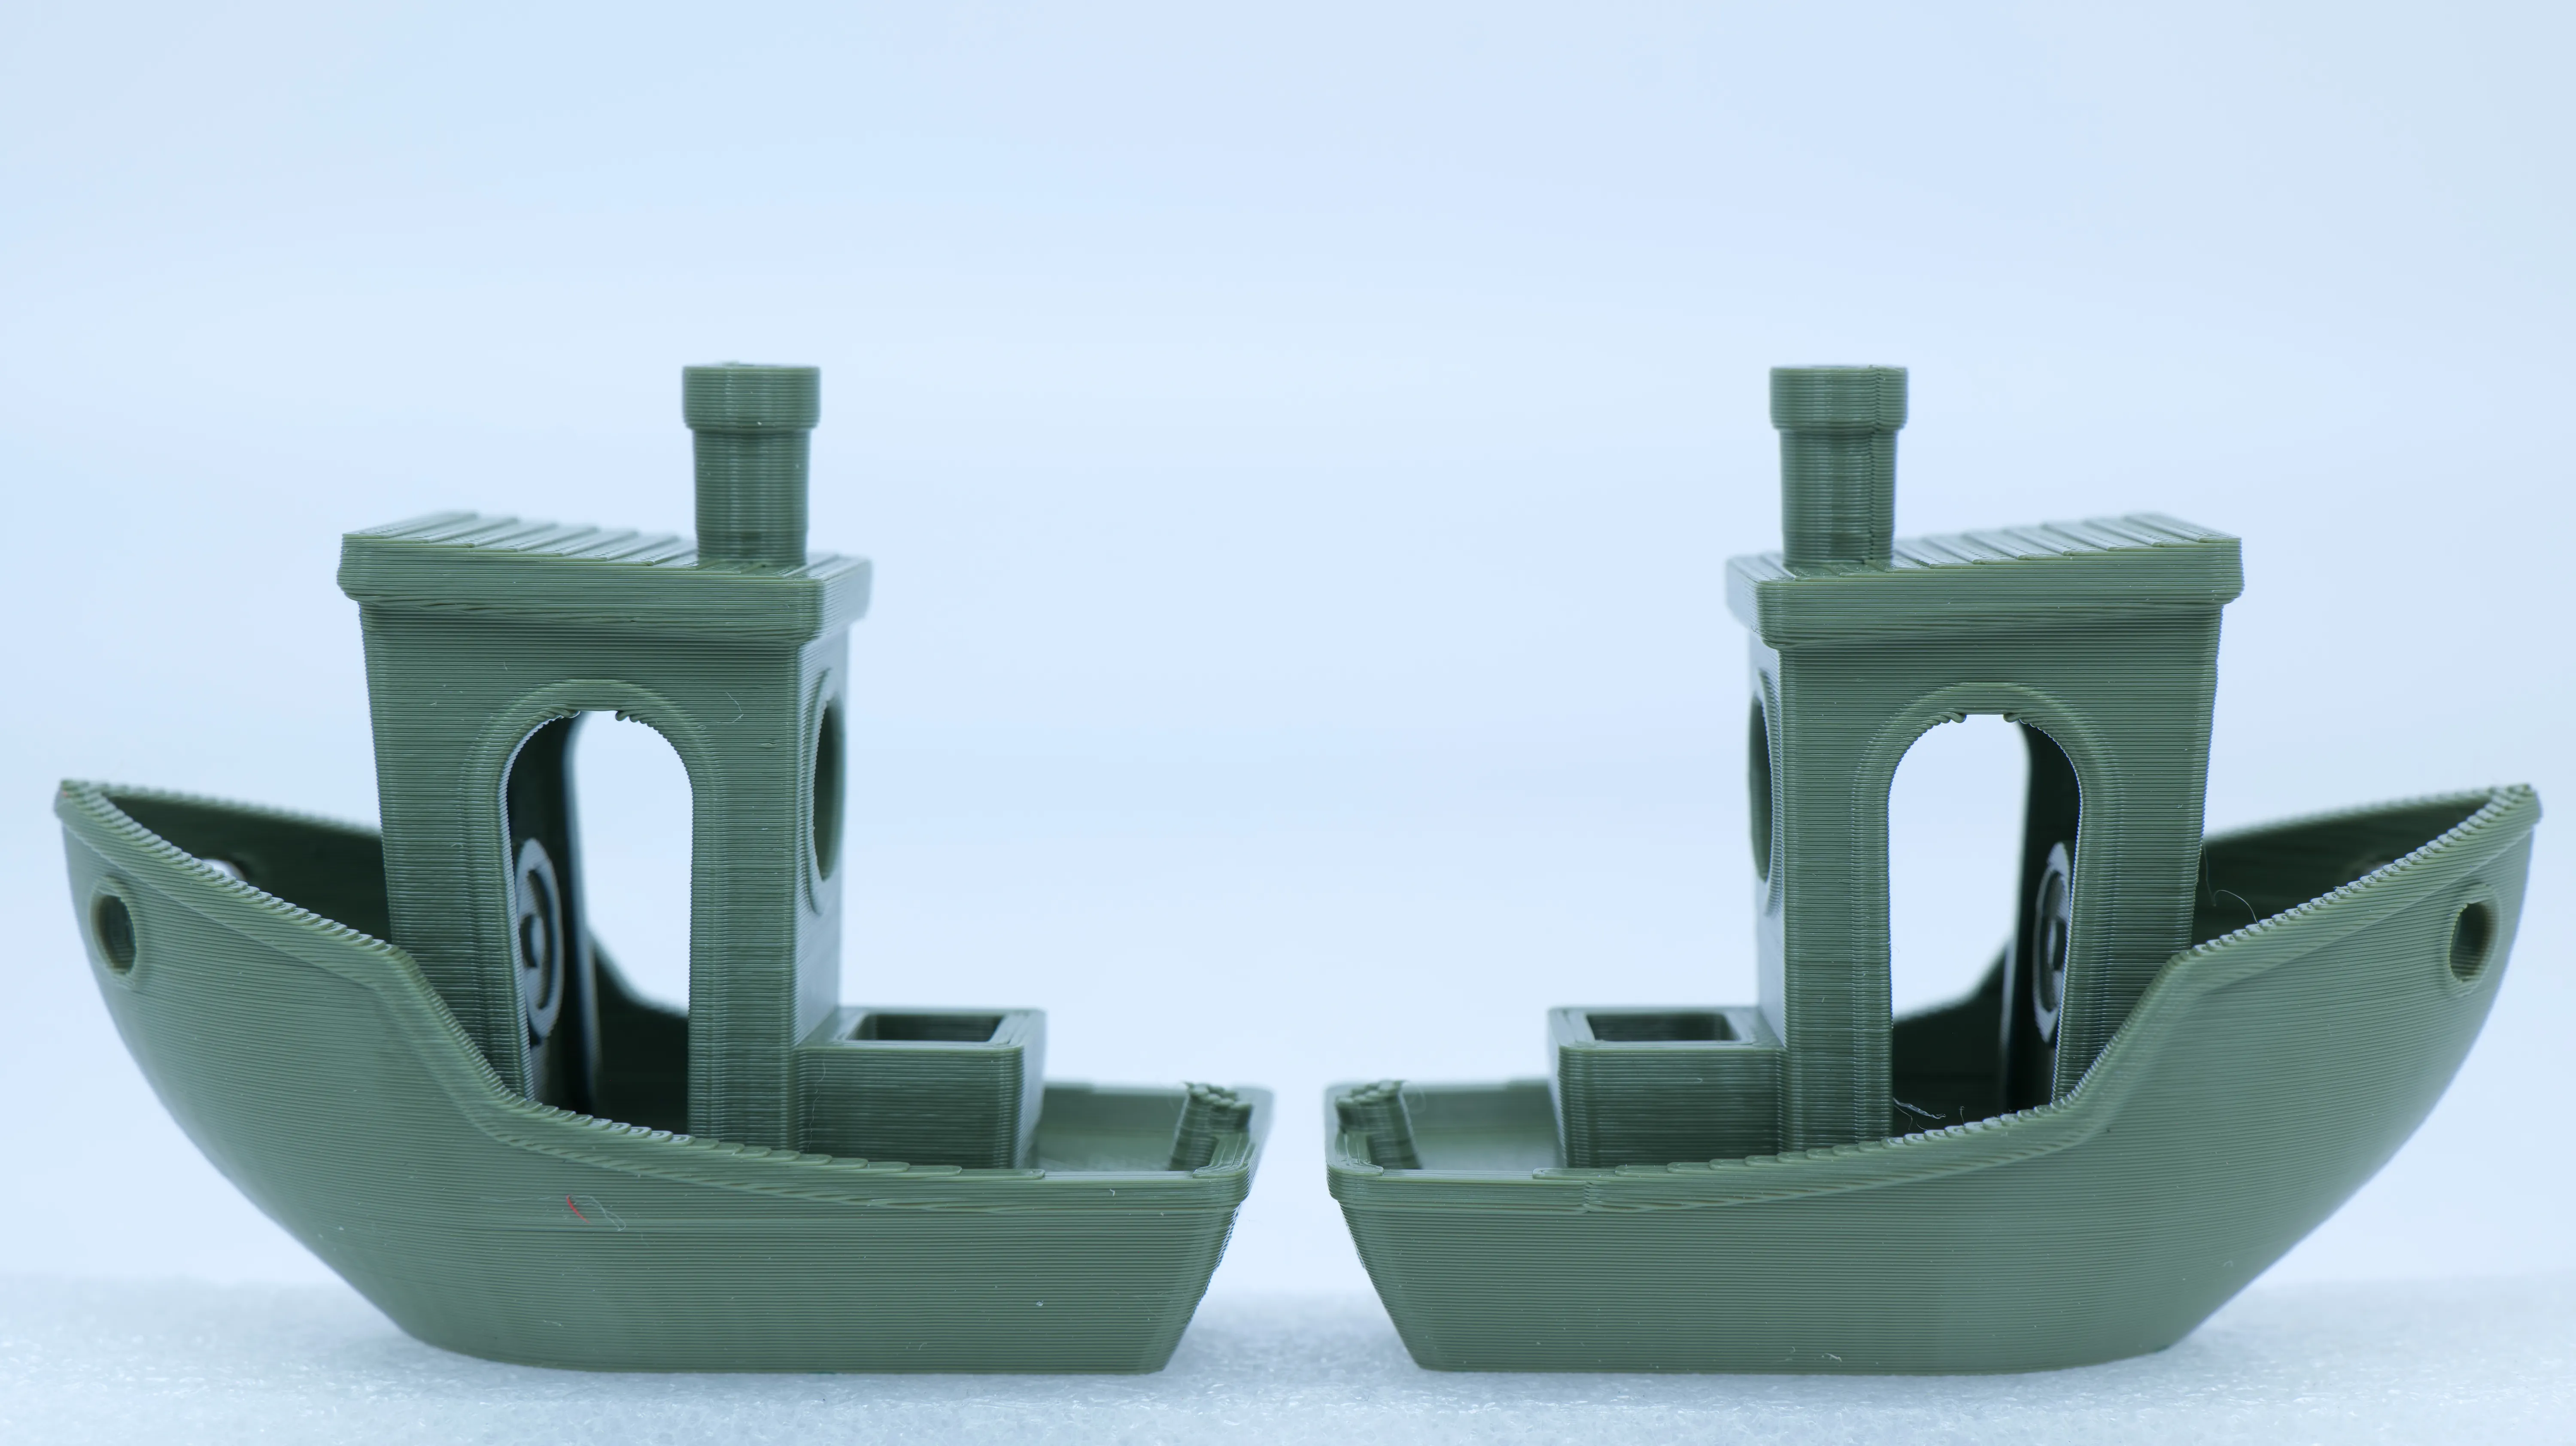
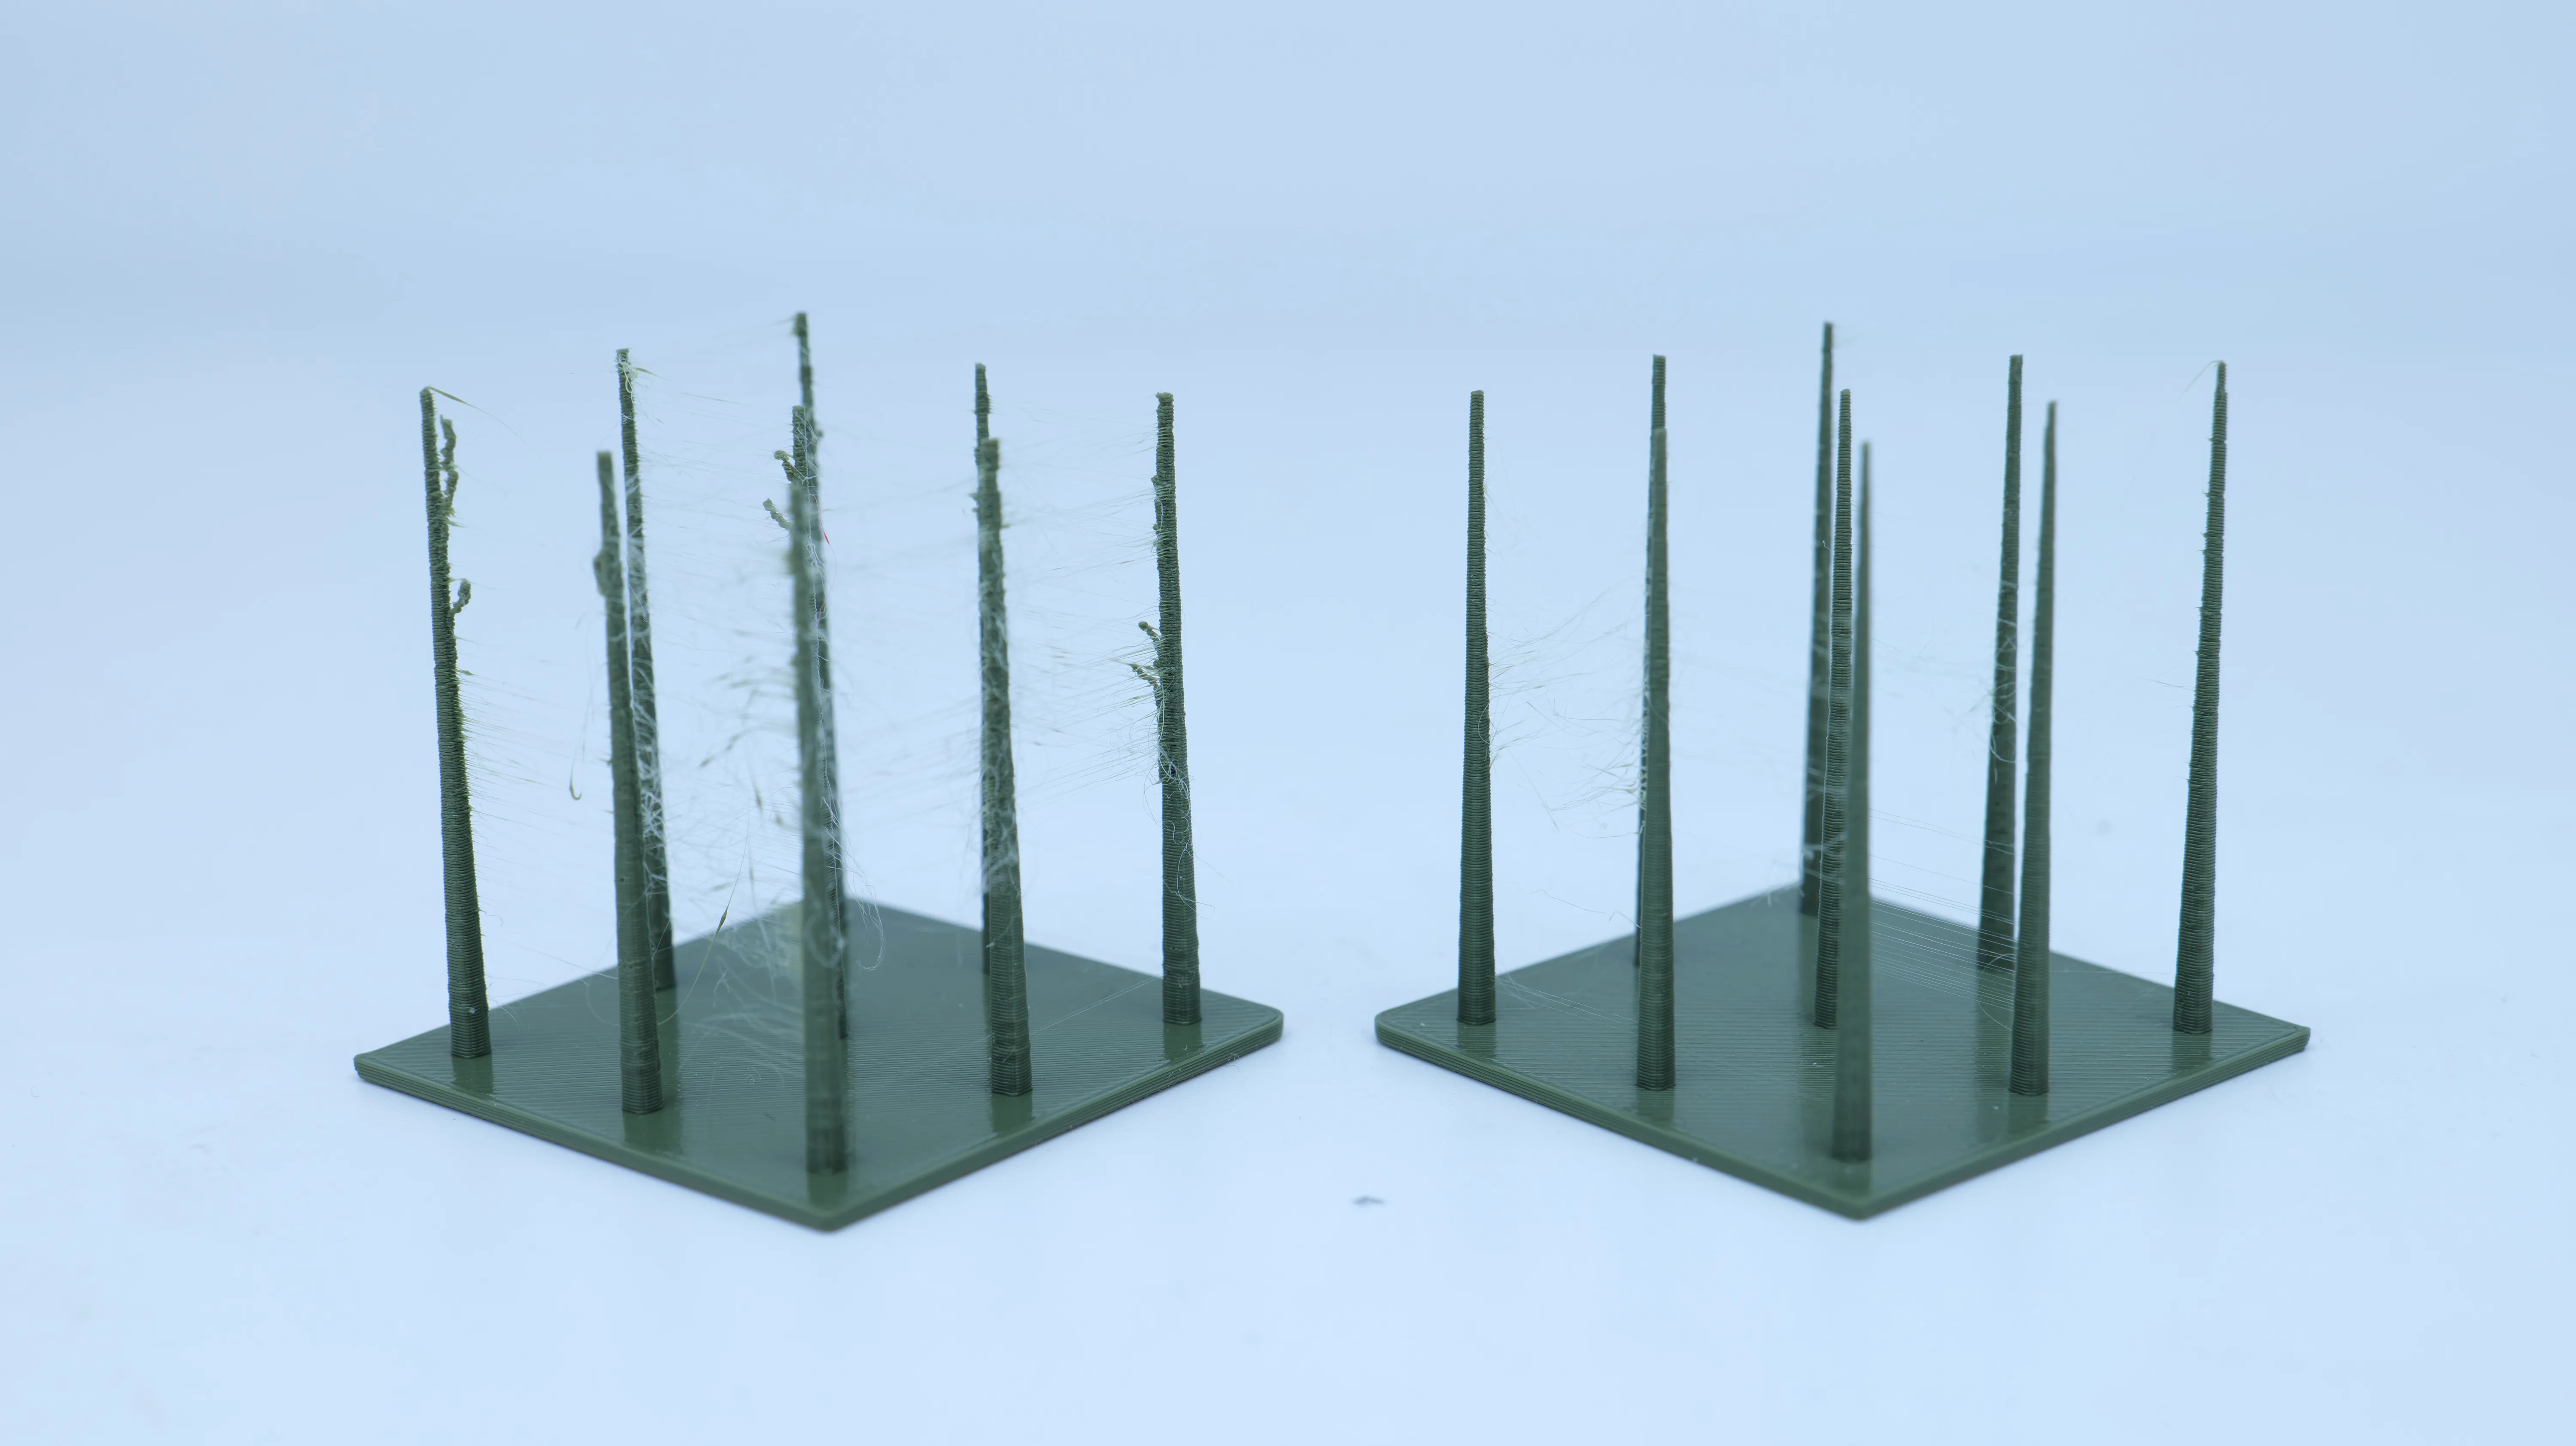
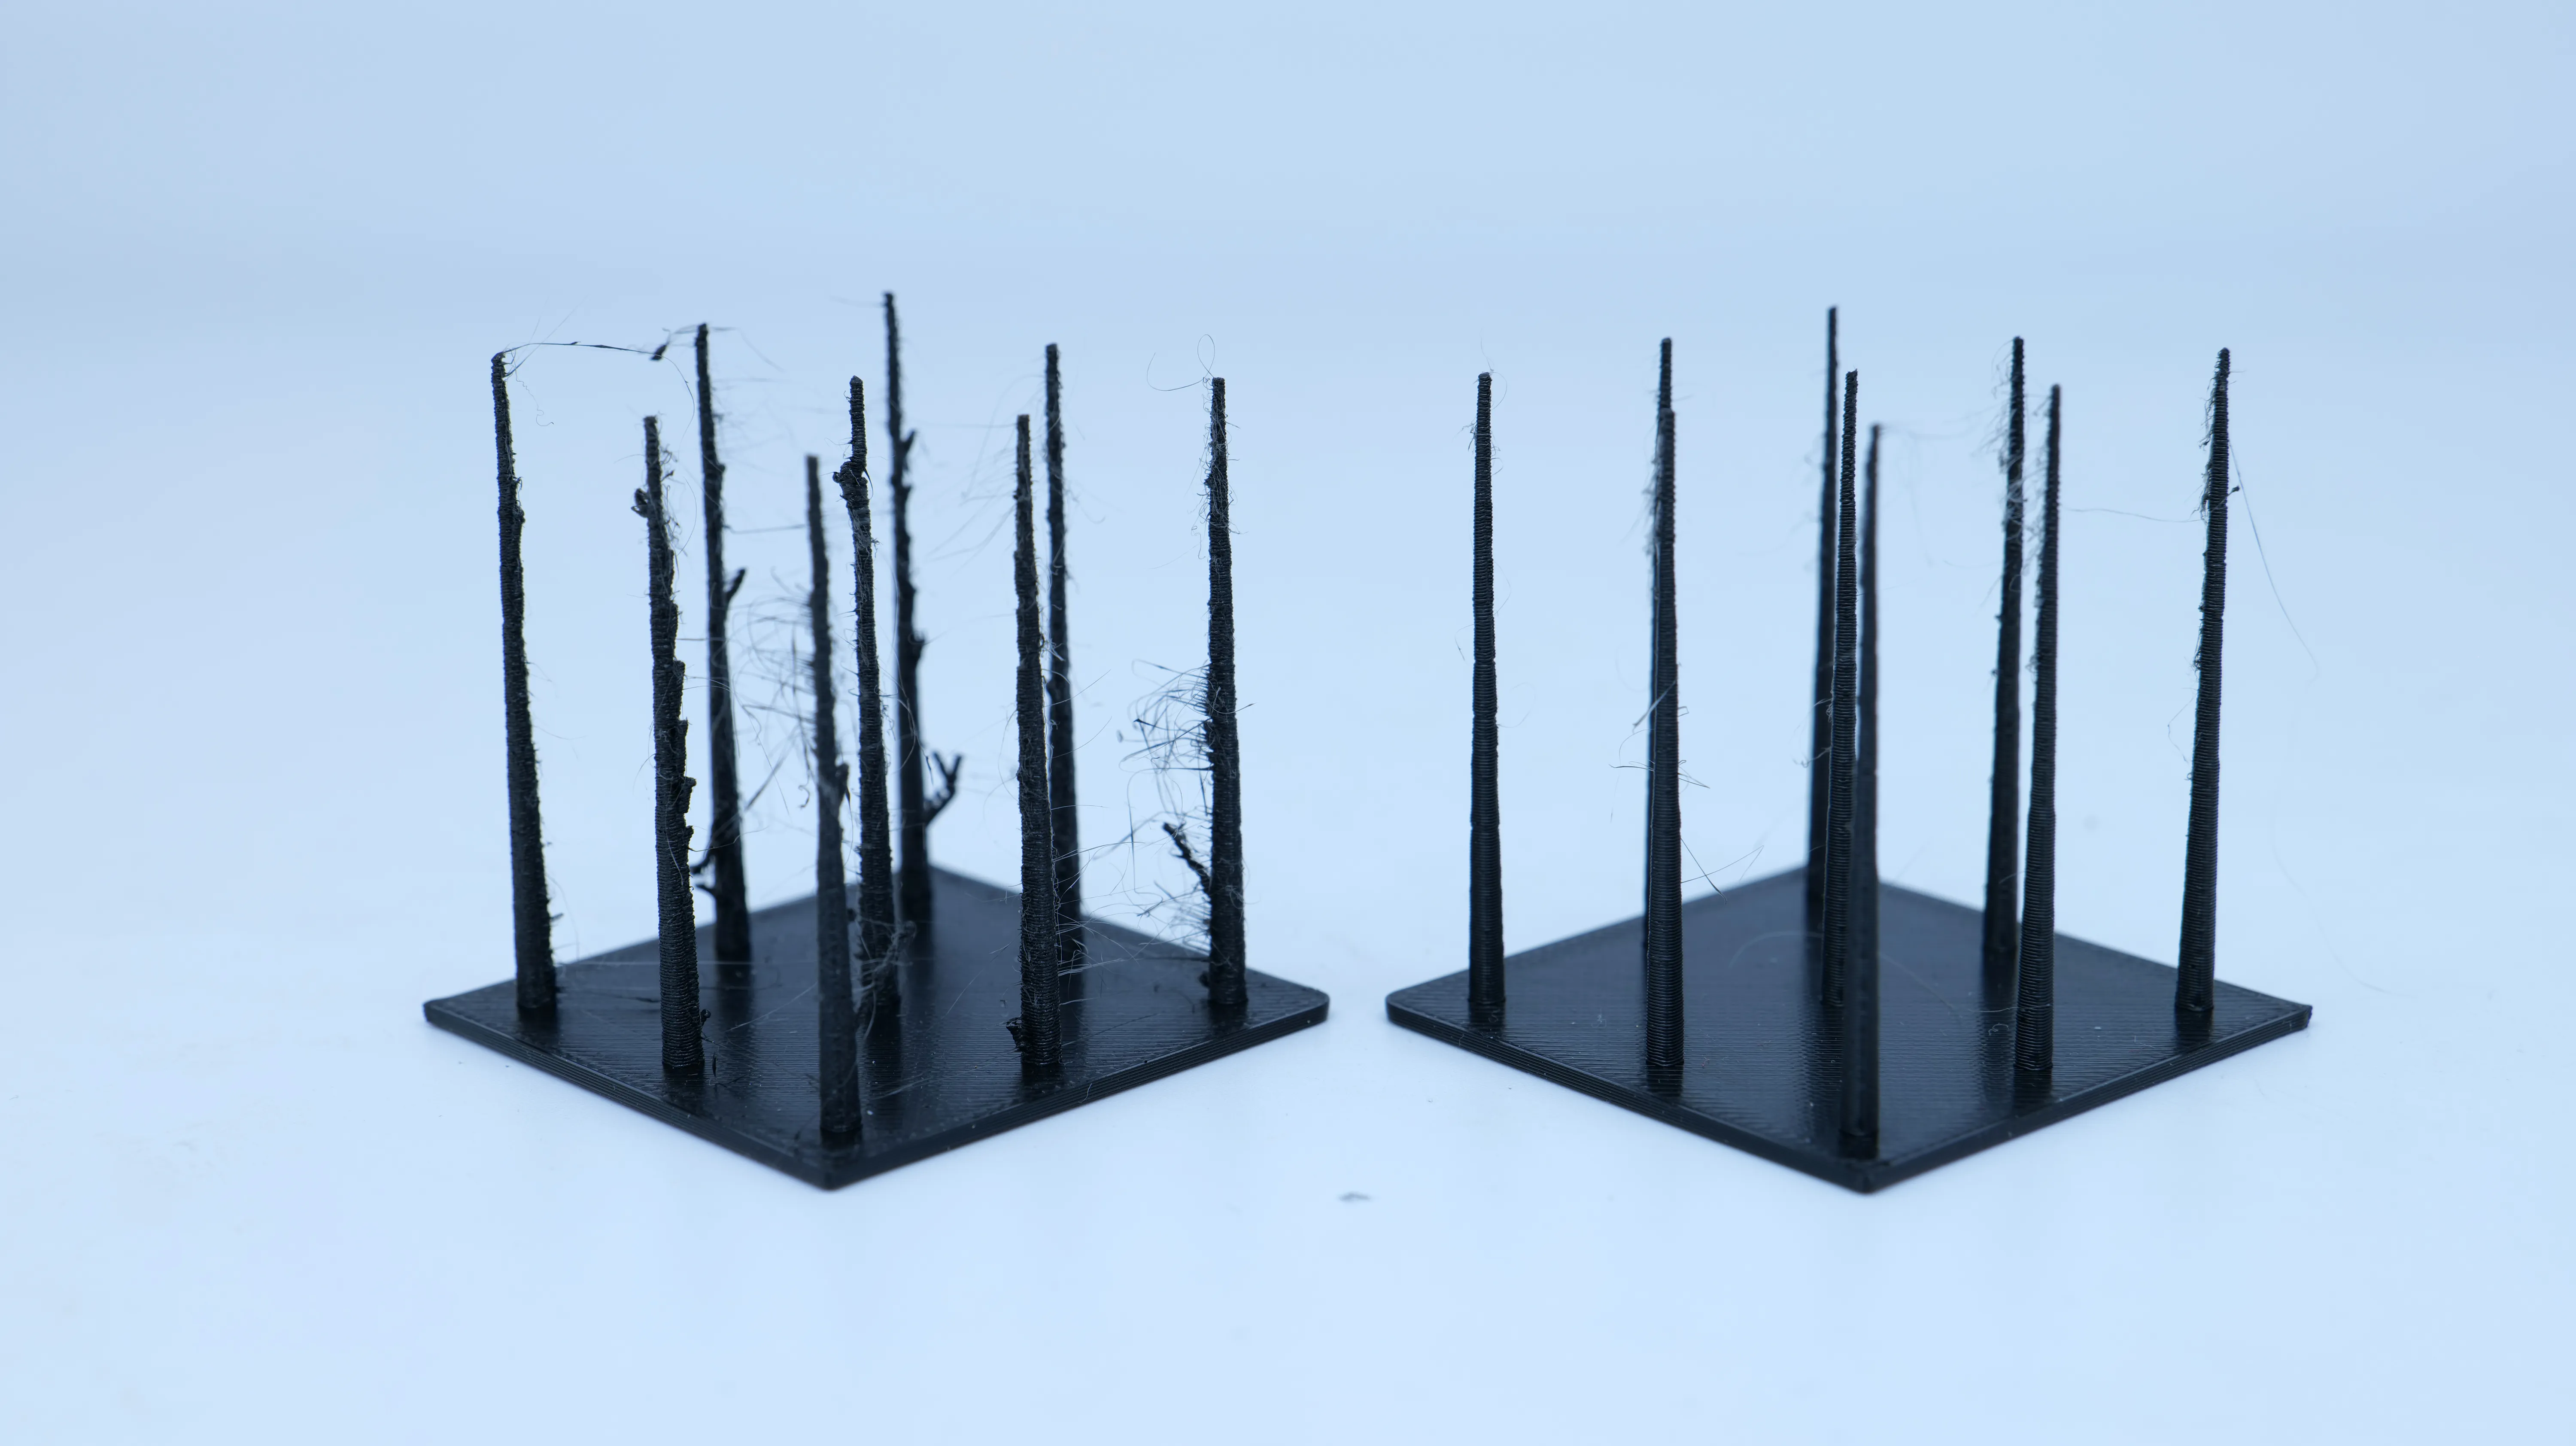
The ASA prints showed the same trend, with less stringing and a smoother surface on the parts printed from filament that had spent twelve days in the dehumidification cabinet.
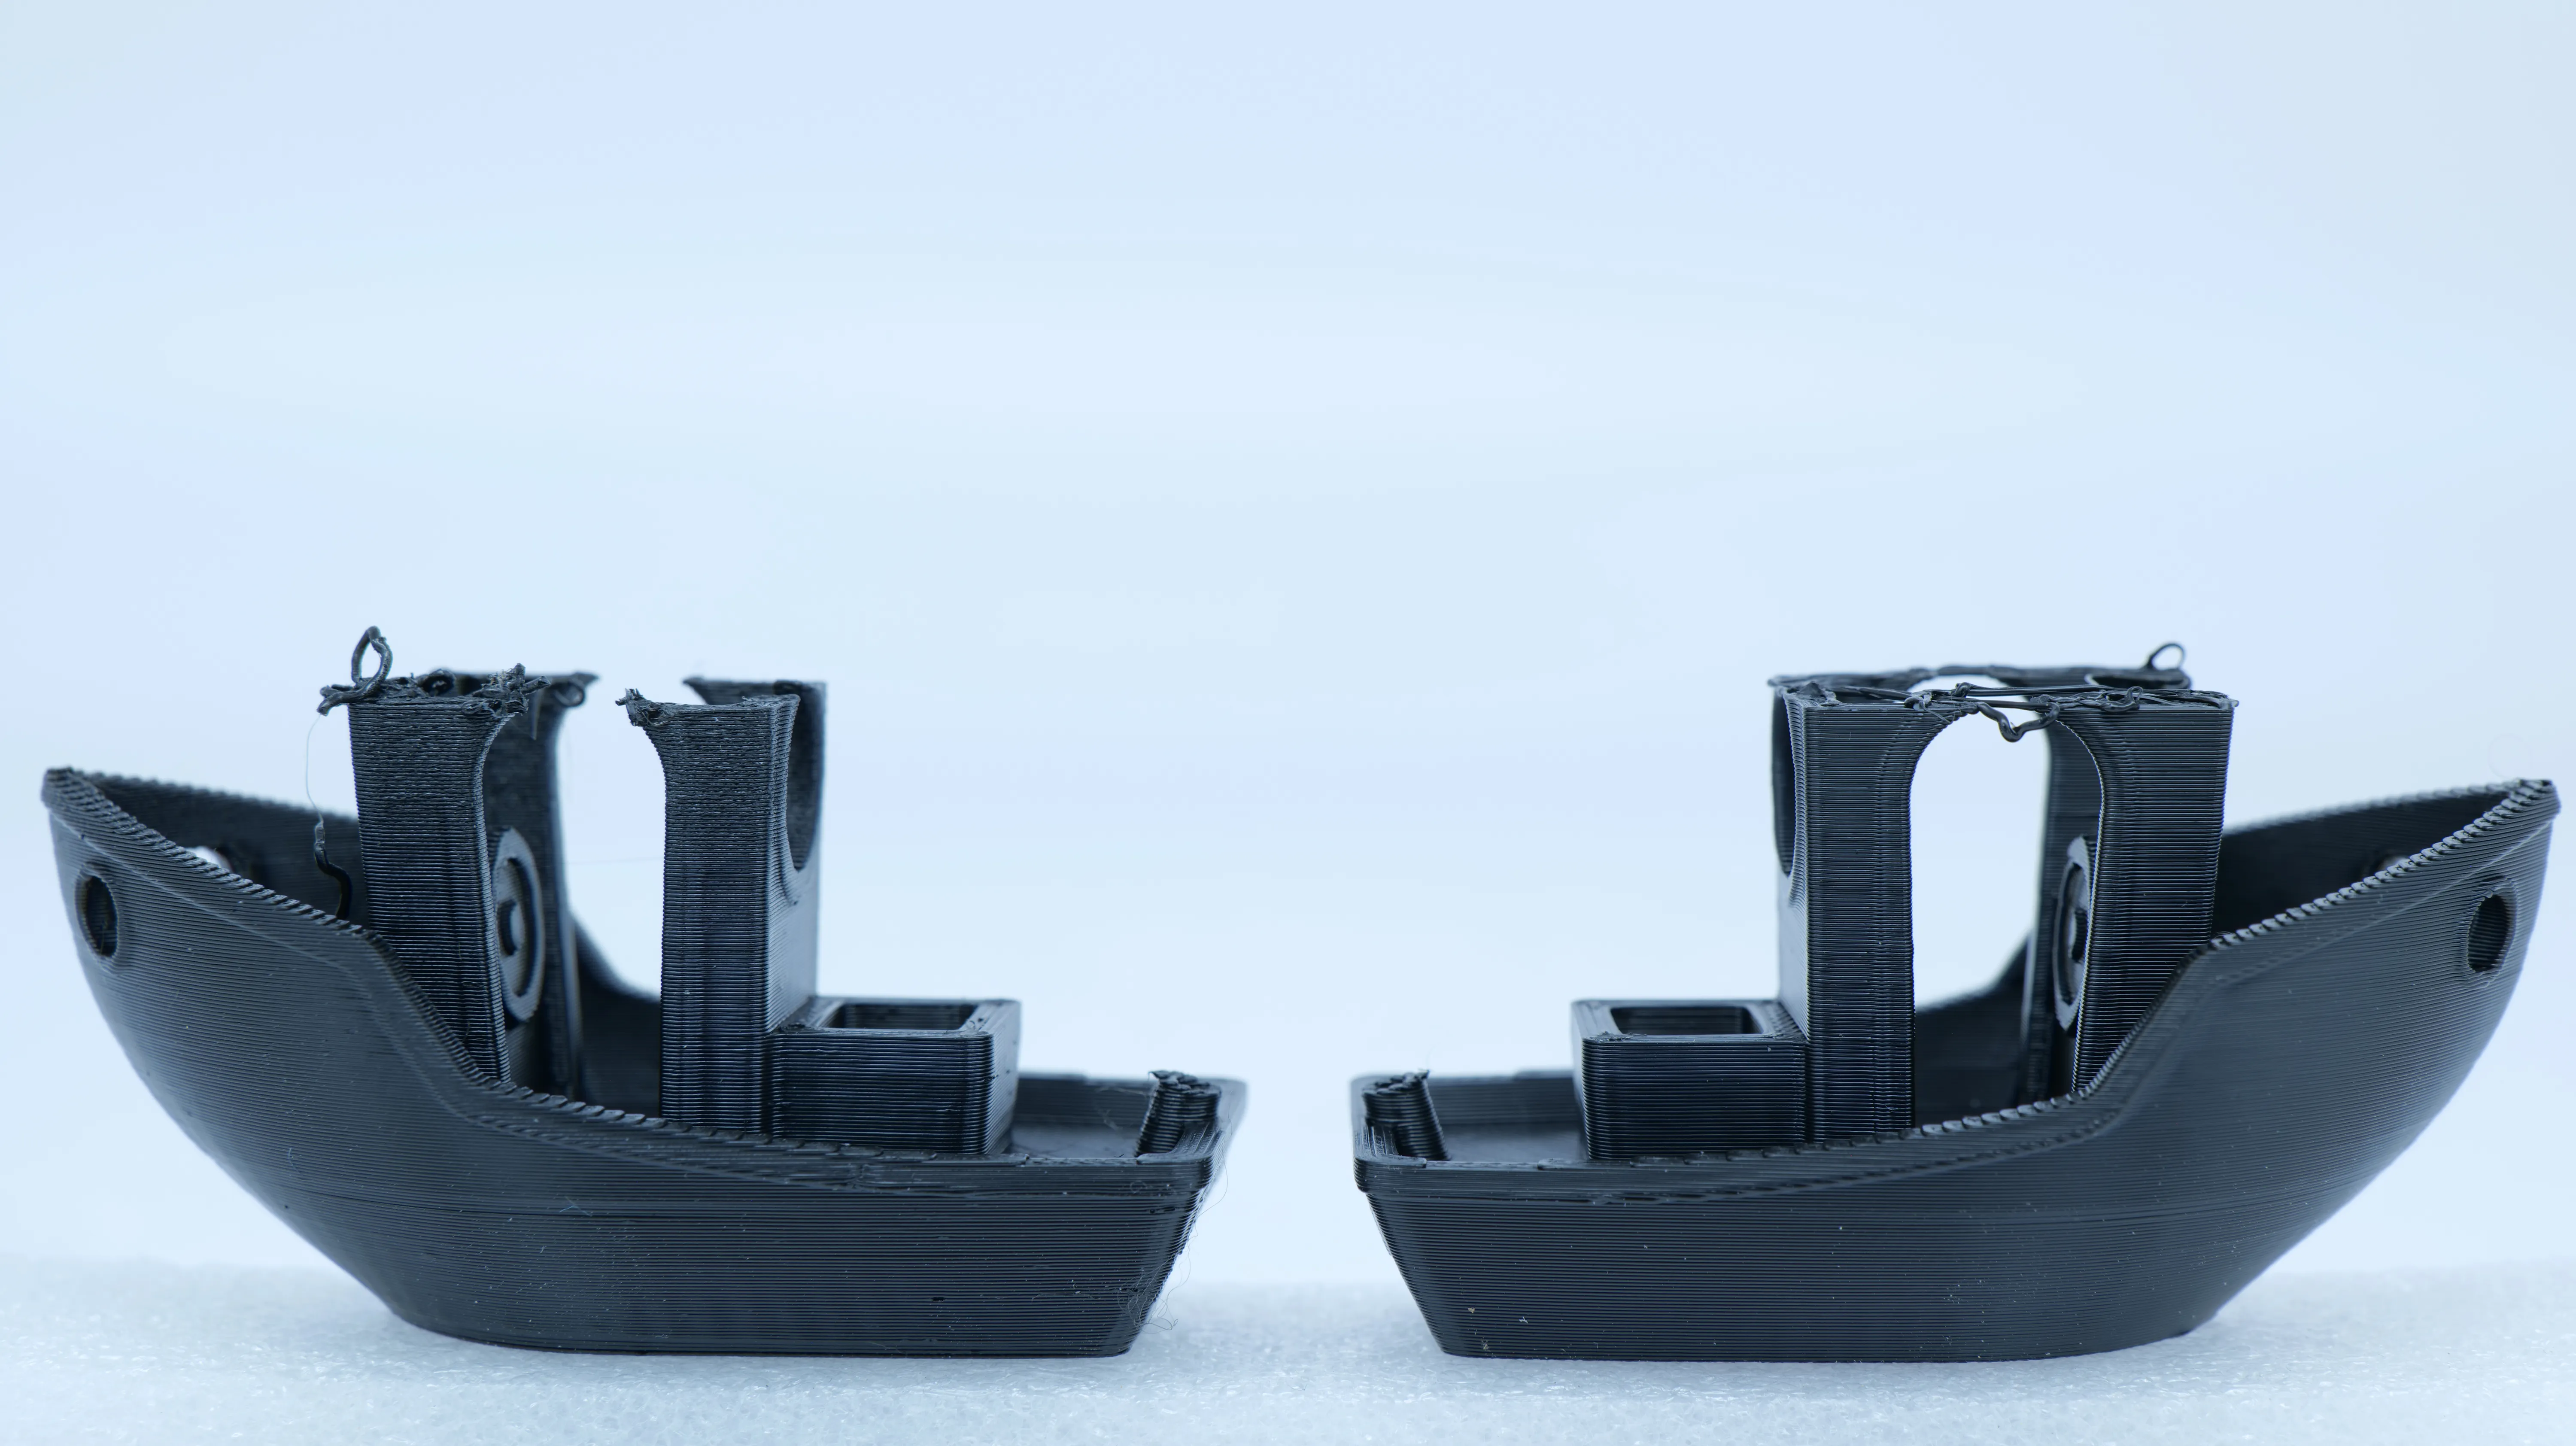 Stored outsideStored in the i10
Out of curiosity, I later also tested Prusa’s PC Blend because those spools didn’t fit into the cabinet during the first run. They stayed inside for seven days and also showed better surface quality than the filament that had simply been sitting on my storage racks. The carbon-fiber version, which is even more susceptible to moisture, printed flawlessly as well.
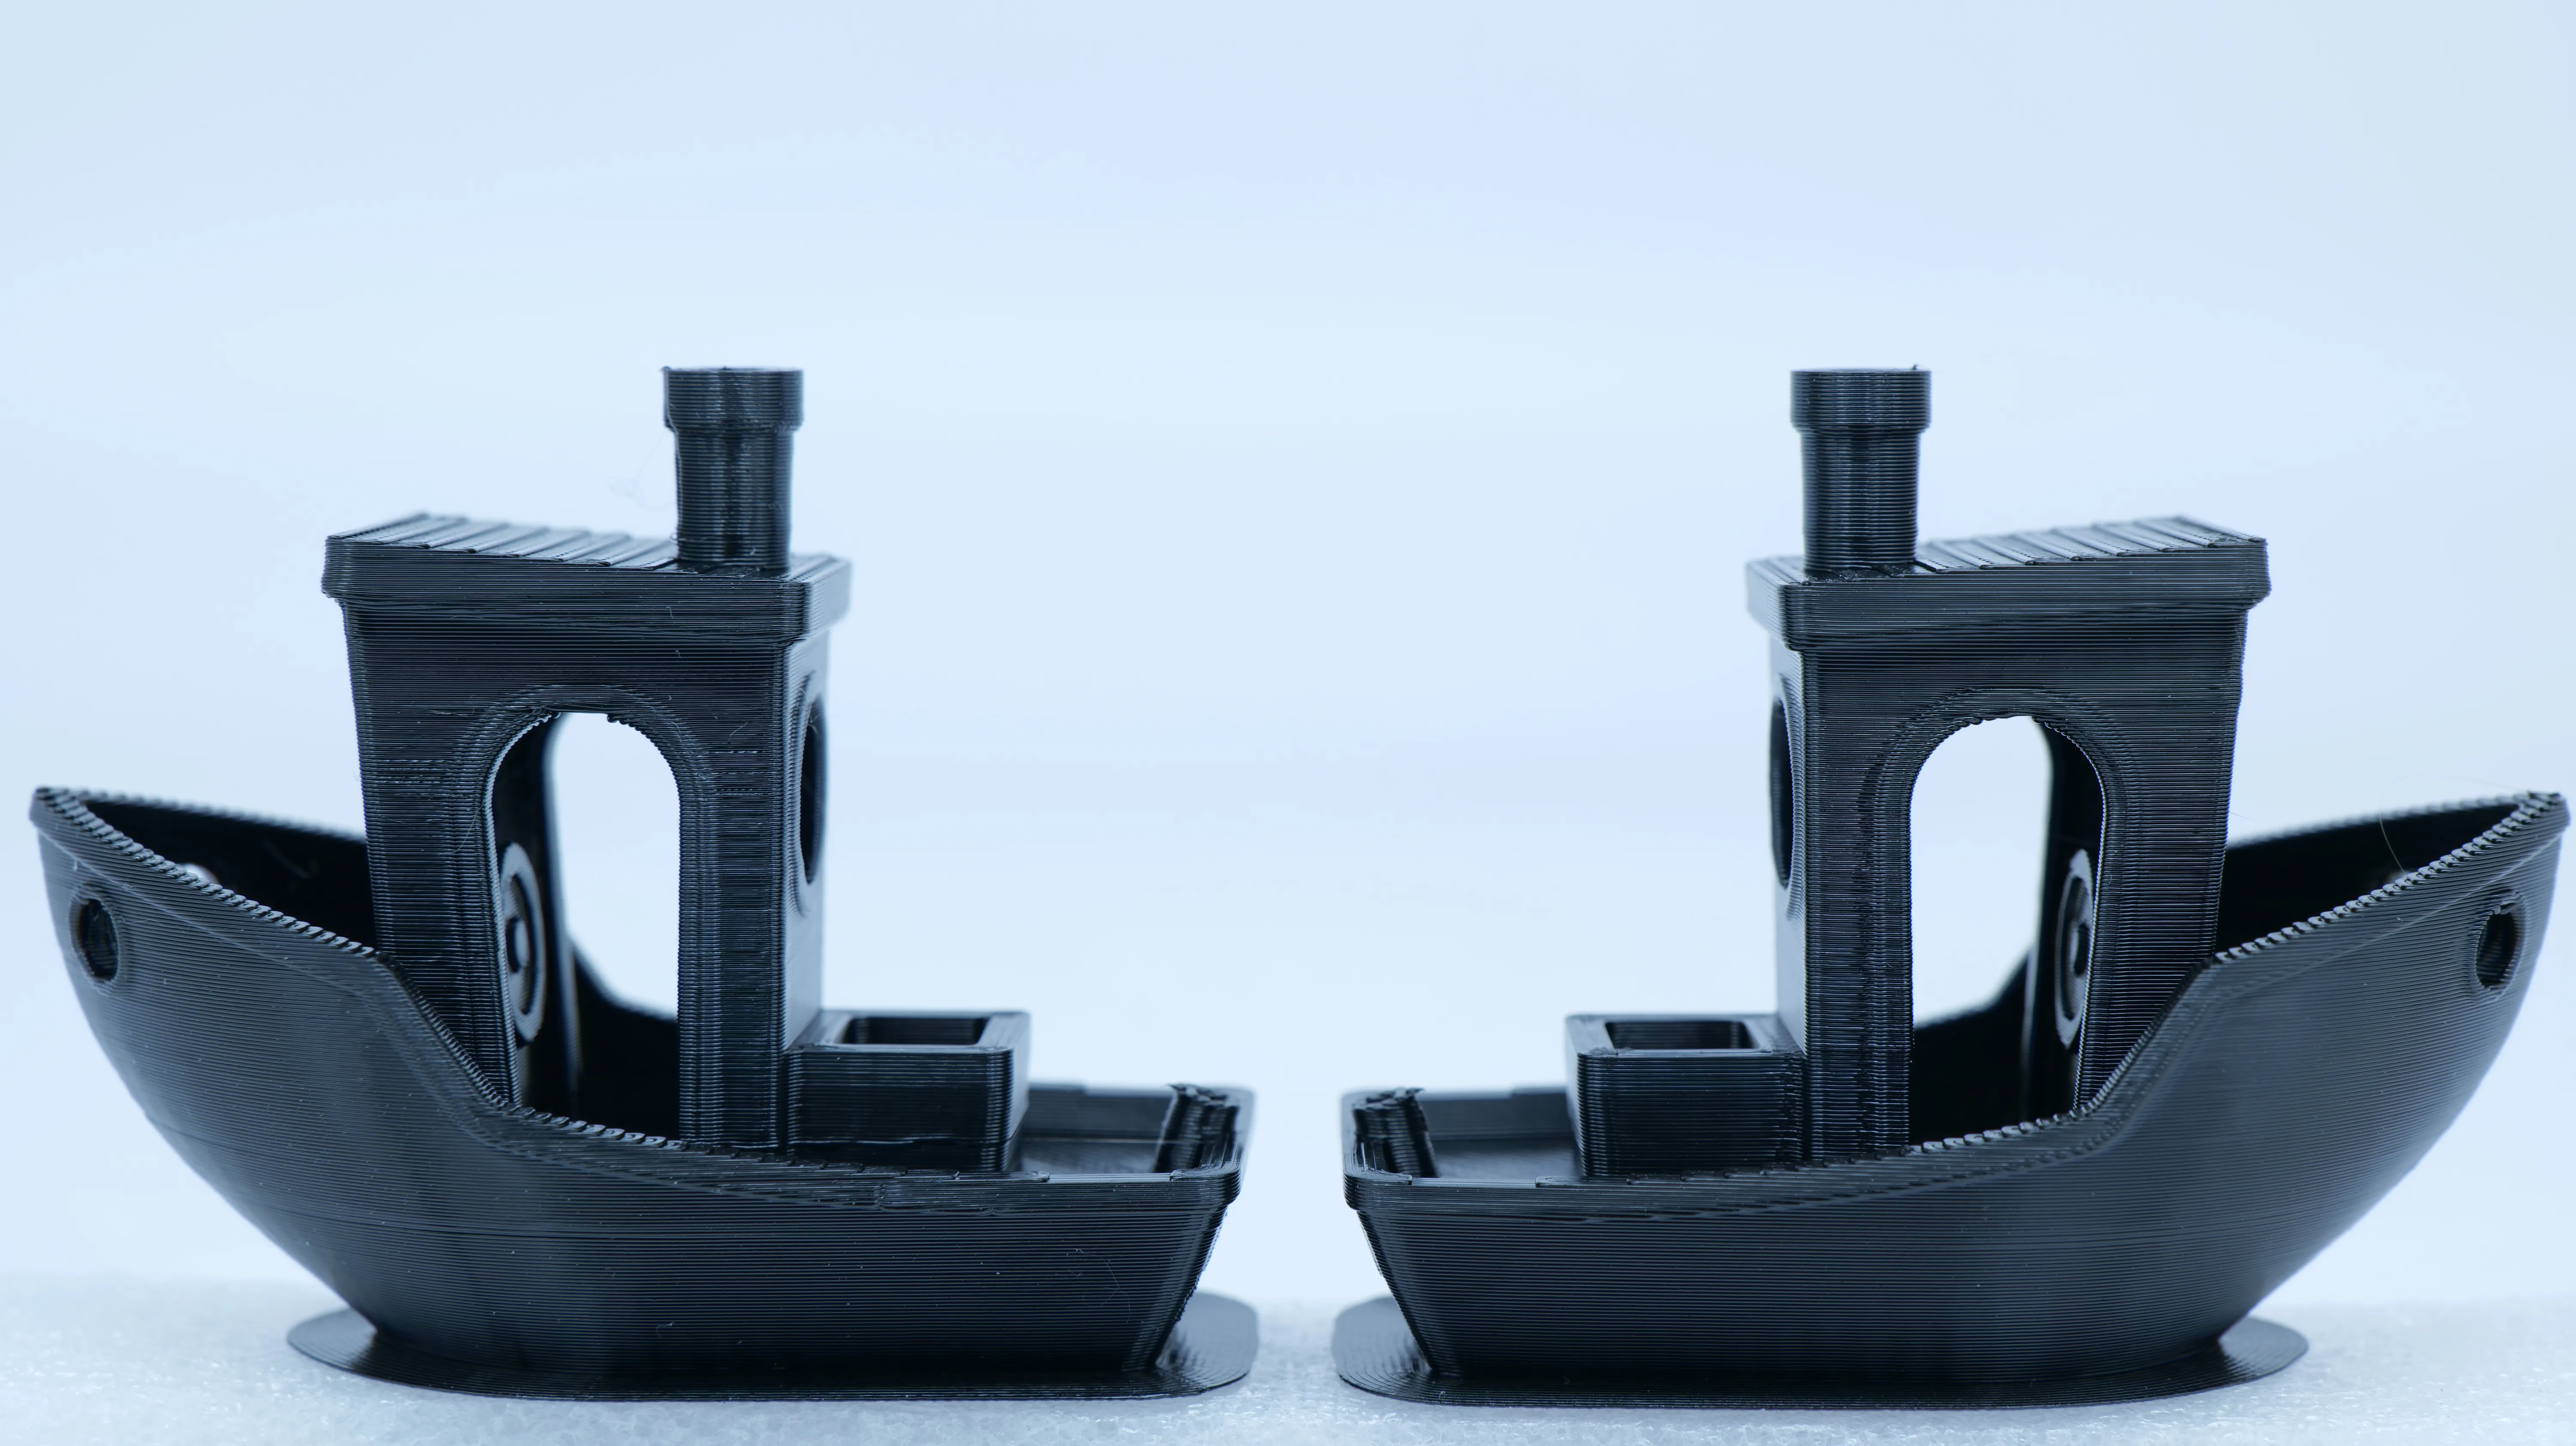 Stored outsideStored in the i10
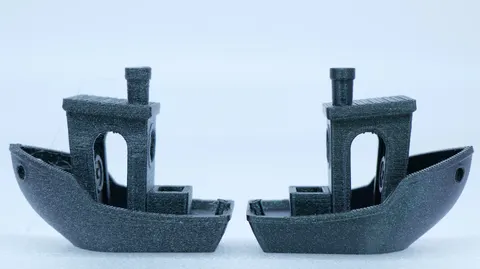
Now let’s get to the more challenging materials, starting with Nylon. The Nylon Benchy printed from filament that had simply been stored out in the open was a textbook example of wet filament. It was covered in bubbles and stringing, and during printing you could constantly hear the filament popping. So how did the print look after the filament had spent twelve days in the dry cabinet? At first glance, not much better. There were still tons of bubbles on the surface and a lot of stringing. If we take a closer look, though, there are some improvements. Parts of the hull that were printed a little faster now came out reasonably smooth.
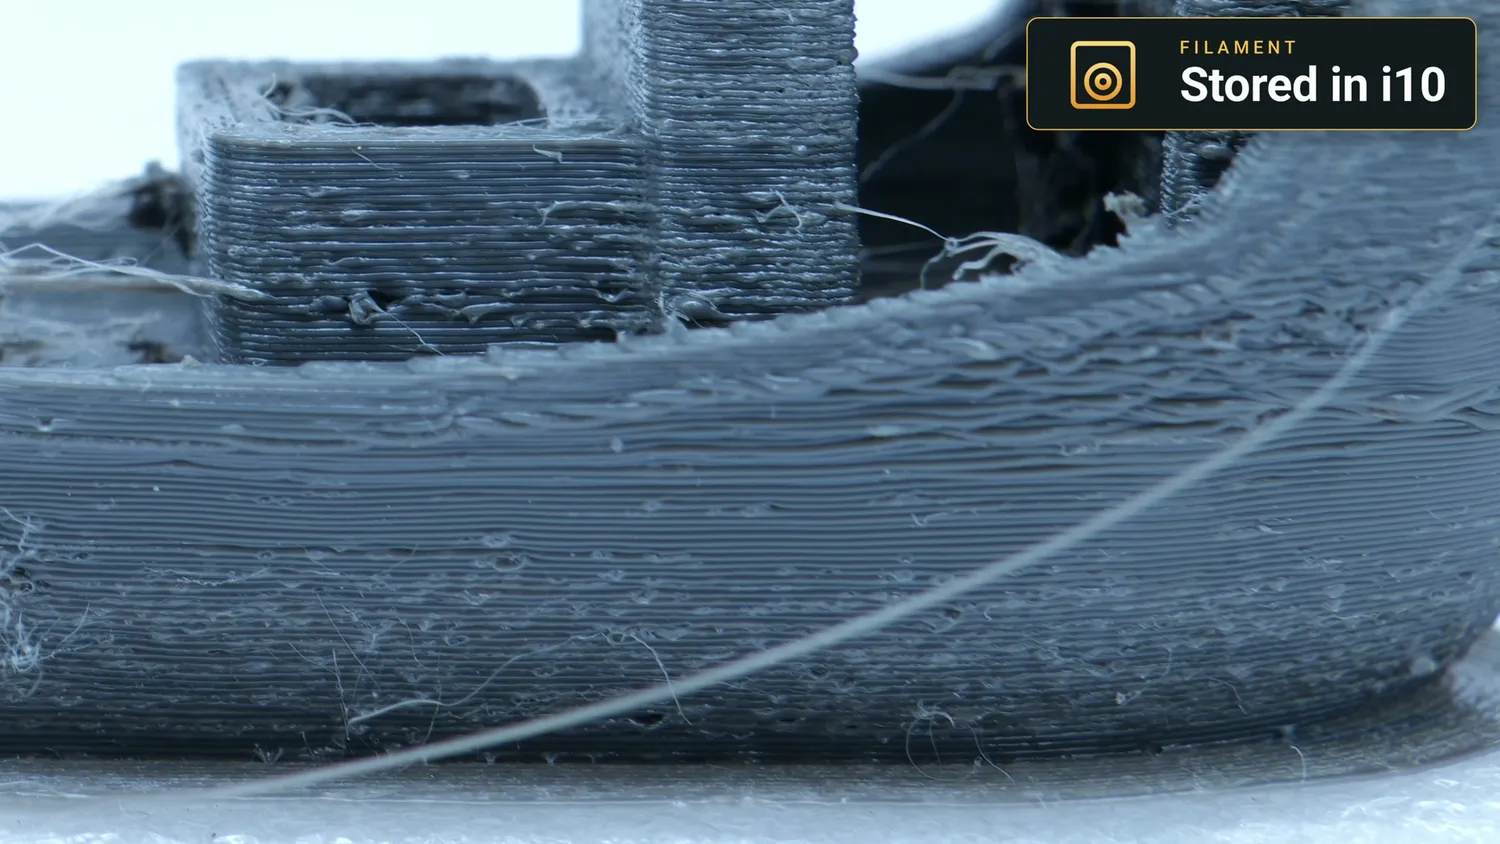 The faster-printed hull sections came out reasonably smooth
But honestly, this was still far from perfectly usable material. And we could already have expected that from the weight-tracking graphs, because the Nylon spool was still steadily losing weight even at the end of the test.
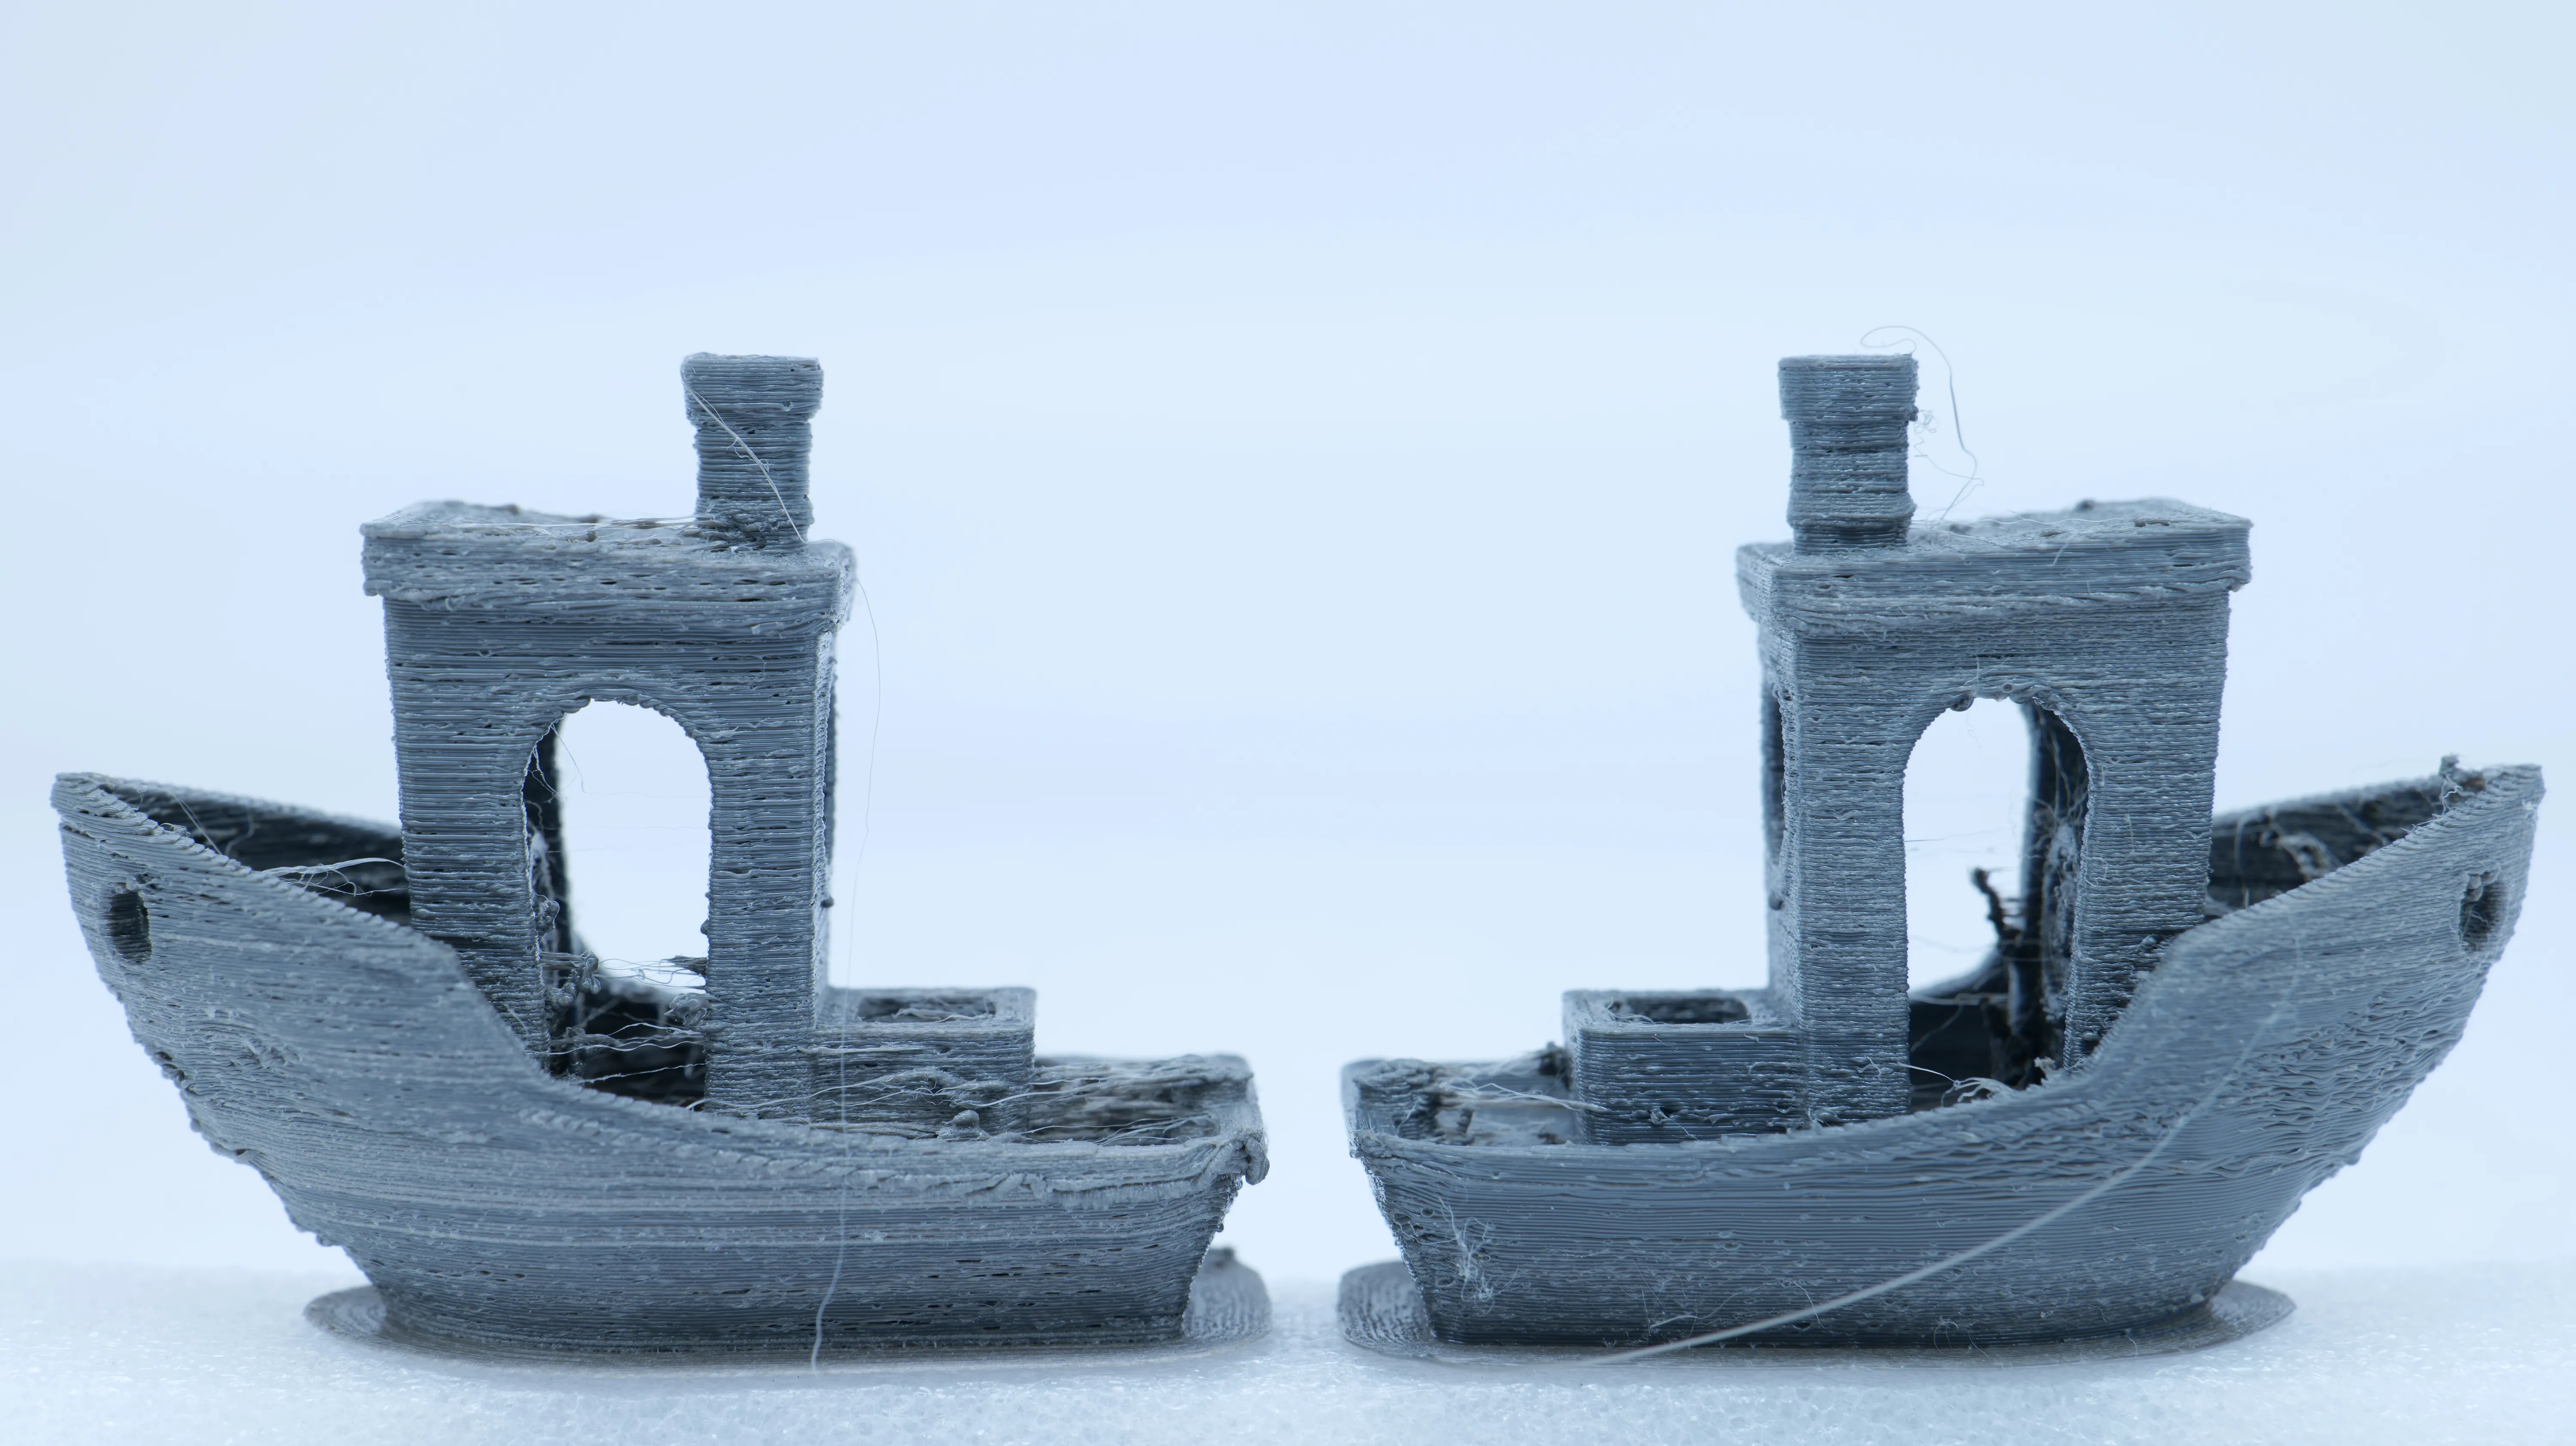 Stored outsideStored in the i10
The last material I tested was TPU. The initial print from the filament stored in the open was terribly stringy. After two weeks in the SUNLU cabinet, it didn’t look much different at first glance. But if you look more closely, the surface is smoother, which suggests that fewer bubbles were forming, even though there was still a lot of stringing. I wanted to know whether that bad print quality really came from the remaining moisture, so I also dried the Bambu Lab TPU in a heated dryer. And it turns out the results weren’t really any better. So the stringing probably wasn’t caused by moist filament at all. Most likely, my print settings on the Prusa CORE One simply weren’t optimal for this TPU. The conclusion for TPU is therefore not quite as clear. There does seem to be an improvement in surface quality, but I’ll probably need to retest this material with better print settings.
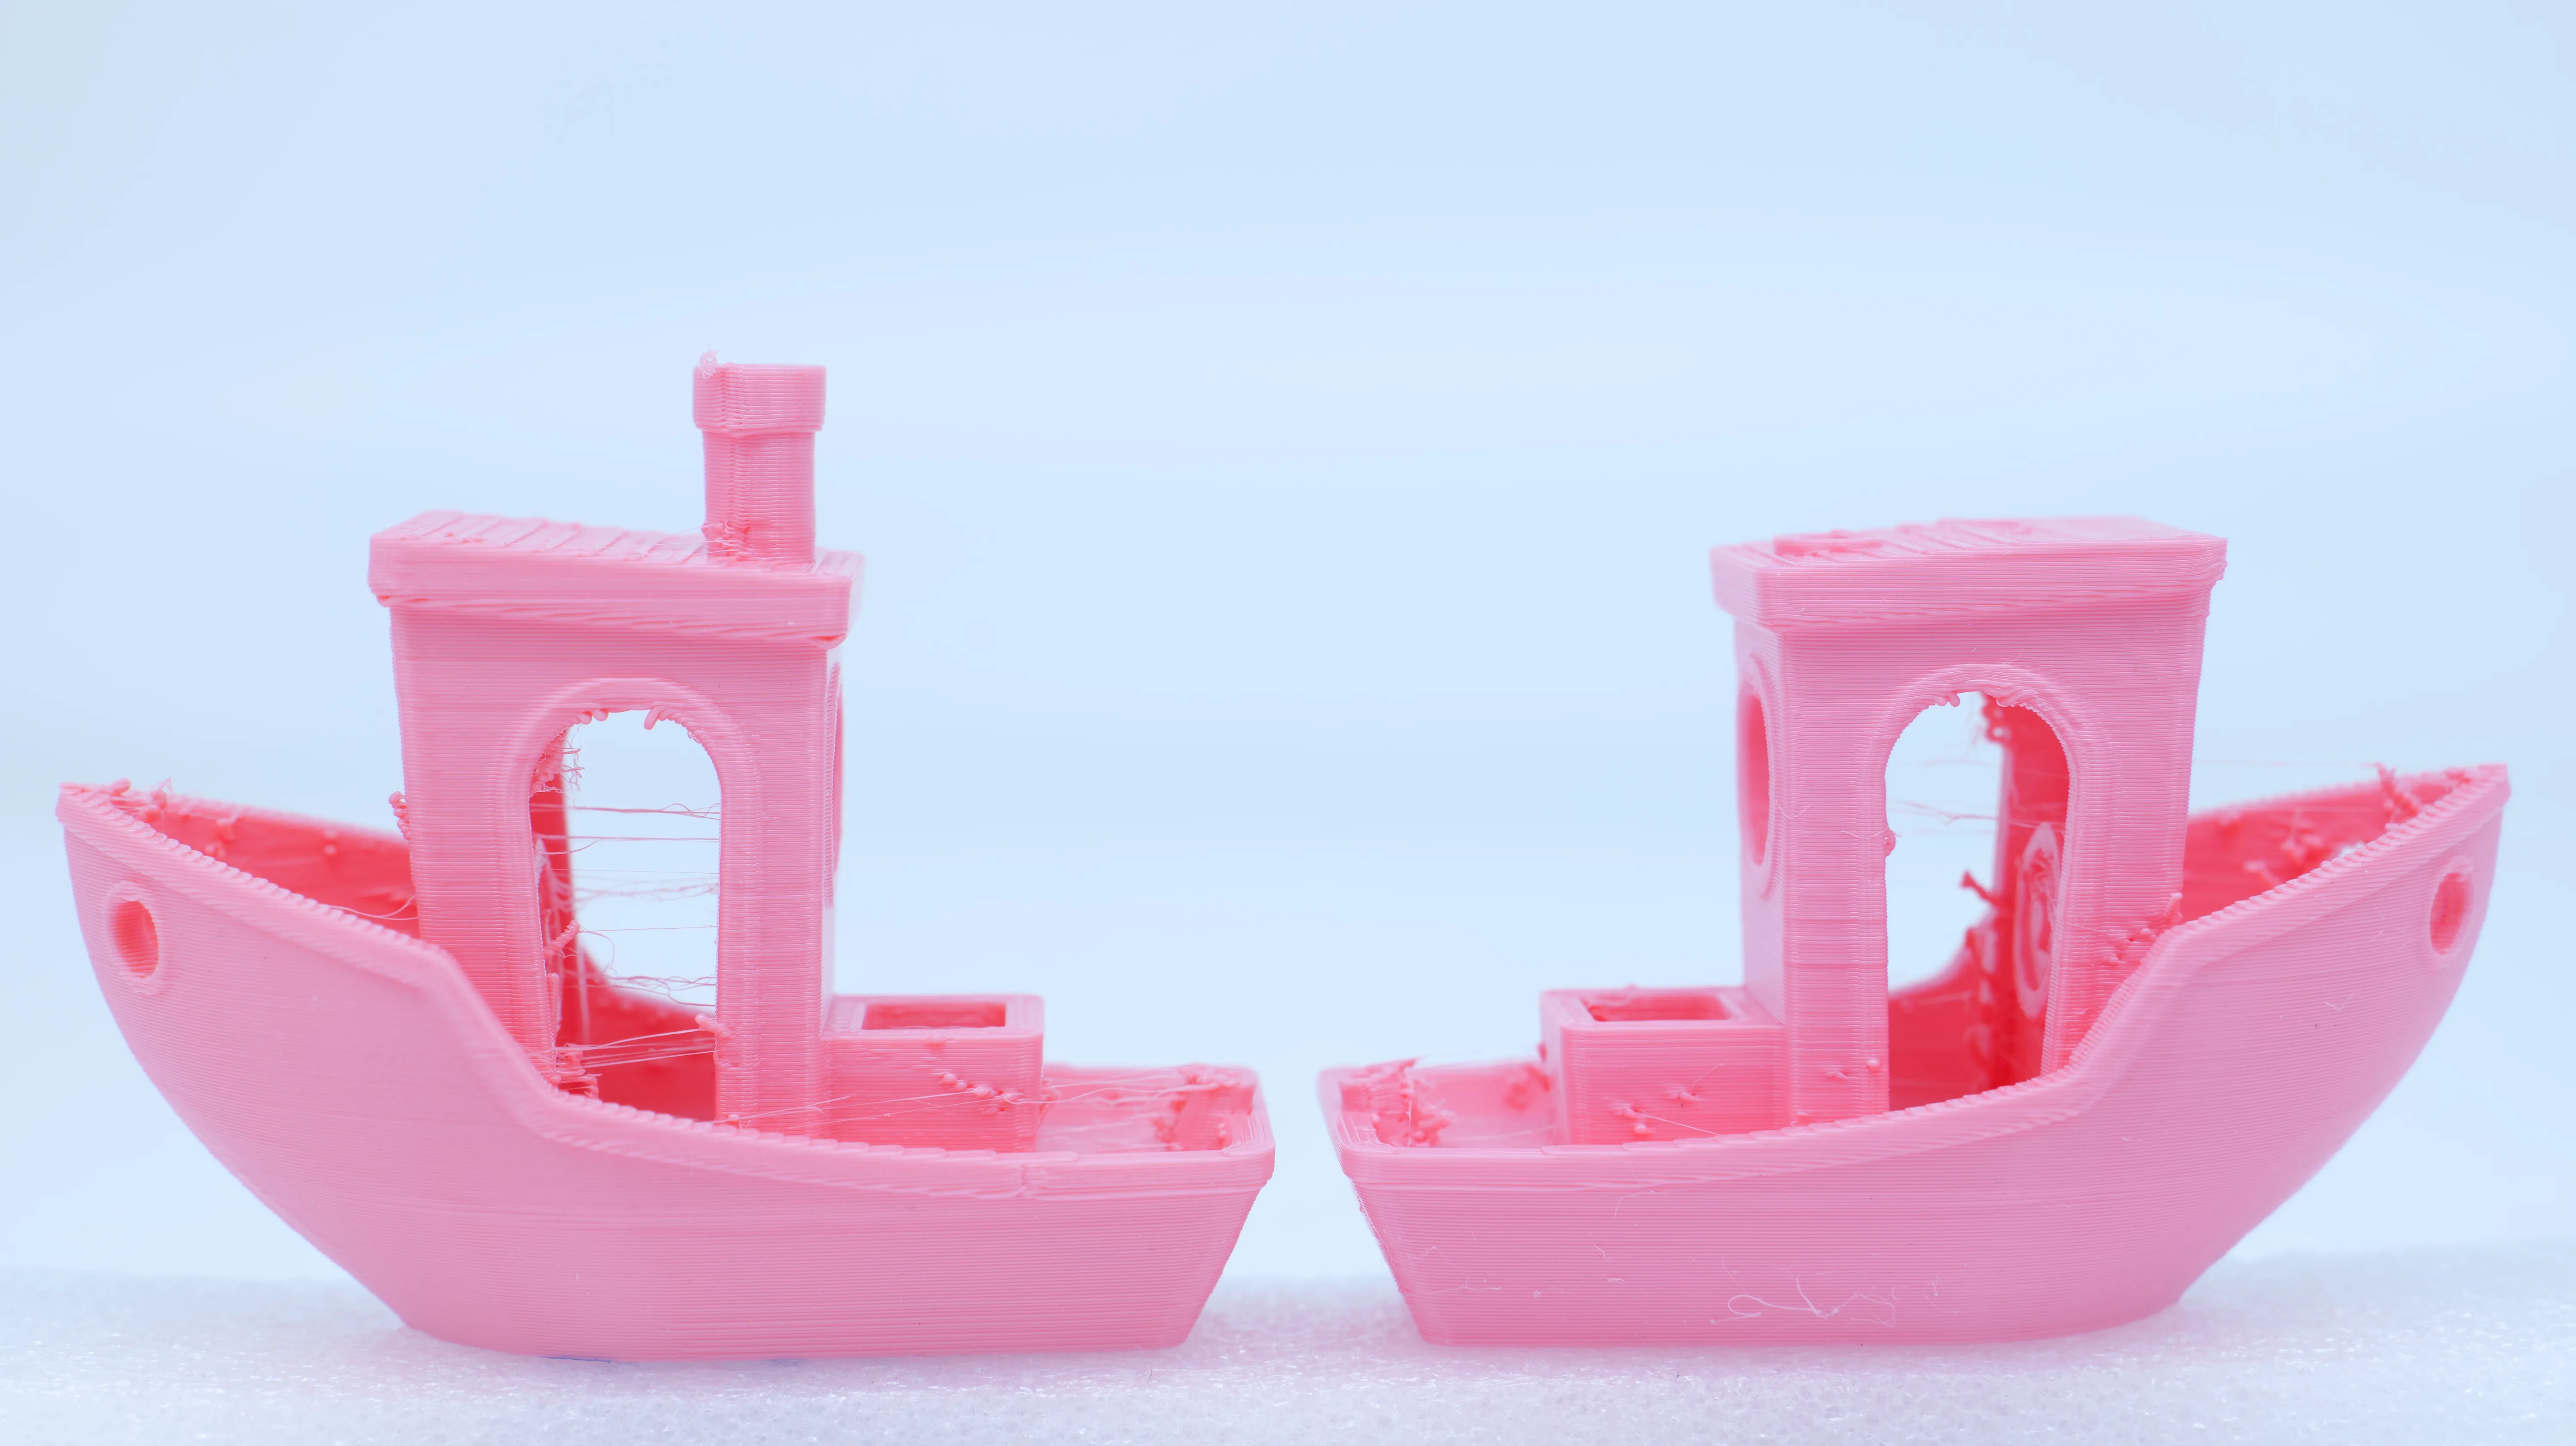 Stored outsideStored in the i10
Heat drying afterwards and storing pre-dried filament
Especially after the less-than-ideal Nylon results, one question remains. How much of the moisture was the SUNLU i10 actually able to remove? For the third test, I took some of the spools out of the dehumidification cabinet and put them into a heated dryer. Again, I weighed them regularly while drying them to measure how much moisture was still trapped inside. And for the Nylon spool, getting out that last moisture took almost two full days. PLA and PETG lost another roughly 0.1% of their weight.
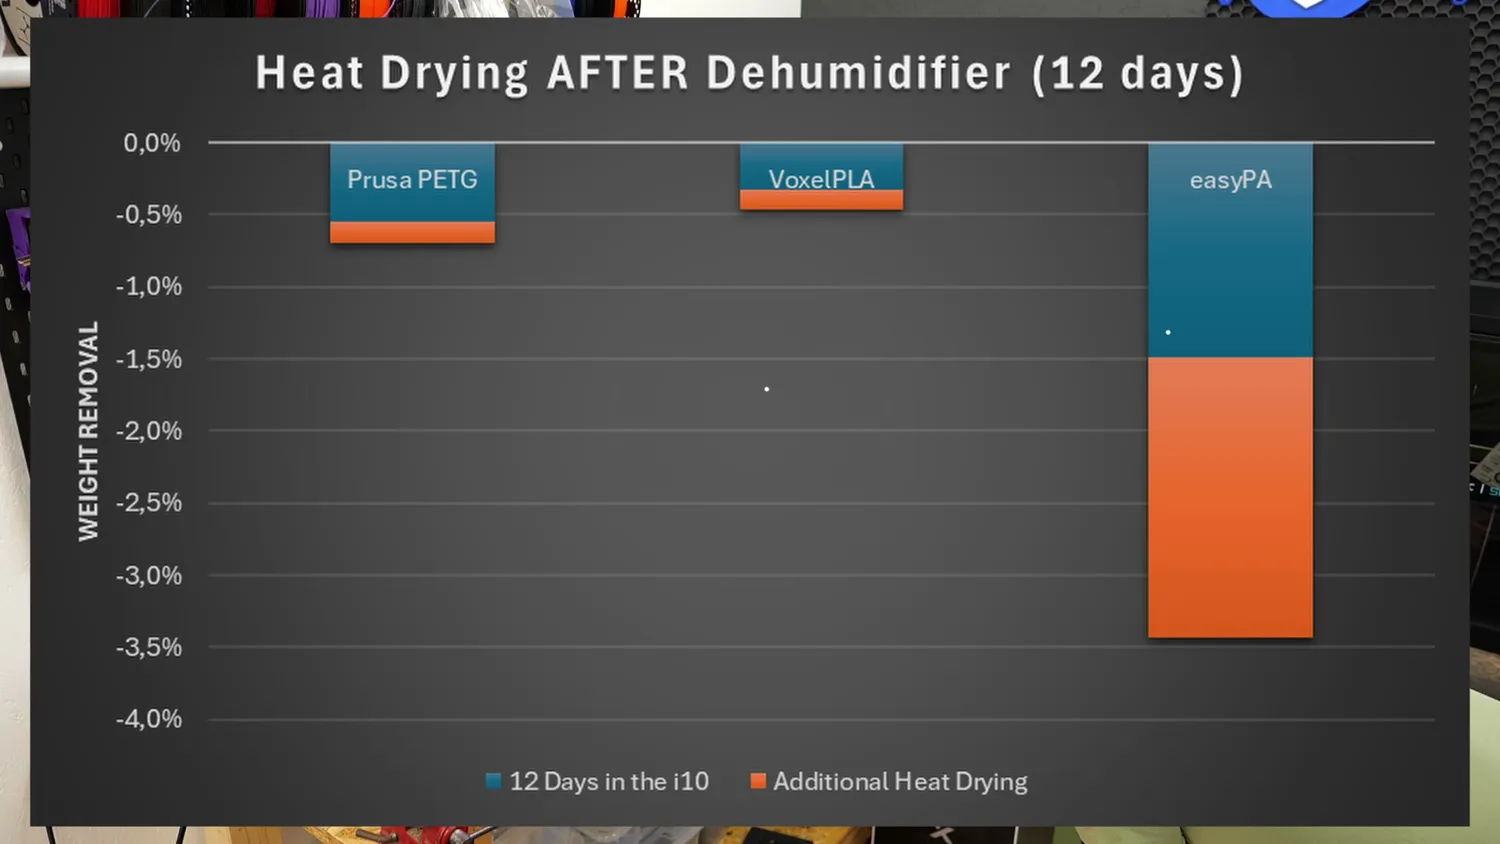 Moisture removed in the i10 vs. additional heat drying
That means the i10 had already removed around 80% and 70% of the original removable moisture from those materials over the two-week test. Heat drying removed the rest. And as we already saw from the print results, removing 70 or 80% of that moisture was enough to produce good prints. Getting out the remaining bit only gives you diminishing returns. With Nylon, though, the result was very different. Heat drying removed almost another 2% of its weight. That’s around 20 grams of additional moisture, which is actually more than the i10 had managed to remove. This shows just how strongly Nylon holds onto moisture. For materials like this, dry air at ambient temperature simply isn’t enough to get them into a properly printable state, even after two weeks. You really need heat to remove that moisture efficiently. And with the fully dried Nylon, the 3D Benchy finally came out clean, at least in terms of stringing and surface quality. The remaining problems were simply down to my print settings.
That brings us to the fourth and final part of the test. How well does the i10 store filament that has already been properly dried? This is also the way SUNLU recommends using it. For this test, I loaded the heat-dried spools back into the i10 and again weighed them every day. The PLA and PETG basically held their moisture level perfectly. The TPU gained a little bit of weight during the first two days but then stabilized as well. The Nylon filaments were different. They’re so hygroscopic that even the roughly 15% relative humidity inside the box wasn’t low enough to keep them in their perfectly dried state. They continued absorbing moisture, and even after a full week in the cabinet, that was still happening.
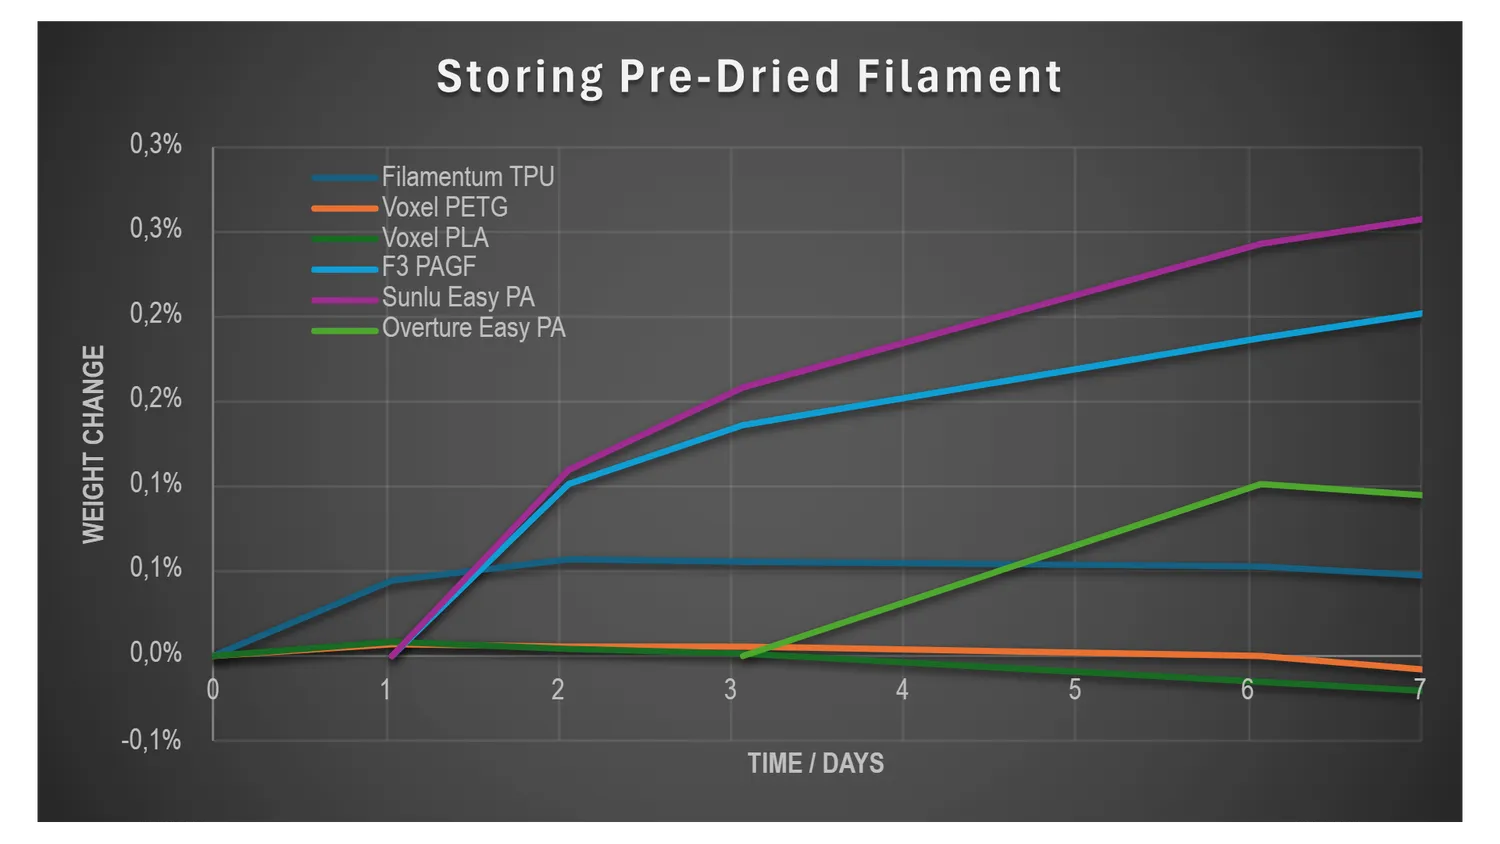 Pre-dried spools in the i10: the nylons keep gaining weight
To see whether that amount of moisture already affected print quality, I printed another 3D Benchy with the Overture Nylon. And yes, you could already see the effect. Bubbles had started appearing again, especially in the more slowly printed regions.
Verdict and what SUNLU should improve
And I think this brings us nicely to the verdict. Sponsored video or not, the numbers and print results clearly show that the SUNLU i10 is more than just a storage box.
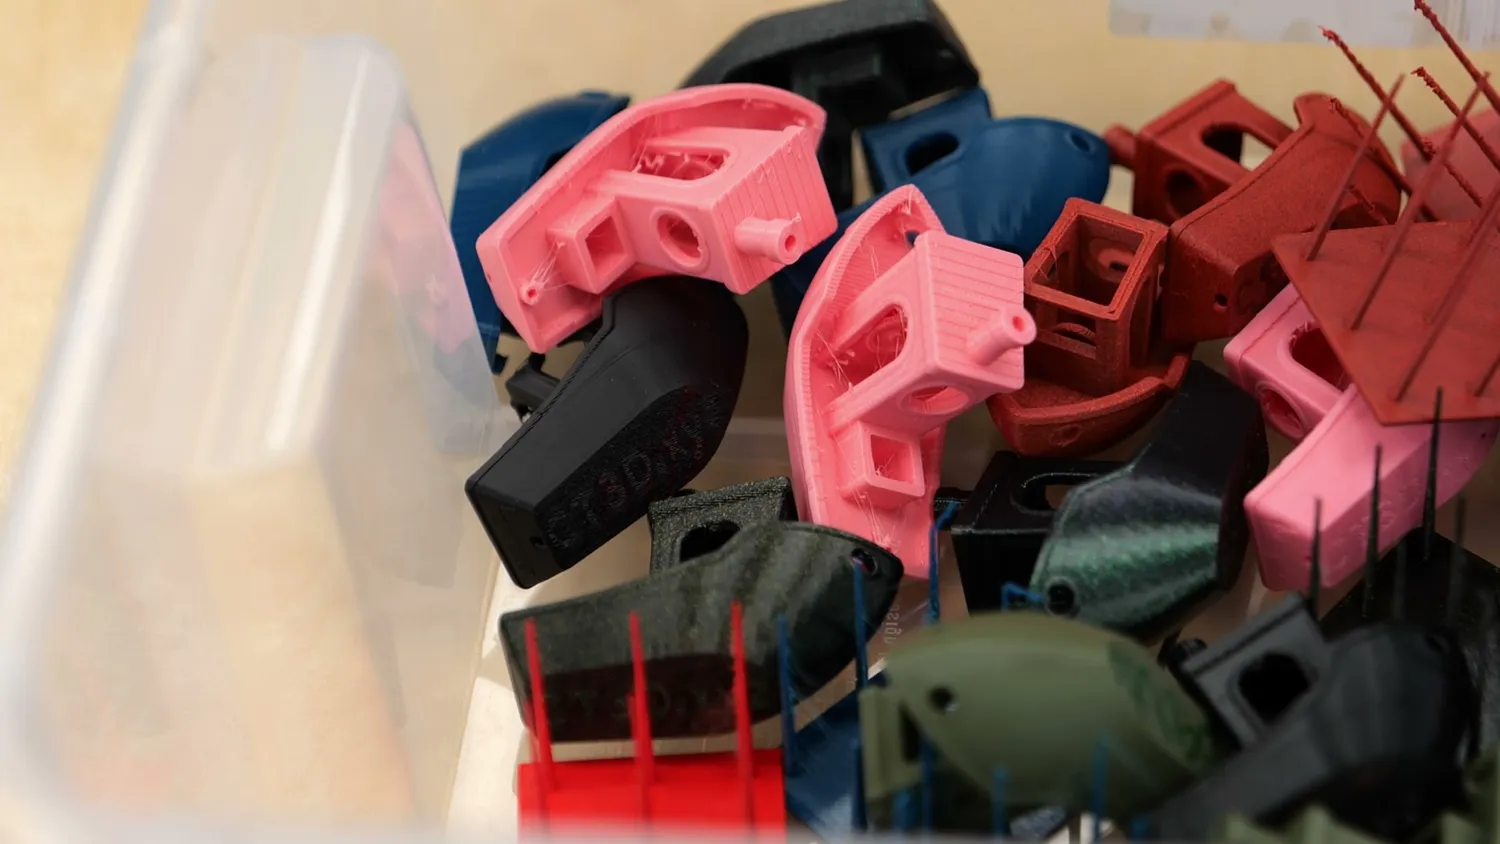 All the test prints
Most standard materials will slowly dry in this low-humidity environment. With PLA, PETG, ASA, and PC, it removed enough moisture that I saw significantly better print quality, and probably better mechanical properties as well. For more technical materials like Nylon, PPS, PPA, or PEEK, though, the low relative humidity inside the chamber isn’t enough to properly dry them or even keep them completely dry. For those materials, you won’t get around heat drying before use. Storing them in the i10 still slows down the moisture uptake making the next drying cycles shorter but you will honestly be better off vacuum bagging them with a lot of fresh desiccant.
For me personally, I really like the i10. It’s the lazy solution that doesn’t require any maintenance and I never end up anymore with a bad print, simply because I forgot to regenerate the desiccant bags in my Samla box! I can always have well-conditioned filament ready when I need it, and I can eliminate one critical variable in my tests for print quality or material strength. Especially for my testing environment, I’ll definitely get at least two more of these for the studio. I mean, that’s exactly why I love my solid-state dehumidifier AMS so much. If a roll has been sitting in there for at least a week and I start a print, I’m pretty confident it’ll come out nicely. The i10 won’t replace a heated dryer for technical materials or whenever I’m in a hurry. But for pretty much everything else, it might be exactly what I need. Honestly, now that I have the i10, I’ll probably start printing more PETG and PCTG again. One of the main reasons I avoided them in the past was that I knew the results wouldn’t look great unless I dried the material beforehand.
Is it better and cheaper than simply storing your filament in a sealed box with desiccant? No, probably not. But, and this is the big but, that’s only true if you diligently monitor the humidity inside your DIY box and regularly regenerate the desiccant. That’s something people often underestimate. You throw a couple of silica bags into a box, everything works great for a few weeks, and then at some point you end up with moist filament again because the desiccant has become saturated.
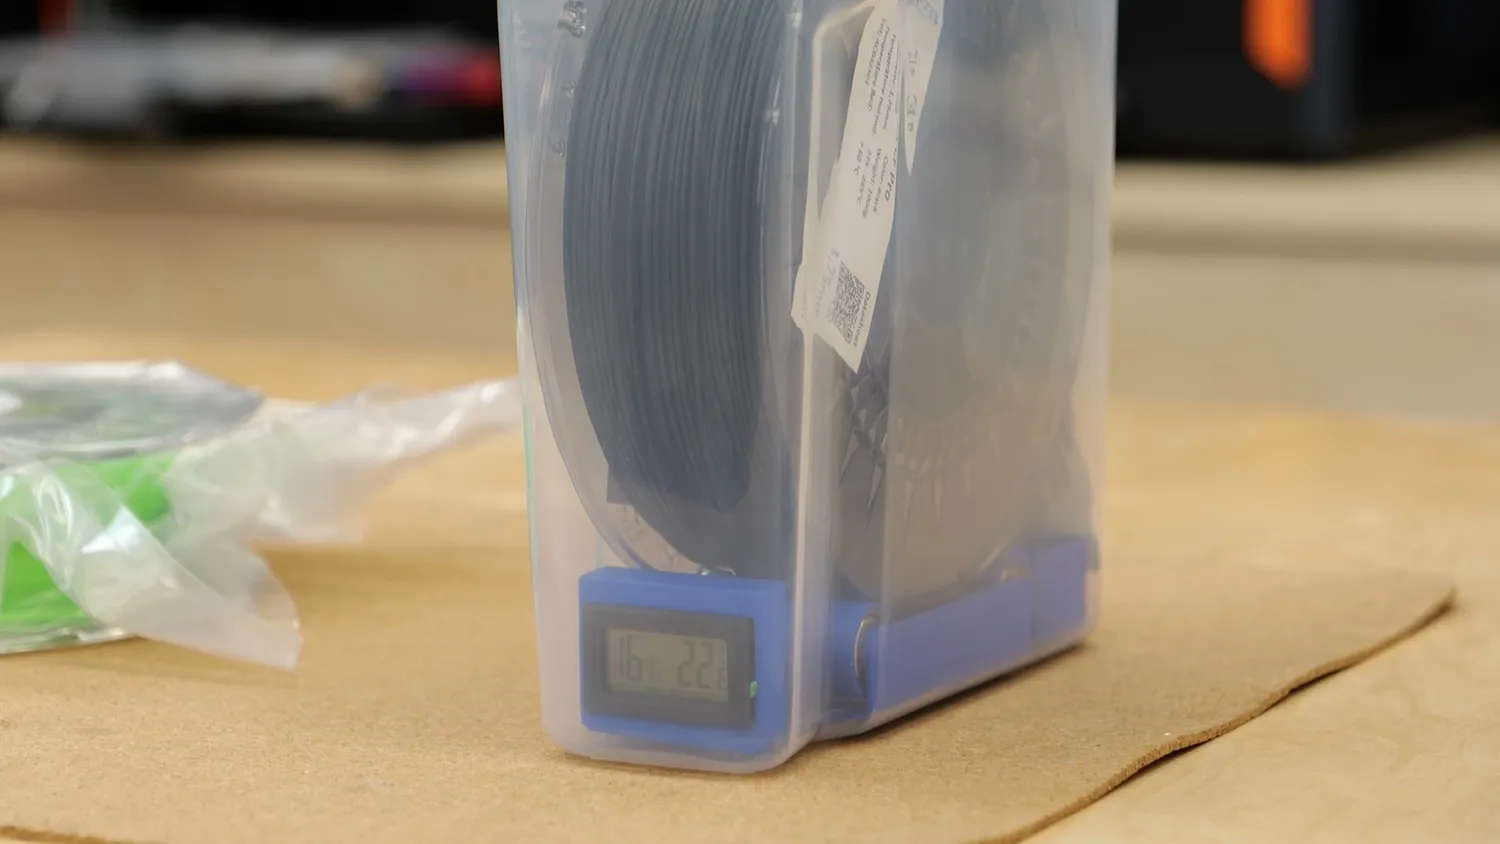 The DIY alternative: a sealed box with desiccant and a hygrometer
And as we saw in the tests, a simple cardboard spool can bring a surprising amount of unwanted moisture into an enclosure. With the SUNLU i10, what you’re really buying is convenience and reliability. If you use additive manufacturing for more than just a hobby, I think that’s very valuable. And at a price of $180 for ten spools, I personally think it’s pretty reasonable.
But as I said before, the i10 isn’t perfect either. And I hope SUNLU lets me keep this section in, because this is constructive criticism and none of these points are dealbreakers. First, I don’t like that the hygrometer inside the machine seems to be too optimistic. And I actually think SUNLU isn’t doing themselves any favors here. With the molecular sieve they’re using, the system should potentially be able to reach even lower humidity levels than what I measured. That could help the i10 dry filament faster and might even make it more effective at storing Nylon. The second thing I already mentioned is the humidity spike during regeneration. I don’t like that moisture gets back into the chamber during this cycle, because it reduces the performance of the system, especially with more moisture-sensitive technical materials. If you’re left-handed, you’ll love this but one small thing that annoys me is that the door opens to the right. As a right-handed person, that makes loading and unloading filament just a little inconvenient.
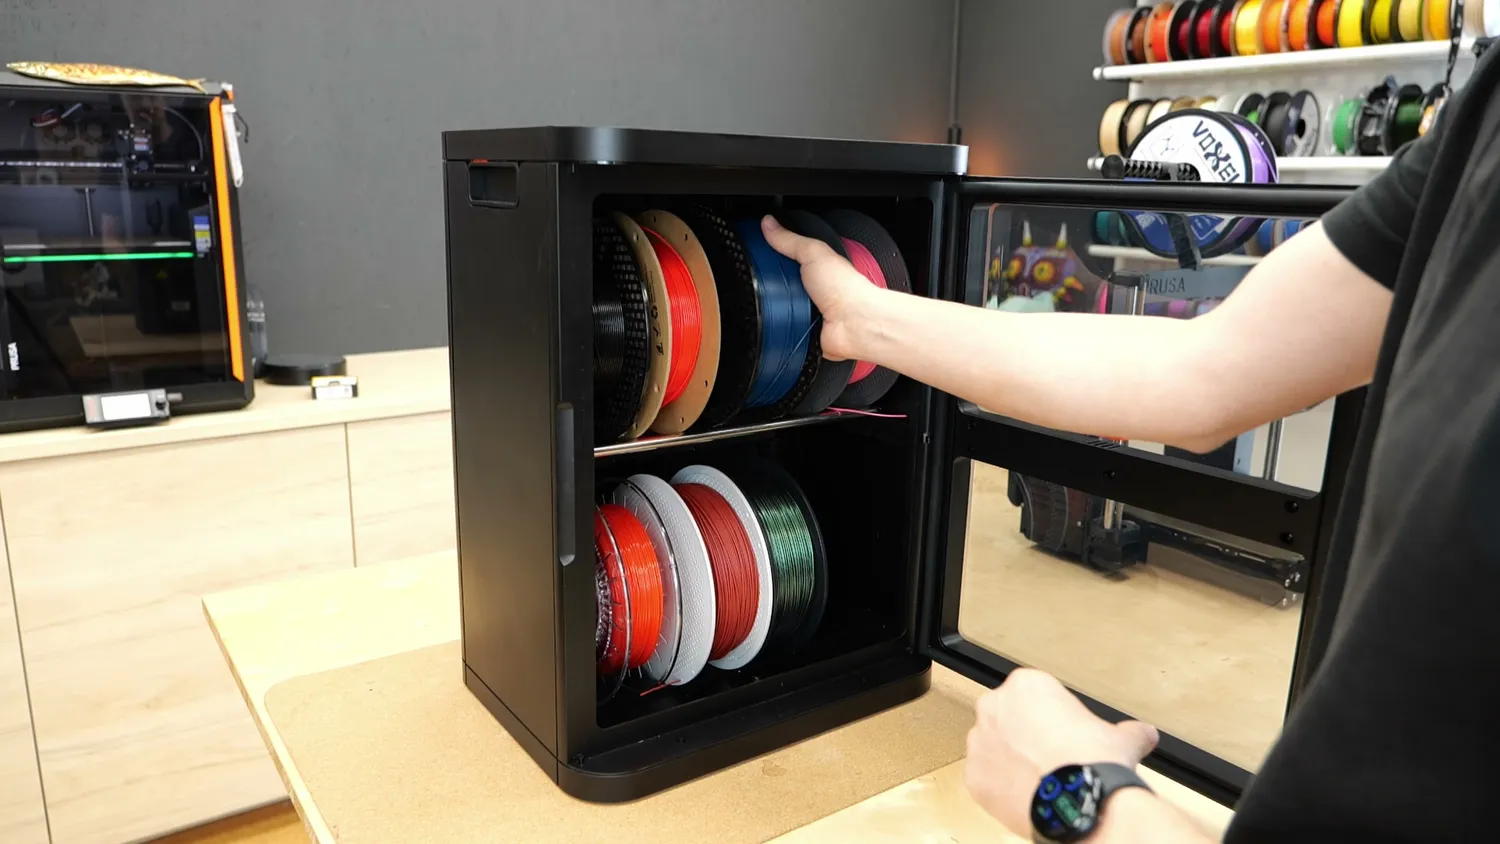 The door opens to the right
And unfortunately, you can’t simply switch the hinges to the other side because there are cables running to the display.
Finally, I’ve heard people say they would have liked the option to print directly from the i10. For some users, that definitely makes sense, especially if you only have one or two printers and they don’t already use some sort of filament management system. For everyone else, I think using the i10 as a standalone cabinet where you grab and return your materials is totally fine. It also means SUNLU doesn’t have to add extra rollers and filament outlets, which would increase the price and create more potential leak paths. And if you really want to print directly out of it, I’m pretty sure that within a few weeks we’ll see plenty of mods for spool holders and filament outlets. Worst case, you drill a hole into the plastic housing.
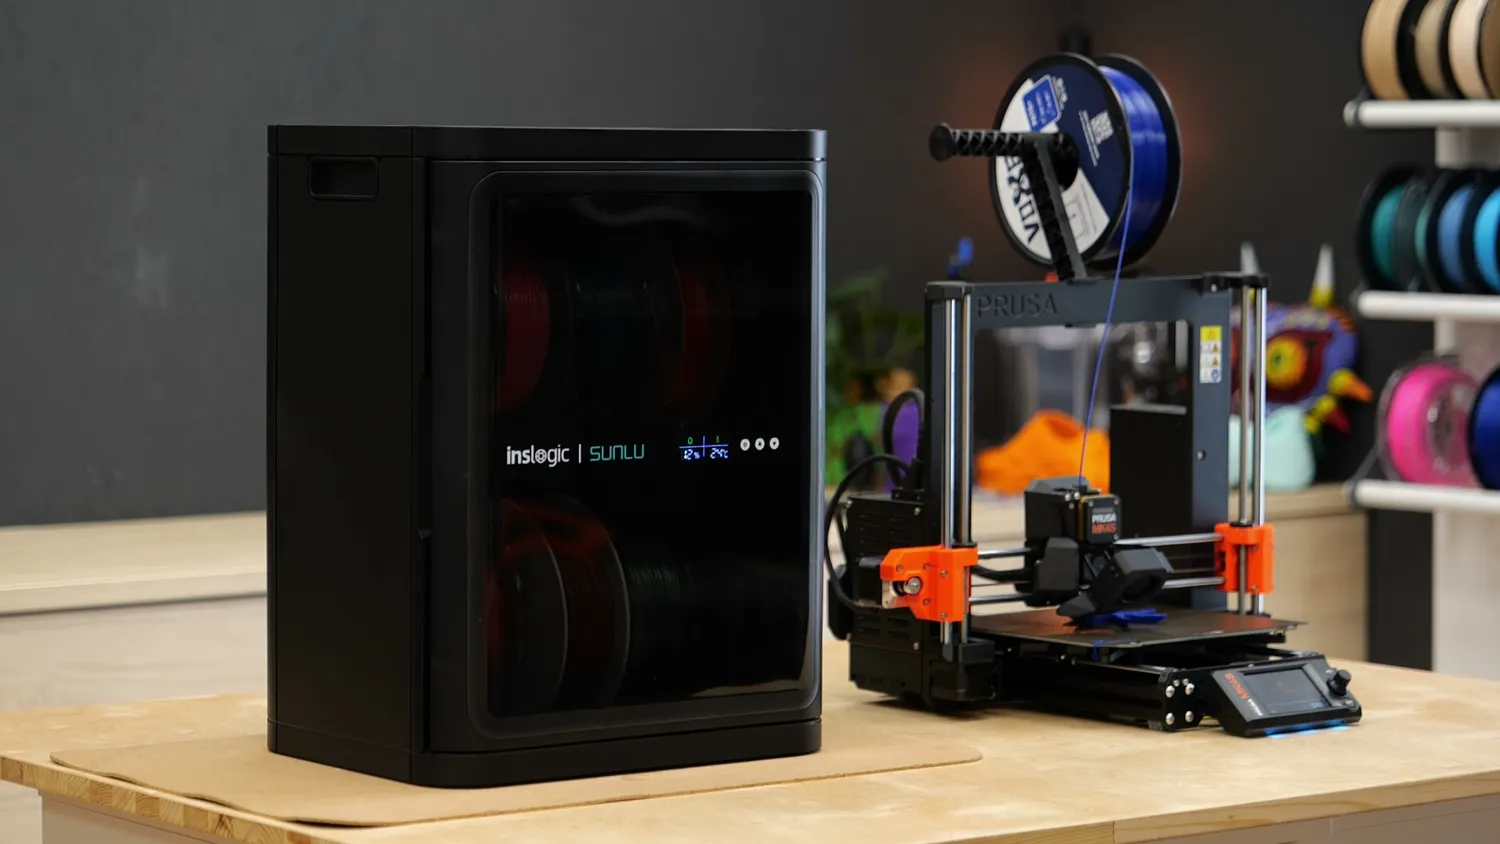 A standalone cabinet next to the printer
Overall, I really think SUNLU has filled a gap in the market and solved a real problem. I’m also pretty sure others will copy this idea, and I actually hope we’ll eventually see smaller versions of these self-regenerating desiccant systems that can be installed directly into something like an AMS. Honestly, I would have expected Bambu Lab to put something like this into the AMS 2 Pro already.
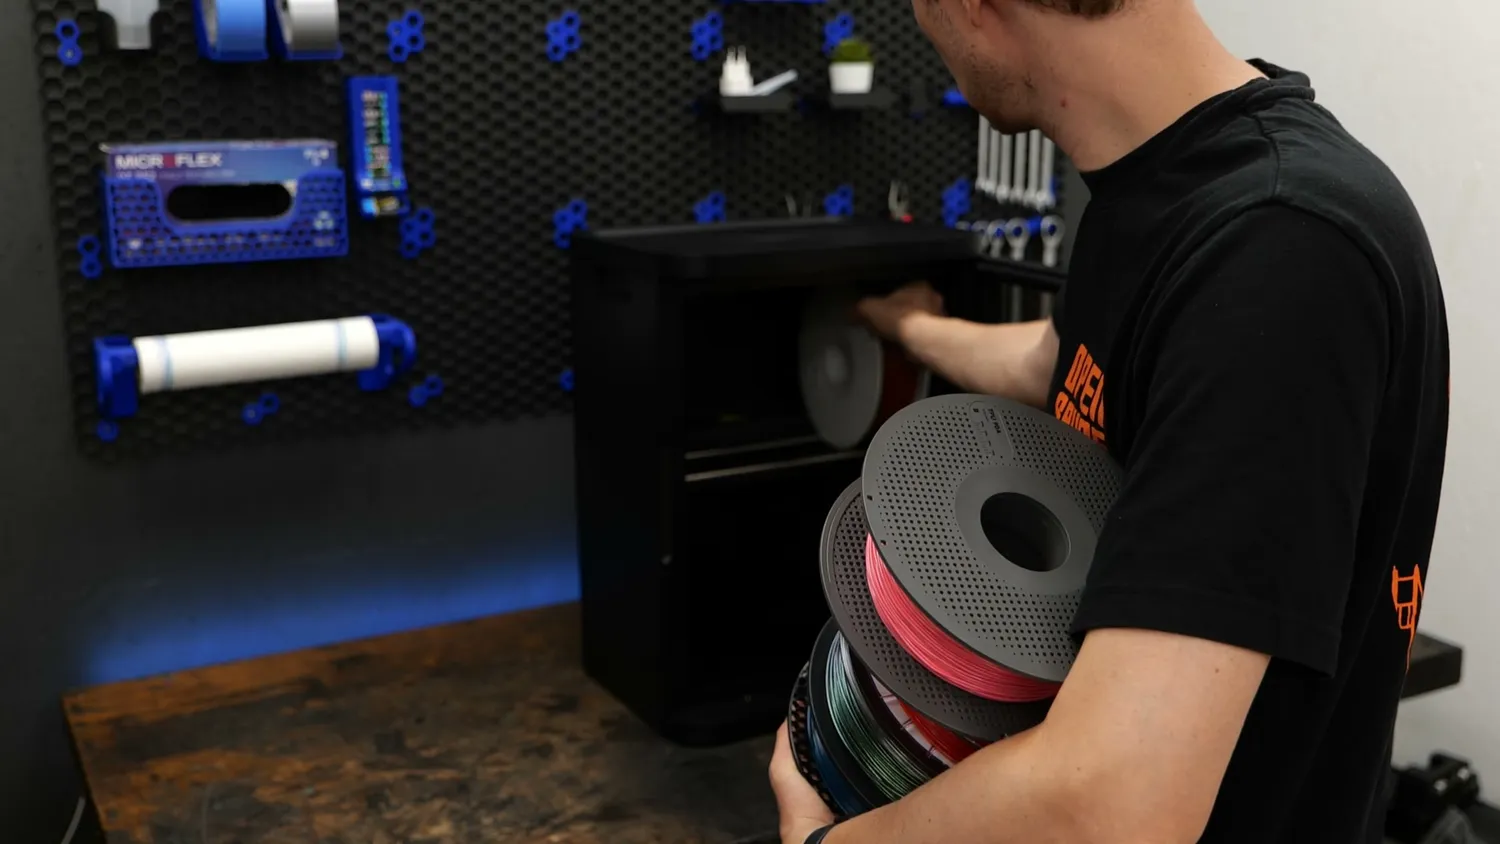 Loading up the i10
If you’re interested in the i10, here is the link again. It’s deliberately not an affiliate link, so I won’t earn any commission if you use it. Do you think this solves a real problem, or will you stick with regular dry boxes and vacuum bags?
📦 Get the FilaDC i10 at SUNLU ($180): https://bit.ly/3SiUlsZ
📦 Get the FilaDC i10 at Inslogic: https://bit.ly/4qoRUlp